If you own an iPhone, you already know it is not a small investment. You want it to last long, run smoothly, and stay in good condition. But many people end up spending a lot on repairs because their phones get damaged, slow down, or face battery issues. The good news is that you can avoid most of these problems by learning how to extend the life of your iPhone and following a few simple habits every day.
This guide is based on real experiences shared by Apple technicians, repair experts, and long-time iPhone users. It includes only authentic information so you can trust what you are reading.
Why it is Important to Learn How To Extend The Life of Your iPhone
Understanding how to extend the life of your iPhone can save you a lot of trouble later. iPhone repairs like screen changes, back-glass replacement, and battery replacements can be expensive. In some cases, they cost almost half the price of a new phone.
By learning how to care for your device, you benefit from:
Less repair cost
Better battery life
Smoother performance
Longer device lifespan
Higher resale value
Most iPhones can last 4 to 6 years if you maintain them properly. So, these habits are worth your time.
1. Use a Strong Case and Quality Screen Protector
Physical damage is the most common reason iPhones need repairs. A single drop can crack the screen or damage internal components, especially the motherboard. So, one of the most basic but powerful steps in preventing repair is protecting your device.
Choose:
✔ A shock-resistant or military-grade case ✔ A tempered glass screen protector ✔ A case with raised edges to protect the camera lenses
Avoid carrying your phone with keys, coins, or sharp objects. Even tiny scratches can weaken the glass over time.
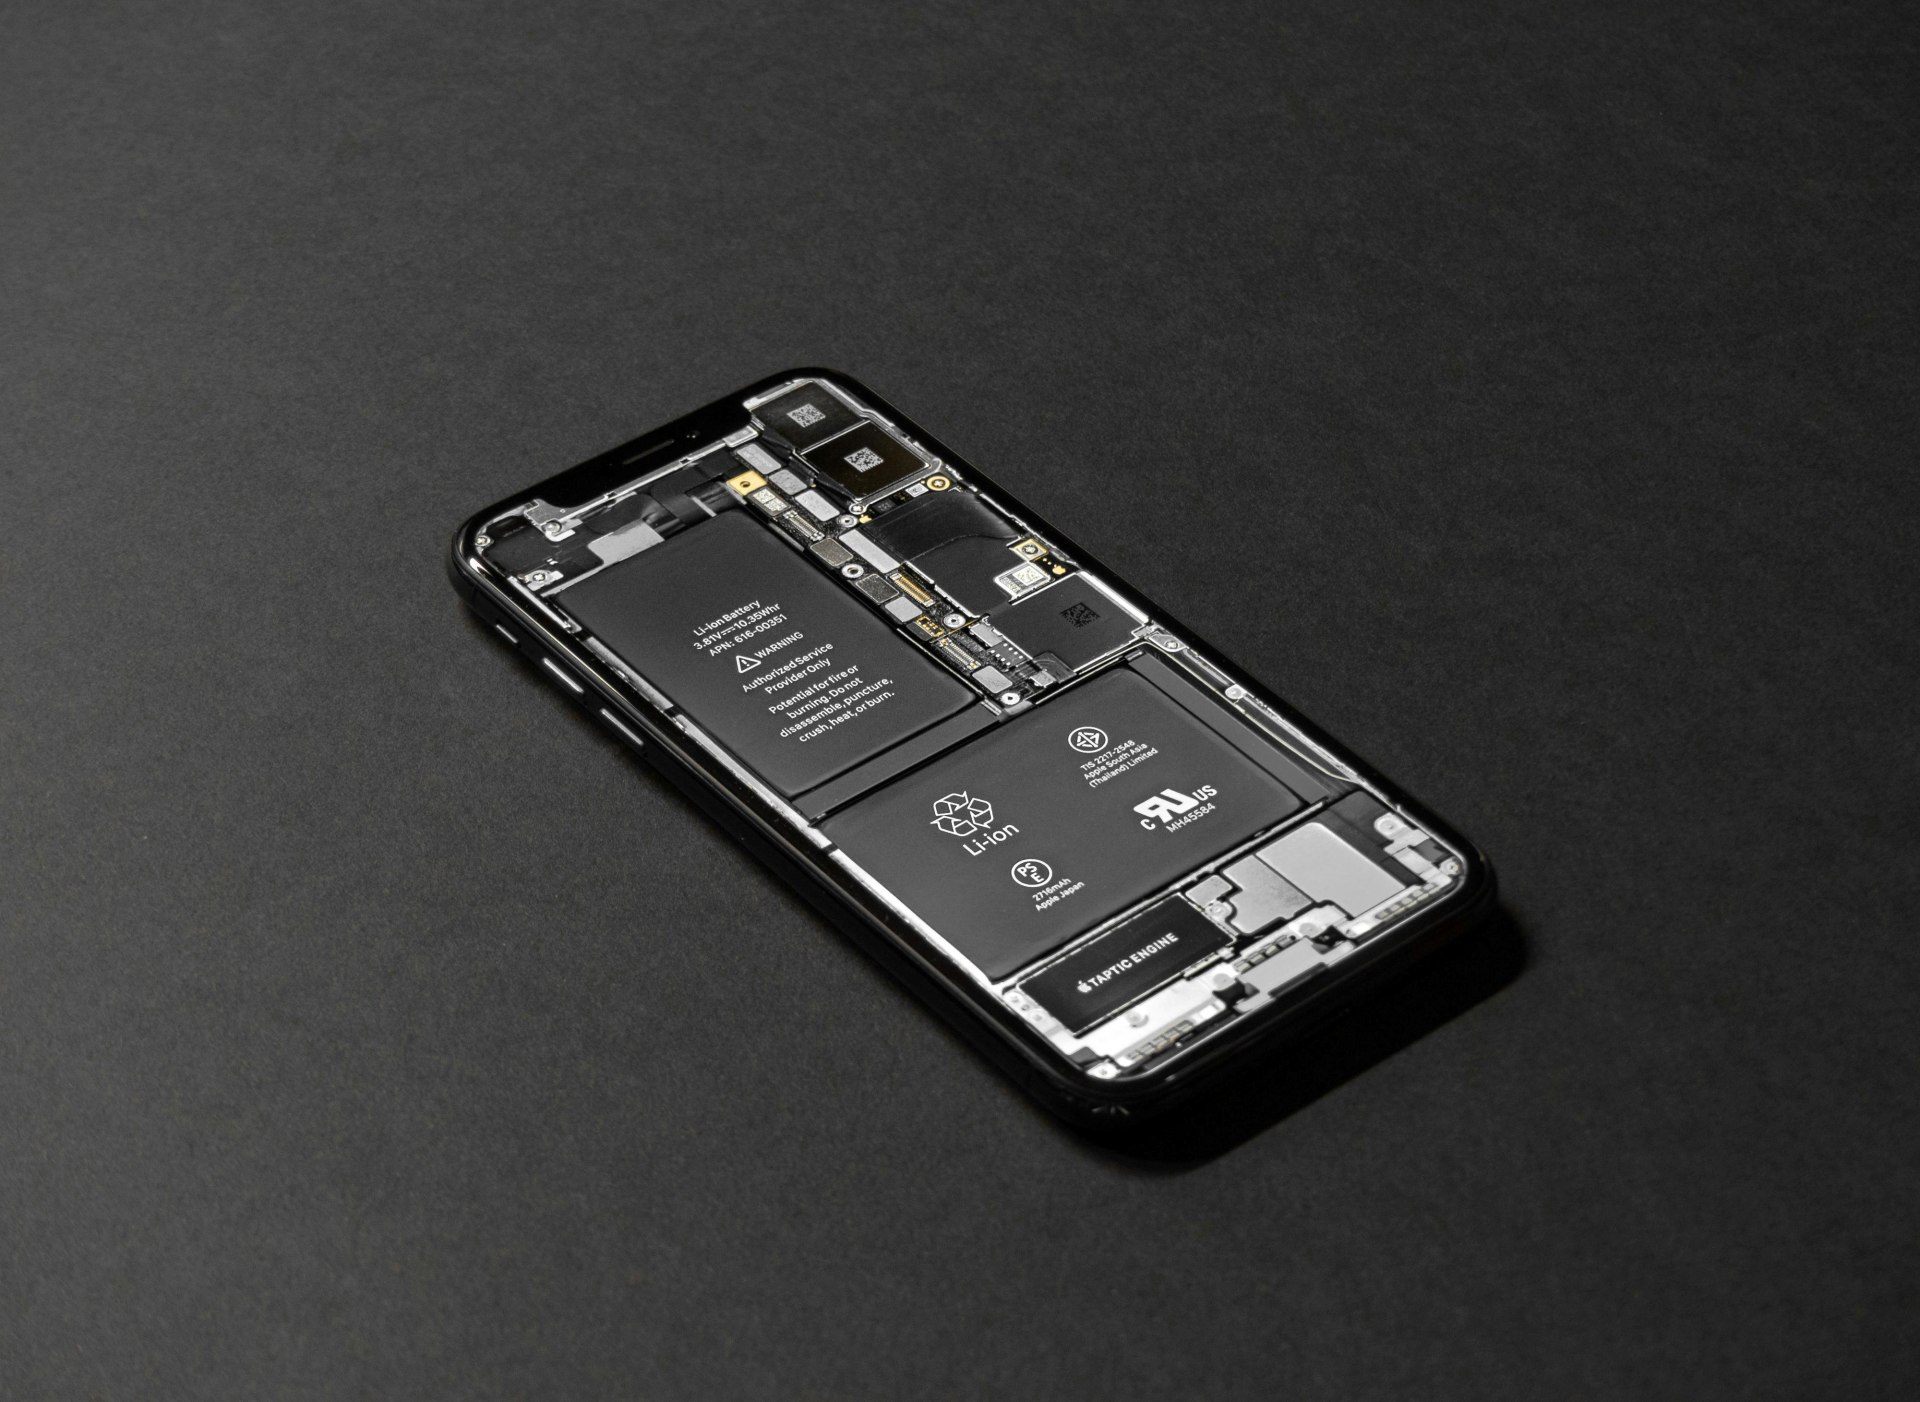
2. Follow Proper Battery Care to Keep Health High
Good battery health is essential if you want your iPhone to last several years. Apple uses lithium-ion batteries, and they age faster due to heat and overcharging. Proper charging habits pkays a major part in exteding the life of your iPhone or other smartphone and thereby preventing repairs.
⭐ Battery care tips:
Keep battery between 20% and 80%
Turn on Optimized Battery Charging
Avoid charging overnight every day
Use Apple-certified chargers
Remove case if phone heats while charging
If you plan to store your iPhone unused for a long time, keep it at around 50% charge.
3. Keep Your iPhone Software Updated
Many users skip updates, but Apple releases them for a reason. Updates fix bugs, prevent crashes, and improve security. They may even help battery performance. This is a key step to avoid software related issues.
Do the following:
Install system updates when available
Restart your phone once a week
Avoid third-party system cleaning apps
Update apps regularly
Experts say that regular updates help prevent overheating, battery drain, and app glitches.
4. Smart Storage Management for Better Performance
Too little storage slows down the phone and causes freezing or lag. That is why storage care is equally important.
Useful storage tips:
Keep 10–20% storage free
Delete duplicate photos and downloaded files
Enable Offload Unused Apps
Move large files to iCloud or a computer drive
Try not to install heavy apps you do not use.
5. Prevent Overheating – A Silent Phone Killer
Heat destroys battery life faster than anything else. Many users ignore this, but temperature control is one of the strongest Tips For Preventing Repair.
Avoid: 🚫 Playing heavy games while charging 🚫 Leaving the phone inside a parked car 🚫 Keeping the screen brightness too high for long periods
If your iPhone feels hot:
Close background apps
Stop charging
Remove the case
Keep it in shade until temperature reduces
6. Charge Your iPhone Correctly
People damage their phones by using cheap chargers and overcharging. Safe charging is a crucial part of extending the life of your iPhone.
Recommended charging habits:
✔ Use original or MFi-certified chargers ✔ Prefer slow charging when possible ✔ Avoid fast charging all the time ✔ Do not use power banks of unknown brands
Wireless charging is fine, but it generates more heat, so avoid very long sessions.
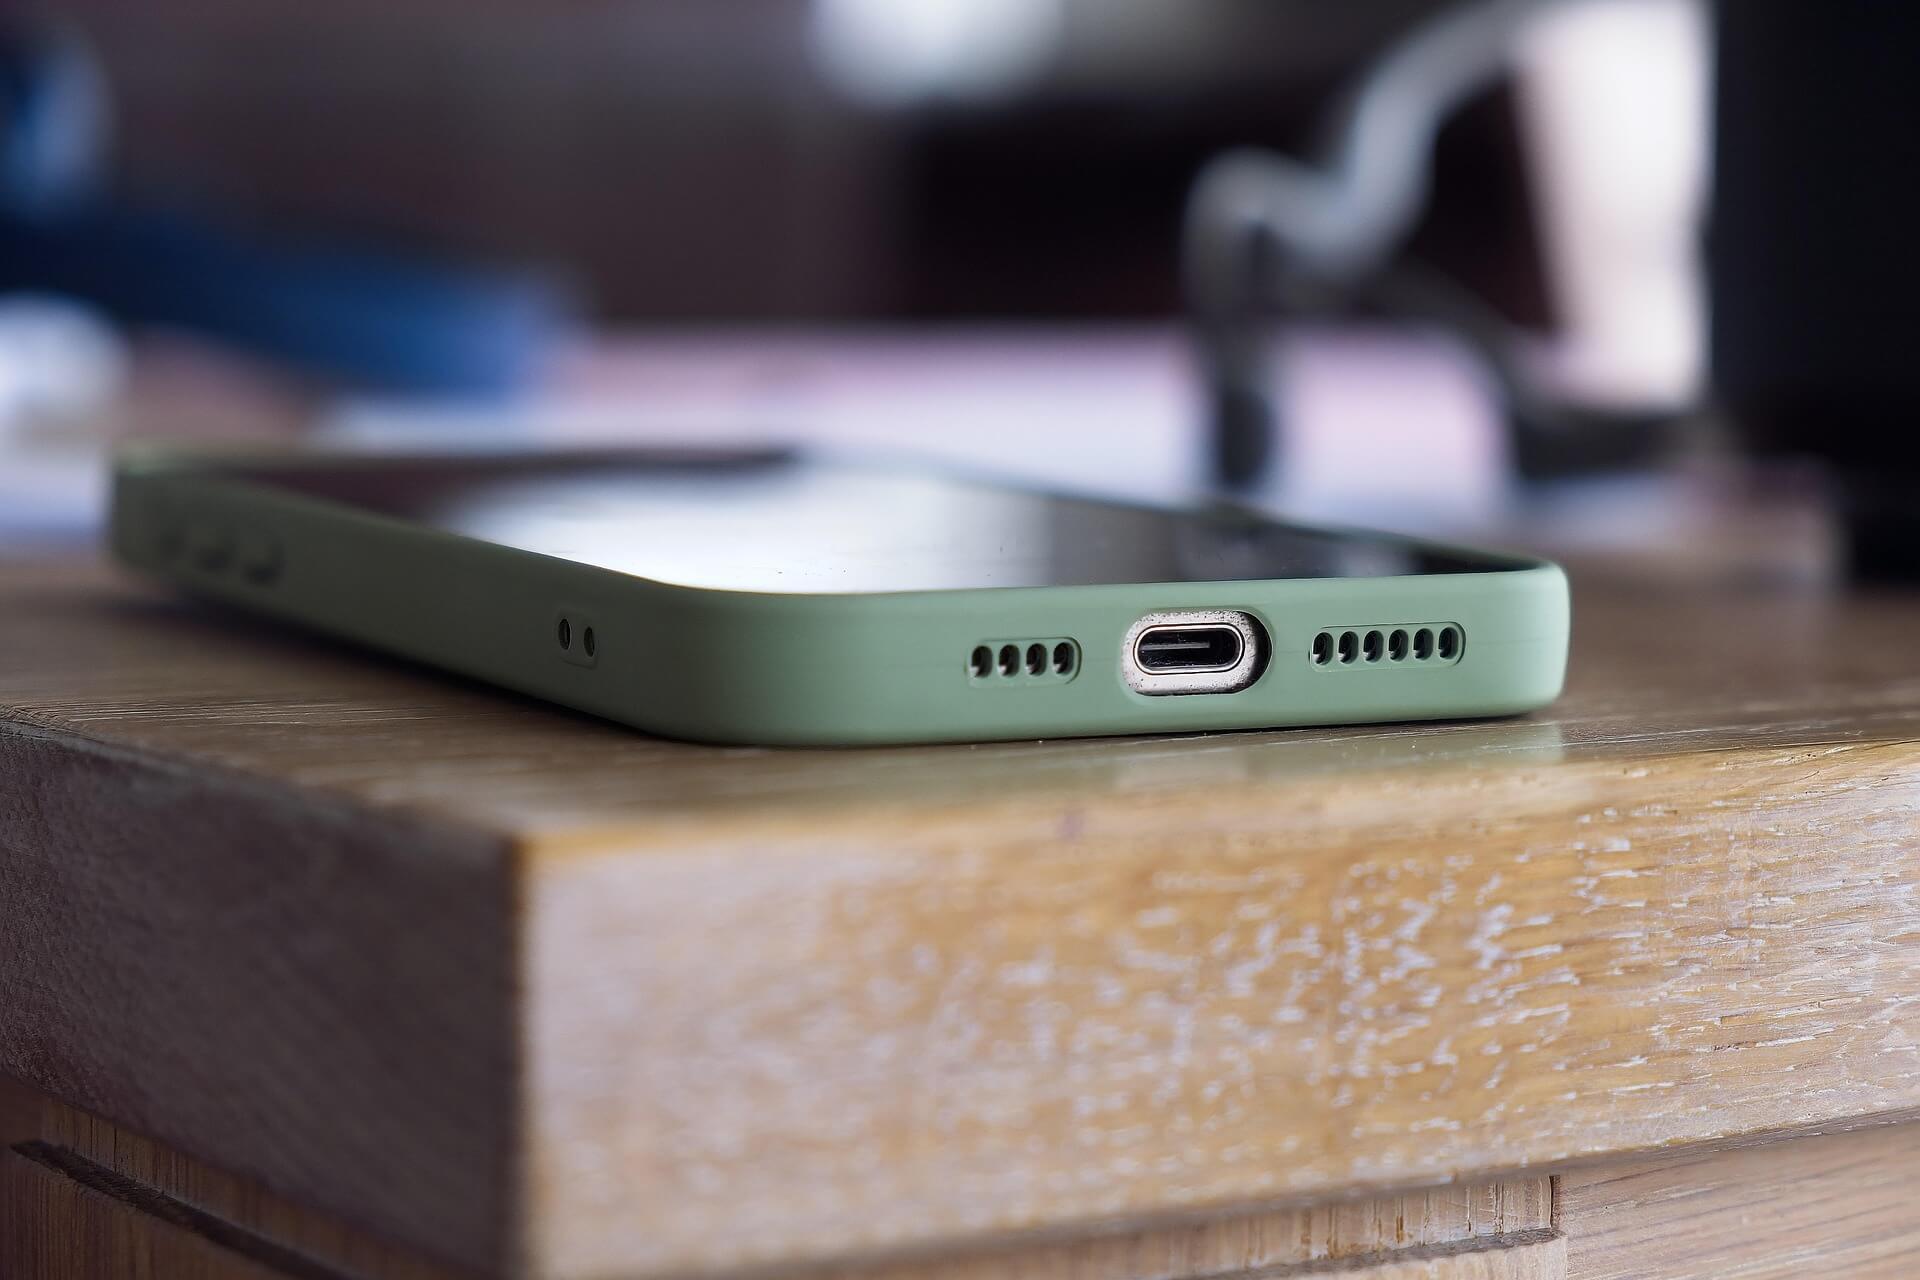
7. Keep the Charging Port, Mic & Speakers Clean
Dust can block your microphone, reduce speaker volume, and disturb charging. For safe cleaning:
Use a soft, dry brush
Do not use needles or toothpicks
Keep your phone in a clean pocket or bag
Many charging issues happen because people force the cable into a dusty port and bend the pins inside.
8. Reduce Battery Drain with Smart Usage
You can make battery life longer and reduce heating by following a few daily habits:
Use Wi-Fi instead of mobile data when possible
Turn on Low Power Mode when battery is low
Disable Bluetooth, AirDrop, Location when unused
Lower screen brightness when indoors
Small habits make a big difference in How To Extend The Life of Your iPhone: Tips For Preventing Repair.
9. Handle Your Phone Carefully
Even small drops and pressure can damage internal parts. Be mindful of how you use your iPhone.
Avoid: 🚫 Sitting with your phone in the back pocket 🚫 Keeping it under pillows while sleeping (heat danger) 🚫 Using it near water, sinks, pools, or rain without protection
Even water-resistant models can get damaged by steam or saltwater.
10. Replace Battery When Needed, Not Too Late
If your battery health falls below 80%, Apple recommends a replacement. For better safety and reliability:
✔ Use Apple Authorized Service Providers ✔ Avoid low-quality local batteries
A weak battery can swell and damage the display, causing expensive repairs.
Final Words
These simple steps will help you keep your iPhone fast, safe, and reliable for years.
To summarize, remember to:
⭐ Use a strong case and tempered glass ⭐ Protect and maintain battery health ⭐ Update iOS regularly ⭐ Manage storage wisely ⭐ Avoid overheating ⭐ Charge safely with certified chargers ⭐ Clean the ports carefully ⭐ Handle your iPhone with care ⭐ Replace the battery at the right time
With these habits, you save money, reduce repair needs, and enjoy a smooth, long-lasting iPhone experience.
Many people prefer fixing small phone issues on their own. It saves time, reduces repair costs, and helps you understand your device better. But iPhones are delicate, and even a tiny mistake can damage an important part. This guide on DIY iPhone Repair explains safe, beginner-friendly fixes and also shows you when it’s better to let a technician handle the job.
Repair experts often give one simple piece of advice: start with what you truly understand. This applies to every beginner trying to repair an iPhone at home.
Why People Choose DIY Repairs
Most users try simple DIY iPhone or mobile repairs because many common problems don’t need a technician. Issues like slow speed, poor battery backup, charging interruptions, audio problems, or a broken screen protector are usually easy to solve.
Fixing these small problems at home can:
Save money
Save travel time
Help you understand your device
Avoid unnecessary repair shop visits
However, it’s important to remember that iPhones are tightly built, and their internal components are sensitive. Only attempt tasks you’re confident about.
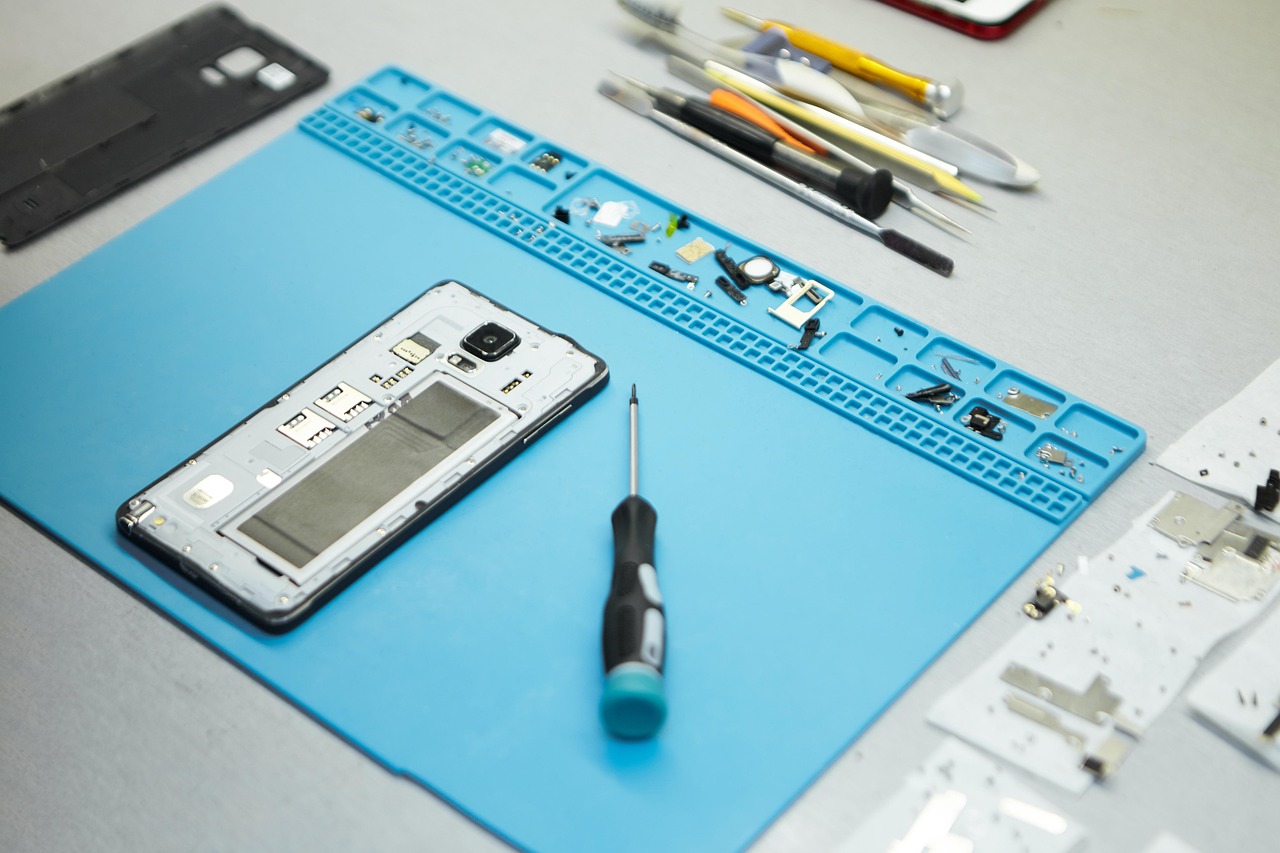
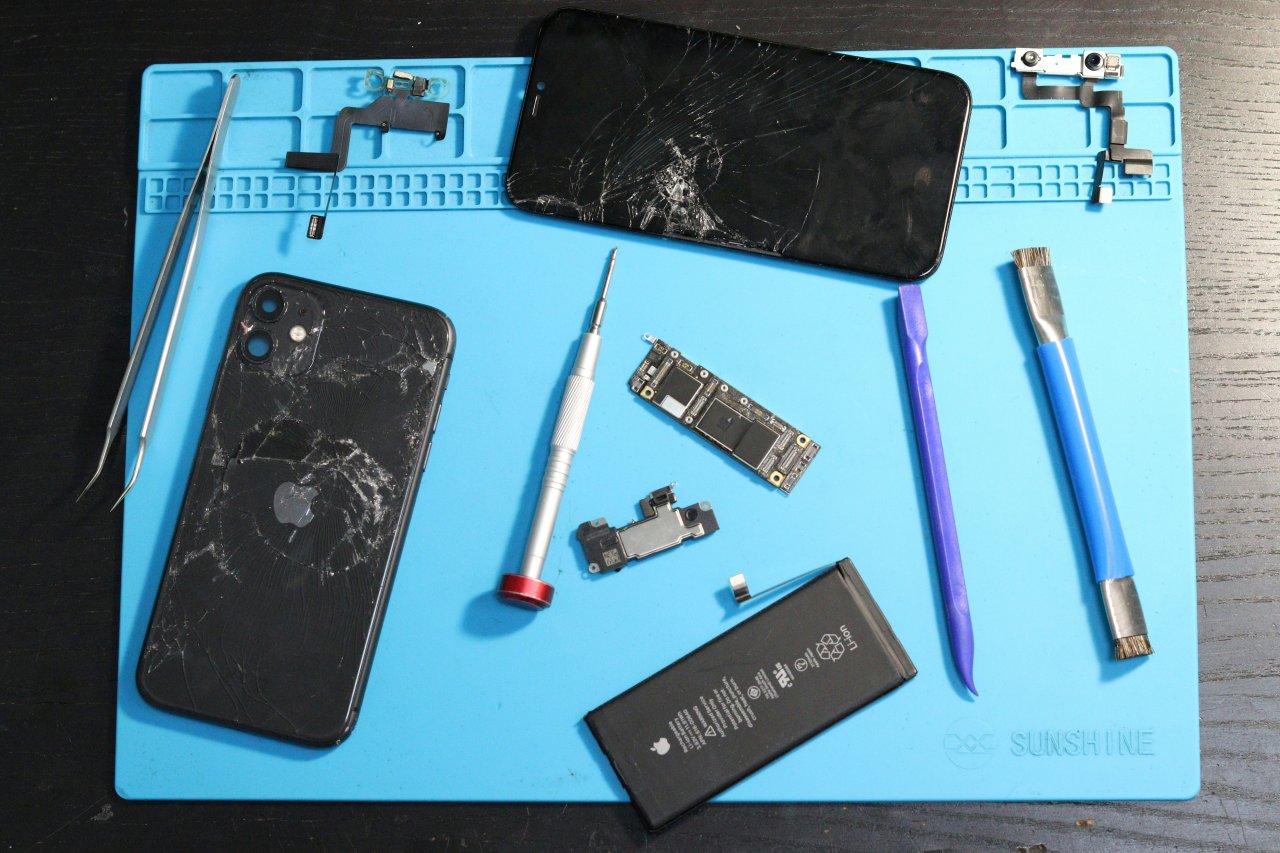
Essential Tools for Safe iPhone Repair at Home
Regular household tools are not suitable for opening an iPhone. You need proper precision tools to avoid damaging screws or delicate internal parts. Some commonly used tools include:
Pentalobe screwdriver
Small Phillips screwdriver
Plastic pry tools
Suction cup
Tweezers
Spudger
ESD-safe mat (to prevent static damage)
These tools make the repair process smoother and reduce the risk of accidental damage.
Common iPhone Issues You Can Fix Yourself
1. Battery Drain
Battery issues are among the most common complaints. Before opening the device, try these simple steps:
Close unwanted background apps
Reduce brightness
Check battery health from Settings
Turn off Bluetooth, Wi-Fi, or location when not needed
If the battery is swollen or losing charge unusually fast, avoid opening the phone. Swollen batteries can be dangerous and should be handled only by trained technicians.
2. Slow Performance or Freezing Screen
These problems usually don’t require opening the phone. You can try:
Restarting your device
Updating to the latest iOS
Deleting unused files
Offloading apps
Resetting settings (not data)
These quick steps often resolve lagging and freezing issues.
3. Charging Problems
Charging issues are very common, and many times the culprit is simple dust in the charging port.
You can try:
Turning off the phone
Cleaning the port gently with a wooden toothpick
Using light bursts of compressed air
Never use metal objects or apply too much pressure. If the port feels loose or physically damaged, it’s better to visit a repair center.
4. Speaker Not Working
Before assuming anything is broken, try these checks:
Ensure the volume is turned up
Disable Bluetooth (to avoid connecting to a speaker/headset)
Clean the speaker grill with a soft brush
Restart your phone
If the sound is still distorted or very low, the internal speaker might need professional repair.
5. Cracked Screen Protector
Replacing a screen protector is one of the easiest DIY tasks:
Gently lift one corner using a plastic card
Peel it off slowly
Clean the screen
Apply a new protector smoothly
This does not require any technical experience.
Safety Tips for DIY iPhone Repairs
Working safely is more important than finishing fast. Keep these basic rules in mind:
Switch off your phone before opening it
Disconnect the battery first if you open the device
Avoid metal tools inside the phone
Work on a clean, well-lit surface
Keep screws organized—iPhones use many different sizes
Take your time and avoid rushing
Following these precautions reduces the chances of mistakes.
When DIY Repair Is Not Recommended
Not all issues should be handled at home. Some repairs are complex and require experience:
These components are delicate, and mishandling them can lead to permanent damage. For such cases, professional help is the safest choice.
Benefits of Doing Your Own Repairs
When done correctly, DIY repairs offer several advantages:
Lower repair costs
Quick solutions for small issues
Increased knowledge about your device
Less reliance on repair centers
Confidence in handling basic problems
Just remember: being a responsible DIY repairer means knowing your limits.
Common Mistakes to Avoid
Beginners often run into trouble because of simple errors. Avoid:
Using cheap or poor-quality replacement parts
Applying too much force
Mixing screws during reassembly
Opening the phone without proper tools
Ignoring safety advice
Any of these can worsen the damage or make the phone unusable.
How to Keep Your iPhone Working Well After Repair
After fixing any issue, regular care will help your phone last longer:
Clean the phone, especially ports and speaker grills
Avoid moisture or extreme heat
Use a good-quality case and screen protector
Keep iOS updated
Handle the phone carefully, especially after repairs
Good habits reduce the chances of future problems.
Final Thoughts
DIY iPhone repair can be a great way to solve small issues at home. Simple steps, the right tools, and patience can help you fix several common problems safely. But it’s equally important to understand which issues require professional skills.
Repair technicians always say: “Do what you know. Leave the risky part to experts.” If you follow that advice, you can keep your iPhone safe and still enjoy the benefits of solving minor issues on your own.
Mobile phones have become essential for almost everything—communication, business, capturing memories, navigation, payments, entertainment, and more. So when a device stops working, even for a few hours, it feels like life has slowed down. That’s why mobile repair skills are more valuable today than ever.
Whether you’re a beginner learning to fix phones, a technician brushing up your skills, or simply someone curious about troubleshooting, this guide will teach you the most important repair tips and tricks in a simple, practical, easy-to-understand way.
As repair professionals often say, “Every device has a solution—you just need the right tools and the right approach.”
What This Guide Covers
This article offers a complete overview of:
Understanding the structure of mobile devices
Identifying motherboard components
Diagnosing hardware and software issues
Hands-on troubleshooting
Safety practices
Flashing, formatting, and firmware repairs
Practical tips for beginners
Common mistake-prevention methods
Examples from real repair scenarios
Everything is written in clean, conversational language so you can learn quickly and confidently.
Introduction to Mobile Phone Repair
Mobile repair may look complicated from the outside—chips, circuits, tiny components, advanced software—but the reality is simpler than most people think. Repairing devices becomes easy when you understand how they work, why they fail, and what steps restore them back to normal.
You’ll find three major pillars in mobile repair:
Dismantling and assembling
Hardware diagnostics
Software troubleshooting
Master these, and you can fix almost any phone, whether it’s Samsung, Apple, Oppo, Vivo, Xiaomi, Motorola, Tecno, or any less-known brand.
And remember this quote that every good technician lives by: “Knowledge grows when you use your hands, not just your eyes.”
Understanding How a Smartphone Works
Before learning repair techniques, you must understand the major parts inside a mobile phone.
Every smartphone contains:
1. Display Assembly
Touchscreen (digitizer)
LCD or AMOLED display
Frame and supporting layers
2. Battery
Removable or non-removable lithium-ion battery.
3. Motherboard
The heart of the device. It includes:
CPU & GPU
RAM
Power IC (PMIC)
Charging IC
Audio IC
Network IC
RF components
EEPROM / ROM
Wi-Fi & Bluetooth modules
4. Cameras
Front and rear modules with separate sensors.
5. Antennas
Responsible for network, Wi-Fi, GPS, Bluetooth.
6. Speakers & Microphones
Ear speaker, loudspeaker, primary and secondary mics.
7. USB/Charging Port
Often one of the most replaced components.
8. Vibrator Motor
For haptic feedback.
When you learn to identify these components, half the troubleshooting already becomes easy.
Tools You Need for Mobile Repair
Having the right tools ensures accuracy and safety.
Essential tools include:
Basic Tools
Precision screwdriver set
Plastic pry tools
Tweezers
Opening picks
SIM ejector
Isopropyl alcohol (IPA)
Magnifying lamp
Intermediate Tools
Soldering iron
Hot air rework station
Multimeter
DC power supply
PCB holder
Microscope (optional but helpful)
Software Tools
Flashing tools (brand-specific)
Drivers and firmware files
Data recovery applications
Unlocking utilities (legal use only)
High-quality tools protect devices from damage and improve your success rate.
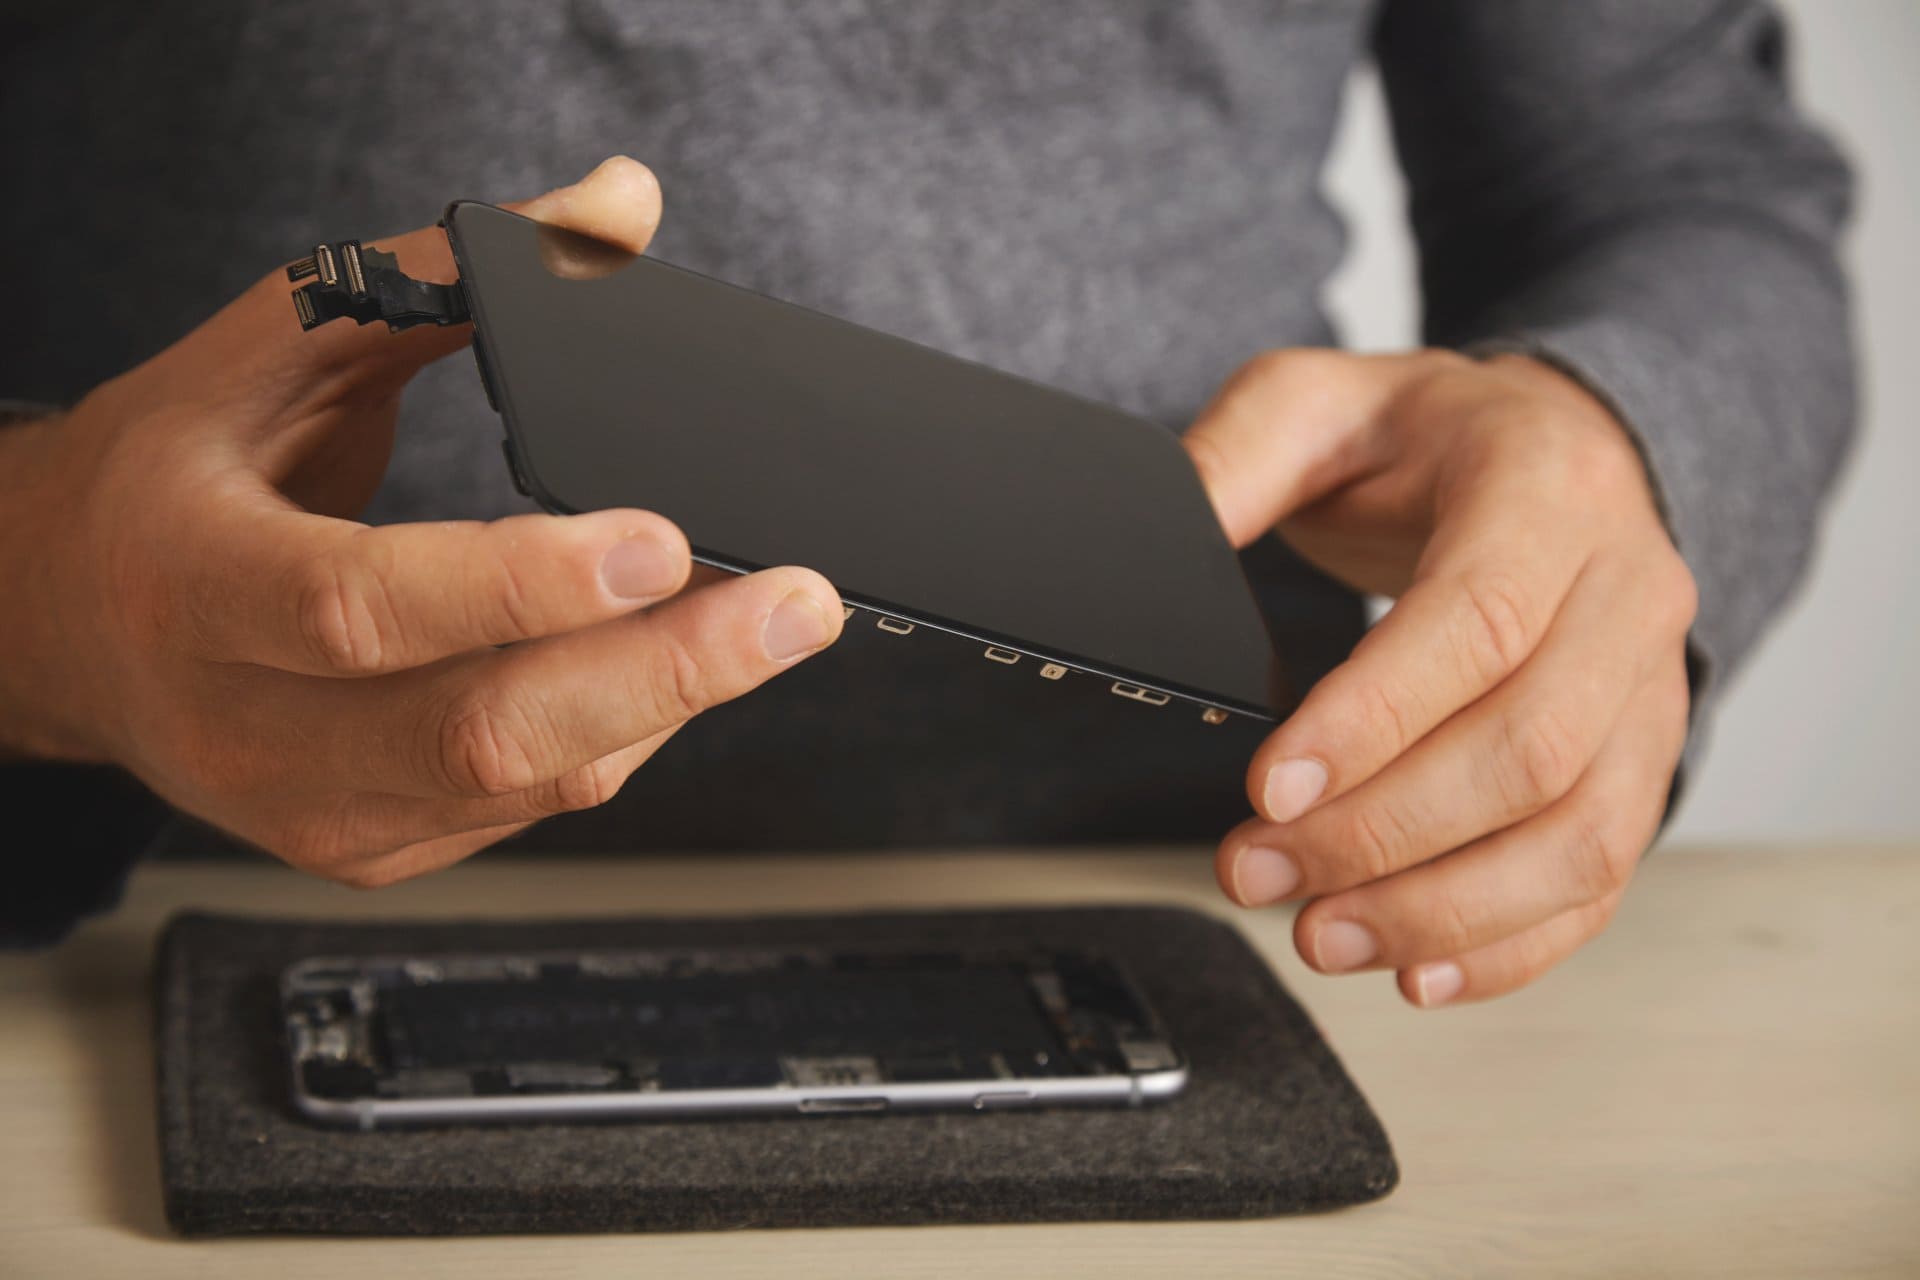
Dismantling and Assembling a Mobile Phone
Correct dismantling prevents accidental damage to:
Display
Motherboard
Flex cables
Connectors
Fingerprint sensors
Safe Dismantling Steps
Power off the phone completely
Remove SIM, SD card, and accessories
Gently heat the back cover if it’s glued
Use plastic tools—not metal—to lift edges
Disconnect the battery before touching anything else
Handle flex cables carefully—they tear easily
Store screws in separate groups to avoid confusion
Reassembling Tips
Never over-tighten screws
Ensure all connectors click into place
Clean surfaces with IPA before closing
Test everything before final sealing
Identifying Motherboard Parts and Their Functions
Understanding the roles of ICs helps you diagnose issues confidently.
Important IC Components
Power IC (PMIC): Controls battery power, charging, and voltage distribution.
Charging IC: Handles fast charging, USB communication, and battery detection.
Audio IC: Manages speakers, headphones, and microphone-related functions.
Network IC / RF section: Controls SIM detection, signal strength, and mobile data.
Backlight IC: Lights up the display; faulty IC causes dim or black screen.
CPU & RAM: Brains of the phone—rarely replaced but often fail due to overheating or water damage.
Learning how these parts interact dramatically improves your fault-finding ability.
Diagnosing Hardware Problems
Hardware faults are usually related to:
Battery issues
Display damage
Motherboard faults
Charging problems
Audio issues
Camera failures
Water damage
Here’s how to approach them.
1. Battery Problems
Common symptoms:
Phone turns off randomly
Full charge drains rapidly
Device only works when plugged in
Solutions:
Calibrate battery
Replace degraded battery
Check charging IC or PMIC if battery is new
2. Display Problems
Symptoms:
Touch not working
Flickering screen
Lines on display
Black screen
Fix:
Replace LCD or AMOLED
Clean flex cable connection
Check display IC
3. Charging Issues
One of the most frequent hardware repairs.
Symptoms:
Slow charging
Not charging at all
Phone heats while charging
Charging only at specific angles
Fix:
Replace charging port
Clean connector pins
Test with DC power supply
Check Charging IC and PMIC if port is fine
4. Camera Problems
Symptoms:
“Camera failed” message
Blurry photos
Camera not opening
Solutions:
Replace camera module
Clean connectors
Update or reset software
5. Audio Problems
Symptoms:
Caller can’t hear you
You can’t hear the caller
No sound in videos or apps
Fix:
Replace speaker / mic
Reheat or replace Audio IC
Clean mesh filters (often clogged with dust)
6. Water Damage Repairs
Water damage is tricky but often repairable if treated quickly.
Steps:
Switch off device immediately
Dry using absorbent cloth
Open back cover
Disconnect battery
Clean motherboard with IPA
Dry thoroughly before testing
Never use a hairdryer—it can push moisture deeper.
Diagnosing Software Problems
Many issues are software-related and easy to fix.
1. Device Running Slow
Clear cache
Uninstall heavy apps
Reset settings
2. Boot Loop or Stuck Logo
Often fixed by:
Flashing firmware
Wiping data and cache
3. Network or SIM Issues
Try:
Reset network settings
Replace SIM
Flash firmware
Check baseband status
4. App Crashes
Update apps
Clear app data
Check storage space
Flashing and Formatting Mobile Phones
Flashing refers to reinstalling the phone’s operating system. Formatting refers to wiping user data.
Why Flashing is Needed
Stuck on logo
Software corruption
Virus or malware
Forgotten password (legitimate use only)
How to Flash Safely
Use official firmware only
Install correct drivers
Backup user data (if possible)
Fully charge the device
Never interrupt the flashing process
Using the wrong firmware can permanently damage the device, so accuracy matters.
Practical Tips and Tricks for Repair Technicians
Here are the most useful mobile repair insights gathered from real-world experience.
1. Always Start with Visual Inspection
Look for:
Burn marks
Corrosion
Loose ICs
Broken connectors
Missing components
2. Use a Multimeter for Quick Diagnosis
Check:
Continuity of tracks
Short circuits
Voltage output from PMIC
3. Clean First, Repair Later
A huge number of issues are caused by:
Dirt
Moisture
Loose connectors
4. Avoid Excessive Heat
Too much heat:
Warps the motherboard
Damages ICs
Melts flex cables
Use proper temperature ranges.
5. Maintain a Troubleshooting Checklist
This prevents missing simple solutions.
6. Follow “Least Risk First” Approach
Example:
Try cleaning → reconnecting → replacing minor parts → motherboard repair.
7. Keep Learning
Mobile technology changes fast. Forums, YouTube channels, and training institutes help build expertise.
Common Mistakes and How to Avoid Them
Mistake 1: Using metal tools on delicate parts
Can cause short circuits.
Mistake 2: Skipping ESD protection
Electrostatic discharge can damage ICs.
Mistake 3: Rushing during dismantling
Leads to torn flex cables.
Mistake 4: Ignoring battery safety
Damaged batteries can swell or burst.
Mistake 5: Flashing wrong firmware
Causes dead phone or corrupted partition.
When a Phone Is “Beyond Repair”
A phone becomes near-impossible to repair when:
CPU or RAM is internally damaged
Motherboard is severely burnt
Board layers are broken
Severe corrosion has eaten through tracks
Device fails even after IC replacement
However, skilled board-level technicians can still revive many cases that seem impossible.
How to Improve Your Repair Skills Quickly
1. Practice on Old Phones
Before handling expensive devices.
2. Watch Live Repair Videos
Helps you understand real scenarios.
3. Join Technician Communities
Forums and groups offer daily learning.
4. Learn Microsoldering
Increases your repair success rate.
5. Stay Updated
New phone models require new methods.
Conclusion
Mobile phone repair is a blend of knowledge, observation, and hands-on practice. When you understand how phones work and follow a systematic troubleshooting approach, even complex problems become simple.
Whether you’re repairing for personal use or building a professional career, the tips in this guide will help you diagnose faults faster, avoid common mistakes, and build confidence.
If you approach every device with patience and curiosity, your skills will grow naturally and consistently.
Security codes play a crucial role in keeping your mobile phone safe. Even though modern devices now use advanced biometrics like fingerprint sensors and facial recognition, the traditional security code still remains an important layer of protection. It acts as a safeguard for your personal data, prevents unauthorized access, and is often required for functions like resetting the device or modifying key settings.
Mobile Phone Security Codes: Complete Guide, Tips, and Reset Methods
This guide explains everything you need to know about mobile security codes—from default codes used by many popular brands to the reasons your device may show a “wrong code” error, along with practical steps to reset forgotten codes. You’ll also learn why it’s essential to change the default security code and how to keep it safe without losing access to your phone.
As the saying goes, “Your phone is your digital identity—protect it as carefully as you protect your home.”
What Is a Mobile Phone Security Code?
A security code is a numeric password set by the phone manufacturer or user. It is used to:
Prevent unauthorized access
Protect sensitive information
Reset or format the device
Modify security and privacy settings
Lock the device menu or key functions
Most phones ship with a default security code, which remains unchanged until the user edits it.
Why Security Codes Still Matter Today
Even though smartphones today offer pattern lock, PIN, biometric unlock, app protection, and cloud-based security, the classic security code is still important because:
It is needed to perform a factory reset on many feature phones and older smartphones.
It helps technicians troubleshoot or restore devices.
Some models still require it for formatting, backup, and setup.
It provides a secondary protection layer if the main lock system fails.
Think of it as a backup key—rarely used but extremely important when needed.
When Does a Phone Ask for the Security Code?
Your device may request the security code during:
Accessing the main menu (on some keypad phones)
Changing privacy or security settings
Performing factory reset
Opening restricted phone features
After multiple failed unlock attempts
Repair or software flashing processes (varies by model)
If you have activated security lock settings manually, the phone will request the code more frequently.
Why You Should Change the Default Security Code
Leaving the default security code unchanged can put your data at risk.
Most default codes are publicly known, which means anyone familiar with mobile repair or phone settings can guess them. To protect your privacy, it is important to:
Change the default code immediately
Choose a memorable but strong combination
Avoid predictable codes like 0000 or 1234
Store your code somewhere safe
Once changed, the phone will not accept the old default code anymore, and inserting the wrong code repeatedly may lock certain functions.
What Does “Wrong Code” or “Code Error” Mean?
If your phone displays messages like:
Wrong code
Code error
Incorrect password
…it usually indicates:
The default code has been changed earlier
The user forgot the new code
Someone else changed it intentionally or accidentally
The device software is malfunctioning
The keypad entered digits incorrectly
In most cases, the device is not faulty—the security code simply mismatch.
Default Security Codes of Popular Mobile Phone Brands
Here are commonly used default codes across various manufacturers. These codes come directly from factory settings and work unless changed by the user.
Note: Manufacturers may update security features over time, and some newer keypad phones require you to create a code during setup instead of using a default one.
Samsung Phones
0000
000000
00000000
(Some models accept any of these depending on region and firmware.)
Nokia Phones
12345 (most common and widely used)
Other Popular Brands (Sony, Motorola, LG, Panasonic, etc.)
0000
1234
9999
These brands often use one of the simple 4-digit combinations.
Chinese & Generic Brands (Itel, Gionee, Micromax, Karbonn, and unbranded models)
1122
0000
1234
Lava Phones
4321
This is one of the few brands with a unique standard code.
Important Note About Newer Keypad Phones
Many recent feature phones no longer come with a preset factory security code. Instead:
During first-time setup, the phone asks you to create your own security code.
You must remember this code, as there is no universal default.
If forgotten, the phone must be reset using special software or hardware methods.
This shift strengthens security and reduces unauthorized access.
If the Default Code Does Not Work
There are only two possibilities:
The code was changed earlier, and the new code is unknown.
The phone’s software requires resetting, because the security file is corrupted.
If you are sure you’re entering the correct default code but it still fails, the only way to unlock is:
Reset through specialized software
Hard-reset using key combinations (if supported)
Visiting a service center or professional technician
Each brand uses different reset protocols, so there is no universal method.
How to Reset or Recover a Forgotten Security Code
Here are the main methods used in real repair environments.
1. Hard Reset (Button Method)
Many keypad phones and some older smartphones support a button-based hard reset.
Common steps include:
Switch off the device
Press and hold specific key combinations (varies by model)
Enter recovery mode
Select “wipe data/factory reset”
Confirm
Once reset, the phone returns to factory settings, and the security code resets to its default.
This method erases all data, so use it only if necessary.
2. Flashing the Device
For phones with forgotten security codes, flashing can:
Remove the current security lock
Restore original firmware
Fix corrupted operating system files
This method requires technical expertise and tools like:
Brand-specific firmware
Flashing boxes (for feature phones)
USB drivers
Backup utilities
It is widely used by professional repair technicians.
3. Using Special Software Tools
Different brands require different software. Examples include:
Tools for Nokia keypad models
Software utilities for Chinese MTK keypad devices
Brand-specific service suites
These programs can:
Read the current security code
Remove the lock
Restore the default settings
They must be used legally and responsibly, especially for devices that do not belong to you.
Precautions When Resetting Any Phone
Before performing a hard reset or flashing, always follow these precautions:
Backup data, if possible
Ensure the battery is sufficiently charged
Use only compatible firmware
Do not disconnect the cable during flashing
Be aware that formatting erases personal files
Incorrect flashing can render the phone unusable, so proceed only if you understand the process.
Security Code vs. Other Locks: What’s the Difference?
Phones today include multiple layers of security. Understanding them helps avoid confusion.
Security Feature
Purpose
Reset Difficulty
Security Code
Menu/Settings access, resets
Easy to moderate
PIN Code
Controls SIM access
Easy (SIM provider can reset)
Password/Pattern/PIN Lock
Locks phone screen
Easy to moderate
FRP / Mi Account / iCloud Lock
Prevents unauthorized reset
Hard (requires ownership proof)
A security code is only one part of a larger ecosystem of protections.
Tips to Keep Your Security Code Safe
To avoid being locked out of your own device:
✔ Use a unique combination
Avoid using your birth year, mobile number, or 0000.
✔ Write it down temporarily
Store it safely until you memorize it.
✔ Do not share it casually
Even close contacts do not need access to your personal code.
✔ Update it if someone learns it
Your privacy is your responsibility.
✔ Reset only when necessary
Frequent resets can confuse your memory.
In digital safety, small habits make the biggest difference.
Common Myths About Security Codes
❌ Myth 1: Every phone has a default code.
Not true. Many new models require creating your own code at first use.
❌ Myth 2: Security codes and SIM PINs are the same.
They are completely different.
❌ Myth 3: Entering the wrong code many times will permanently lock the phone.
Most phones allow resets through recovery or flashing.
Frequently Asked Questions
1. What happens if I never change the default code?
Anyone who knows default codes can unlock certain functions of your phone. It reduces privacy and security.
2. Can security codes be bypassed easily?
Only through technical methods like flashing or specialized tools—never by guessing unless default values were not changed.
3. Will resetting remove the security code?
Yes, a full factory reset usually restores the default code.
4. Can a technician unlock the phone without data loss?
Sometimes yes, depending on the model and software tools available.
Conclusion
Security codes play a vital role in protecting personal information stored inside your phone. While modern devices offer advanced unlocking methods, the traditional security code remains a valuable backup and an essential part of device management. Changing the default code, remembering it, and knowing how to reset it when forgotten are fundamental steps in maintaining control over your digital life.
With the right knowledge, even situations like “wrong code” errors or forgotten passwords can be solved confidently. The key is to follow safe methods, understand your phone’s brand-specific behavior, and always prioritize privacy.
Mobile phones have become essential to daily life. We use them for communication, payments, entertainment, work, online shopping, banking, and storing personal information. Because of this, smartphones have become a prime target for cyber threats. Just like computers, phones can be infected by viruses, malware, spyware, ransomware, worms, and other malicious programs designed to harm the device or steal important data.
A phone virus behaves very much like a computer virus—it spreads, multiplies, disrupts normal functions, and can cause serious damage if left unchecked. As one security expert puts it, “Your phone is not just a device; it holds your digital identity. Protect it like your most valuable asset.”
This comprehensive guide explains how mobile viruses spread, how to identify infections, and—most importantly—how to protect your phone from malware using simple, practical methods that actually work.
What Is a Mobile Phone Virus?
A mobile phone virus is a malicious software program created to:
Disrupt normal phone operations
Damage or delete data
Steal personal information
Display unwanted ads
Track activity or monitor user behavior
Spread to other devices through networks, Bluetooth, or installed apps
These viruses take advantage of vulnerabilities in your phone’s operating system, downloaded files, apps, or connectivity settings.
Modern malware is far more advanced than early mobile viruses. Instead of simply corrupting data, today’s threats can:
Send unauthorized SMS or WhatsApp messages
Automatically install harmful apps
Steal passwords
Record conversations
Monitor browsing
Capture keystrokes
Encrypt files and demand ransom
Spread silently through WiFi, Bluetooth, or malicious websites
Because smartphones store sensitive data like banking details and photos, viruses today pose not just a technical risk but also a privacy and financial threat.
How Do Mobile Viruses Spread?
Understanding the sources of malware is the first step toward preventing it.
Here are the most common ways your phone can get infected:
1. Bluetooth File Sharing
Virus creators often target Bluetooth connections because:
Many users leave Bluetooth ON all the time
Files can be shared without internet
Users frequently accept files without checking the sender
If your Bluetooth is set to “visible,” your phone becomes easy to target.
2. Memory Cards & External Storage
If someone uses an infected memory card and inserts it into your phone, the virus can automatically copy itself into your system. Similarly, sharing SD cards between devices increases the risk of transferring hidden malware files.
3. Malicious Websites
Certain websites automatically download harmful files when you:
Click ads
Download free ringtones, wallpapers, or apps
Visit unsafe or unverified pages
This is one of the fastest-growing sources of mobile infections.
4. Fake Apps and APK Files
Apps downloaded from outside official app stores are a major threat.
Many free or cracked apps:
Contain spyware
Ask for unnecessary permissions
Install hidden services
Display intrusive ads
Steal information
Even the Google Play Store and Apple App Store occasionally remove apps that collect unauthorized data.
5. Public WiFi Networks
Hackers can intercept your data or inject malicious scripts when you connect to unsecured WiFi networks such as:
Cafes
Airports
Hotels
Railway stations
Your phone becomes vulnerable to malware, phishing, and data theft.
6. Email Attachments & Messages
Opening unknown links or attachments from SMS, WhatsApp, Telegram, or email can install hidden malware.
Cybercriminals often disguise themselves as:
Banks
Delivery companies
E-commerce websites
Payment services
This is one of the most effective methods used by phishing attackers.
Signs Your Phone Might Have a Virus
Most mobile viruses operate quietly in the background, but you might notice:
Sudden battery drain
Phone heating unusually
Random pop-ups or ads
Slow performance
Unknown apps appearing on your device
Increased mobile data usage
Contacts receiving strange messages
Apps crashing frequently
Phone behaving unpredictably
Background noise during calls
If multiple symptoms occur together, your phone might be infected.
How to Protect Your Phone from Viruses: Complete Guide
Below are the most effective and practical ways to secure your device from malware, spyware, and viruses. These methods combine modern cybersecurity practices with real repair-experience insights.
1. Keep Bluetooth Turned Off When Not in Use
One of the simplest yet most effective security habits is keeping Bluetooth OFF.
When Bluetooth is always enabled:
Your phone becomes visible to nearby devices
Hackers can send harmful files
Malware can spread automatically
Tip: If you must keep Bluetooth ON—for example, for earbuds or smartwatch—set your phone to “Hidden/Not Discoverable”.
2. Never Open Unknown Files or Messages
If an unfamiliar user sends you a file through Bluetooth, WhatsApp, or email, avoid opening it.
Many viruses spread through:
Random images
“Funny” videos
Free wallpapers
ZIP/RAR files
APK installers
Even a single click can activate a malicious script.
Rule of thumb: If you don’t know the sender, don’t open the file.
3. Download Apps Only from Trusted Sources
Make sure to:
Use Google Play Store or Apple App Store
Avoid third-party websites that offer free APKs
Never install “cracked” or modified apps
Read user reviews before downloading
Check app permissions
If an app needs access to things that don’t match its function (like a flashlight app asking for camera or microphone access), it’s a red flag.
4. Install a Trusted Antivirus Program
Antivirus apps help in:
Scanning for malware
Removing harmful files
Protecting your browsing
Blocking suspicious apps
Detecting unusual activity
However, installing multiple antivirus apps can slow down your phone. Choose one reputable brand and keep it updated.
Important: Always update your security apps, because new threats appear regularly.
5. Keep Your Operating System Updated
Software updates may seem annoying, but they often include:
Security patches
Fixes for vulnerabilities
Improved protection features
Hackers target outdated devices because they are easier to exploit.
Turn ON automatic updates whenever possible.
6. Avoid Using Someone Else’s Memory Card
Memory cards can hide malware even if they look empty.
Sharing SD cards increases the risk of:
Hidden virus scripts
Damaged files
Corrupted folders
Spyware installation
Likewise, avoid giving your card to others. A single infected device can compromise your data.
7. Do Not Insert Unknown Pen Drives or OTG Devices
OTG drives can contain autorun scripts that infect your phone immediately after plug-in.
Use only trusted storage devices, especially if you handle important data.
8. Use a Secure Lock Screen
Although not directly related to viruses, it prevents unauthorized installation of harmful apps.
Use:
Strong PIN
Alphanumeric password
Fingerprint
Face unlock
Avoid predictable passwords such as birthdays or repeated digits.
9. Be Careful on Public WiFi
Public WiFi networks can allow attackers to:
Monitor your browsing
Inject malware
Steal login credentials
Redirect you to fake websites
When using public WiFi:
Avoid banking or shopping apps
Do not log into important accounts
Use a VPN for safer browsing
A VPN encrypts your data, making it difficult for hackers to intercept.
10. Manage App Permissions Wisely
Modern apps ask for multiple permissions. Some are necessary; others are not.
For example:
A calculator app doesn’t need microphone access
A wallpaper app shouldn’t need location permission
A notes app shouldn’t need SMS access
Review permissions every few months:
Settings → Apps → Permissions
Revoke anything unnecessary.
11. Do Not Click Suspicious Ads
Pop-up ads or banners such as:
“You have won a prize!”
“Your phone has a virus!”
“Click to clean your system!”
…are often scams designed to install malware.
Close such windows immediately.
12. Avoid Rooting or Jailbreaking Your Phone
Rooting removes built-in security protections, making your device vulnerable.
Risks include:
Malware accessing your system files
Loss of warranty
Installation of unauthorized apps
Higher chance of system corruption
Unless absolutely necessary, avoid rooting.
13. Use Cloud Backup for Important Data
If your phone becomes infected, corrupted, or encrypted by ransomware, having a backup is a lifesaver.
Use:
Google Drive
iCloud
OneDrive
Secure external storage
Backups allow you to restore your phone without losing essential files.
14. Install a Reliable Firewall App (Android)
A firewall helps:
Block suspicious network activity
Prevent unknown apps from accessing the internet
Monitor data usage
This is especially useful for users who download many apps.
15. Be Careful With QR Codes
Malicious QR codes can redirect you to dangerous websites or trigger malware downloads.
Scan only from trusted sources.
If Your Phone Is Already Infected
Here are effective steps to clean your device.
Step 1: Run a Full Antivirus Scan
Most antivirus apps can identify and remove harmful files automatically.
Step 2: Uninstall Suspicious Apps
Go to:
Settings → Apps → Installed Apps
Look for apps you don’t remember installing.
Step 3: Clear Browser History & Downloads
Sometimes infections hide in temporary files.
Step 4: Reset App Permissions
If a malicious app changed permissions, reset them manually.
Step 5: Backup Important Files
In case you need to format the device, ensure your photos, contacts, and documents are backed up.
Step 6: Perform a Factory Reset
If nothing works, a full reset removes all malware.
Settings → System → Reset → Factory Reset
This wipes all data, so backup first.
“When your device is compromised, starting fresh is often the safest path.”
Practical Real-Life Example
A user once complained that their phone was overheating, sending messages automatically, and switching on Bluetooth without permission. On examination, the device contained a modified APK downloaded from an unknown website. The malware had installed background services that controlled Bluetooth, messaging, and internet usage.
Solution steps included:
Removing unauthorized apps
Revoking permissions
Running a full security scan
Resetting the device
Installing a trusted antivirus
Educating the user on safe download practices
This example shows how easily infections occur—and how they can be prevented with simple habits.
Final Tips for Maximum Protection
Regularly update both apps and OS
Avoid suspicious downloads
Use strong passwords
Disable unnecessary connectivity
Remove unused apps
Keep antivirus updated
Mobile safety is not difficult. It is simply a collection of smart habits practiced daily.
Conclusion
Protecting your phone from viruses is easier than most people think. The key lies in understanding how infections spread and applying simple, consistent security habits. Whether it’s turning off Bluetooth, installing trusted apps, or being careful with public WiFi, every small step contributes to a safer device.
Smartphones carry our photos, messages, work files, payment apps, and personal information. Keeping them secure is not optional—it’s essential.
By following the tips and practices in this guide, you can enjoy a smoother, safer mobile experience without worrying about hidden threats.
Choosing a new smartphone has become more challenging than ever. With so many brands, models, features, and price ranges, buyers often feel overwhelmed and confused. One phone offers a great camera, another focuses on battery life, and another shines with performance. Finding the “perfect” phone can feel like searching for a needle in a digital haystack.
But the truth is simple: the best smartphone is the one that suits your lifestyle, your needs, and your budget. When you understand what features truly matter, choosing the right phone becomes easy and enjoyable.
As many tech reviewers say, “A good phone isn’t the most expensive one—it’s the one that feels right in your hand and fits your daily life.”
This complete guide will help you shortlist phones confidently, compare options intelligently, and avoid common buying mistakes. You’ll learn how to evaluate performance, battery, camera, build quality, brand support, and more—based on real-world usage, not just technical jargon.
Why Choosing the Right Smartphone Matters
Your smartphone is more than a device. It’s your camera, your wallet, your notebook, your work tool, your entertainment hub, and your connection to everything that matters. A good phone:
Makes your tasks faster
Improves communication
Keeps you entertained
Stores important memories
Enhances productivity
Saves time and effort
On the other hand, a poor choice leads to:
Lagging performance
Heating issues
Weak battery life
Disappointing camera quality
Software problems
Regret and early replacement
Buying a phone is an investment. Making the right choice ensures you get value for your money and satisfaction for years.
The main points to remember BEFORE buying your new handset:
Below are the most important factors to consider before choosing your next phone. These points will help you narrow down options and understand what truly matters based on how you use your device.
1. Fix Your Budget: The First and Most Important Step
Before comparing models or searching online, decide how much you can comfortably spend. Prices vary widely, from basic budget phones to premium flagships.
Mid-range: Best value for average users (multitasking, social media, camera, entertainment)
Premium: Top performance, best cameras, cutting-edge features
Tip: Define your maximum budget and stretch limit before browsing phones. This prevents confusion and avoids emotional buying.
2. Decide Your Preferred Brand
Some people are loyal to brands like Samsung, Apple, Xiaomi, OnePlus, Vivo, or Motorola. If you already trust a brand’s quality, after-sales support, and user interface, your choices shrink automatically—making selection easier.
Ask yourself:
Do you prefer iOS or Android?
Do you like customizable interfaces or simple layouts?
Do you care about software updates?
Is brand reputation important to you?
Both iOS and Android have strengths. Choose the ecosystem you’re comfortable with.
3. Understand Technical Specifications (In Simple Terms)
This is where most users get confused. But specifications are simply tools to understand what a phone can do. Let’s break them down.
• Processor (CPU) – The Brain of the Phone
Popular chipset families include:
Apple Bionic
Qualcomm Snapdragon
MediaTek Dimensity/Helio
Samsung Exynos
A good processor ensures:
Smooth performance
Efficient multitasking
Better gaming
Faster app loading
Tip: For regular use, a mid-range chipset is enough. For gaming or heavy work, choose a faster processor.
• RAM – For Multitasking
RAM helps apps run smoothly.
Basic recommendation:
4 GB RAM: Light use
6 GB RAM: Balanced performance
8 GB RAM: Heavy multitasking
12 GB+: Power users/gamers
• Storage – For Apps, Photos, Videos & Files
Phones get full quickly with photos, apps, and WhatsApp downloads.
Choose:
64 GB: Very basic use
128 GB: Most users
256 GB+: Heavy media usage
Also check for:
Expandable storage
Cloud backup support
4. Screen Size & Display Quality
Your phone’s screen affects how you view videos, play games, read texts, and browse.
Important things to check:
Screen Size
Small (5.5–6.0″) → Compact, easy to handle
Medium (6.1–6.5″) → Best balance
Large (6.6″+) → Entertainment, gaming
Display Type
LCD: Affordable, decent quality
AMOLED / Super AMOLED: Rich colors, deep blacks, more energy-efficient
OLED / LTPO: Flagship-grade, best for smoothness and clarity
Refresh Rate
60Hz: Basic
90Hz / 120Hz: Smooth scrolling, better gaming
144Hz+: High-end gaming phones
A good display improves the entire user experience.
5. Camera Quality: What Truly Matters
Many buyers focus only on megapixels, but camera quality depends on much more.
Key factors to check:
Sensor size
Aperture
Image stabilization (OIS/EIS)
Night mode performance
Video stabilization
Portrait clarity
Color accuracy
Ultra-wide capabilities
Real-Life Example
A 12MP camera with a large sensor can outperform a 108MP camera with weak processing. Always check sample photos, especially:
Low light
Portraits
Moving subjects
If photography is important to you, prioritize camera software optimization and stabilization features.
6. Battery Life: One of the Most Important Factors
Nobody likes charging the phone multiple times a day.
Look for:
Battery capacity: At least 4500–5000 mAh
Fast charging: 25W, 33W, 44W, 65W or higher
Battery optimization: Software-based efficiency
Heat management: Phones that heat excessively drain faster
A durable battery ensures your phone stays reliable throughout the day.
7. Build Quality & Durability
Your phone must survive daily wear and tear.
Check for:
Strong frame
Scratch-resistant glass
Water and dust resistance (IP rating)
Drop protection features
Metal or high-quality polycarbonate body
Durability affects long-term satisfaction.
8. Software & User Experience
Operating system quality determines how smooth and intuitive your experience is. Look for:
Regular software updates
Security patches
Stable user interface
No heavy bloatware
Easy navigation
Good customization options
Phones with cluttered systems feel slow even with strong processors. If you prefer simple and stable, choose brands known for clean UI.
9. After-Sales Service & Reliability
Good service can save you time, money, and stress.
Consider:
Availability of service centers
Cost of spare parts
Warranty terms
Software update support
A phone is only as good as the support behind it.
10. Network Connectivity & Future-Proofing
Modern phones come with advanced connectivity options. Look for:
4G / 5G support
Carrier aggregation
VoLTE & VoWiFi
Dual SIM support
Latest WiFi standards
Bluetooth version updates
A future-ready device ensures long usability.
11. Gaming & Performance Needs
If you are a gamer, consider:
High refresh rate display
Large battery
Vapor cooling system
High-performance chipset
Good GPU optimization
Phones with gaming modes often deliver smoother gameplay.
12. Speaker Quality & Audio Experience
Good sound makes streaming, video calls, and music more enjoyable.
Look for:
Stereo speakers
Dolby Atmos support
Clean call clarity
Good microphone performance
Audio quality still matters more than people realize.
13. Comfort & Hand Feel
A phone may look great on paper but feel uncomfortable.
Check:
Weight
Grip
Button placement
One-handed use
Pocket comfort
Tip: Always hold the phone in your hand before finalizing. Comfort matters.
14. Real-World Performance Matters More Than Specs
Technical spec sheets can be misleading. What matters is how the phone performs daily:
Does it lag during multitasking?
Does it heat unexpectedly?
Does the battery drain fast?
Does the camera take consistent photos?
Is the display bright outdoors?
This is why many buyers rely on reviews and user feedback.
As one reviewer says, “Specs tell a story, but usage tells the truth.”
15. Ask a Friend Who Owns the Same Model
This is one of the oldest and most reliable buying strategies. A user who has used the phone for months can tell you:
What works well
What doesn’t
What breaks easily
How the battery behaves
How smooth the phone feels
Holding and testing the same model yourself can give instant clarity.
16. Check Reviews, Comparisons & Videos
Reputable review platforms provide detailed insights into:
Camera performance
Display quality
Battery tests
Heating issues
Pros and cons
Use multiple sources for a balanced opinion.
17. Consider Long-Term Value, Not Just Price
A phone with better software support and stronger durability may cost a little more initially but save money over time.
Factors that add long-term value:
Clean software
Strong processor
Good battery
Durable build
Reliable brand
Regular updates
A slightly higher price today can save you from replacing the phone prematurely.
Conclusion
Choosing the best smartphone doesn’t have to be confusing. When you know what to look for—budget, brand preference, display quality, camera performance, software, battery life, durability, and everyday usage—the decision becomes easy and enjoyable.
A great smartphone is one that matches your lifestyle. Whether you use your phone for work, photography, entertainment, gaming, or simple communication, the right device makes your daily life more efficient and enjoyable.
Take your time, compare wisely, and choose confidently. The perfect phone is out there—it just needs the right buyer to recognize it.
Smartphones are an essential part of daily life. We use them for communication, payments, work, navigation, entertainment, and storing personal memories. When something goes wrong, even a minor issue can feel extremely stressful. Many people rush to a repair shop for every small problem, not realizing that most phone issues are simple and can be fixed at home with basic knowledge.
This easy, practical guide is designed for beginners, DIY enthusiasts, and anyone curious about how mobile repair works. You don’t need advanced tools or special technical training to fix many common problems. All you need is patience, careful handling, and the right steps.
As a well-known technician once said, “A phone isn’t complicated—it becomes complicated only when you panic.” With the right approach, even tough-looking issues become simple.
Let’s explore everything you need to know to repair your phone yourself safely and confidently.
Understanding the Type of Problem (Most Important Step)
Every repair begins with one essential question:
What kind of problem is your phone facing?
Before attempting any fix, identify the category of fault. Almost all mobile issues fall into three main types:
Settings Faults
Hardware Faults
Software Faults
Once you know the category, choosing the right troubleshooting step becomes easy.
1. Settings Faults: Simple Issues That Need Quick Fixes
Settings faults are minor problems caused by incorrect settings, accidental changes, or temporary glitches. They are the easiest to fix.
Examples include:
Unable to make or receive calls
Phone switching off while opening gallery
SMS inbox causing the phone to freeze
Screen rotation not working
WiFi or Bluetooth behaving strangely
Sound profile stuck on silent
In most cases, these issues are small and can be solved with basic steps.
Step 1: Restart Your Phone
This is the simplest and most effective method. Restarting clears temporary bugs and refreshes the system.
Most problems are fixed simply by restarting.
Step 2: Reset the Settings (Not Factory Reset)
If restart doesn’t work, try resetting settings without deleting your data.
Go to:
Settings → System → Reset → Reset All Settings
This restores default system behavior while keeping:
Photos
Apps
Contacts
Files
This is a safe option for beginners.
Step 3: Factory Reset (Use Only If Needed)
If the issue continues, perform a factory reset.
Settings → System → Reset → Factory Data Reset
This removes:
Installed apps
Customizations
Cached faults
Unwanted files
Your phone becomes fresh like when it was new.
Important: You must remember the security code or screen lock; otherwise, the phone will not allow the reset.
If a reset does not fix the issue, it may belong to hardware or software categories.
2. Hardware Faults: Problems Related to Physical Components
Hardware issues occur due to damage, wear and tear, loose connections, dust, moisture, or failing parts. These problems often require basic tools and careful handling.
This ensures you don’t damage internal flex cables or the plastic frame.
YouTube has detailed videos for almost every phone model.
Step 2: Clean Dust and Connections
Most hardware faults happen because:
Dirt blocks sensors
Speaker mesh gets clogged
Charging port filled with dust
Button flex loses contact
Connectors move slightly out of place
Use:
Soft brush
Isopropyl alcohol (IPA)
Microfiber cloth
Compressed air
Do not use water or liquid cleaners.
Common Hardware Fixes You Can Do Yourself
• Charging Issues
Reasons:
Dust inside charging port
Loose port
Damaged cable
Try:
Clean the charging port gently
Try a different charger
Check if the charger supports fast charging
If the port is physically broken, you may need replacement, which beginners should avoid attempting alone.
• Speaker or Microphone Not Working
Often caused by:
Dust
Blocked grills
Fix:
Clean the grills
Check sound settings
Test with earphones to confirm
If sound works on earphones but not on speaker, the speaker module may need replacement.
• Touchscreen Not Working
Try:
Clean the screen
Restart
Enter safe mode (to check if an app is causing it)
Remove any tempered glass that might be affecting touch
If still unresponsive, the touch panel may be damaged.
• Buttons Not Functioning
Side buttons fail due to:
Dust
Loose flex
Physical damage
Cleaning and reconnecting the flex often solves the issue.
• Camera Not Opening
Try:
Restart
Clear camera app cache
Check for loose connector
If the camera shows a black screen, the module may need replacement.
When to Stop DIY Hardware Repair
Some repairs are unsafe for beginners:
Replacing charging IC
Fixing motherboard shorts
Microsoldering
Replacing display IC
Heating motherboard components
If cleaning and reconnecting don’t solve the problem, take it to a trained technician.
3. Software Faults: Issues Caused by System or Apps
Software faults are extremely common today because smartphones depend heavily on apps and operating systems. These problems are easier to fix compared to hardware repairs.
Common software issues:
Phone hanging
Freezing during calls
Apps crashing
Automatic restart
Stuck at boot logo
Slow phone performance
Touch lag
System glitches
Overheating due to apps
Step-by-Step Software Repair Guide
Step 1: Restart
Simple but effective.
Step 2: Free Up Storage Space
Low storage is the #1 reason for lag.
Delete:
Large videos
Old WhatsApp media
Unused apps
Duplicate photos
Aim to keep at least 20–30% free storage.
Step 3: Clear Cache of Heavy Apps
Apps like YouTube, Instagram, Facebook, browser apps store large cache files.
Updates include bug fixes and performance improvements.
Step 5: Reset Settings
Restores stable system behavior. If its a feature phone, it will ask for security code. Enter default security code if the code has not been changed. Your problem should get solved. If you are not lucky, you will have to format (factory reset) or flash your handset.
Beginners should attempt only with proper guidance, otherwise consult a technician.
Bonus: Common Mistakes to Avoid During DIY Repair
Not backing up data
Using excessive heat on the phone
Applying force while opening
Using metal tools that cause short circuits
Mixing up screws
Touching motherboard circuits with fingers
Skipping battery disconnection
A careful, patient approach always gives better results.
When Should You Not Repair the Phone Yourself?
DIY repair is great—but not for everything.
Avoid DIY if:
The screen is cracked badly
Motherboard has water damage
Phone has no power at all
Components require soldering
Burning smell or smoke is present
Device repeatedly gets hot even when idle
In such cases, DIY attempts may worsen the damage.
If you wish to build a career in mobile phone repairing, selecting the right institute is the first step. This curated list of Mumbai’s best mobile repairing course institutes can help you start on the right path.
Real-Life Example: A Simple Problem Made Complicated
A user complained that their phone wasn’t charging. They assumed the motherboard was damaged and tried to open the device. In reality, the charging port was filled with lint from the pocket. Once cleaned carefully, the phone worked perfectly.
Lesson: Not every problem is serious. Sometimes, a simple cleaning saves time and money.
Final Tips for Safe DIY Phone Repair
Work slowly
Keep tools organized
Watch tutorials for your exact model
Always disconnect the battery first
Replace parts only when necessary
Maintain backups regularly
Don’t panic—phones are simpler than they appear
As one technician says, “You fix a phone with patience before tools.”
Conclusion
Repairing your phone yourself is completely possible. Most issues—whether settings, software, or hardware—can be fixed using simple steps that require no advanced skill. By understanding the type of problem, applying the right method, and following safety precautions, you can save money and avoid unnecessary service center visits.
However, know your limits. When repairs involve motherboard components, soldering, or severe hardware damage, it’s better to leave the job to professionals.
DIY phone repair is empowering, practical, and surprisingly easy once you understand the basics. Start small, follow the right steps, and your confidence and skill will grow naturally.
Your smartphone battery is the silent engine that keeps everything running. Without it, even the most advanced device becomes useless. A healthy battery means fewer interruptions, better performance, and a device that lasts longer before needing replacement. Yet most people unknowingly use habits that weaken battery health over time.
Understanding battery care is essential today because phones are thinner, more powerful, and often contain non-removable batteries. You cannot simply replace them easily. Learning to maintain battery health isn’t just cost-saving—it protects your device’s overall lifespan.
As one repair expert says, “A battery doesn’t die in a day. It dies a little every day—how you use it decides how fast.”
This guide explains everything you need to know about extending your battery’s life, using updated science, practical habits, and easy-to-apply tips.
Understanding Modern Smartphone Batteries
Most smartphones today use lithium-ion or lithium-polymer batteries. These batteries are powerful, lightweight, and support fast charging. However, they also have natural limitations.
Key facts you should know:
Every battery has a fixed lifespan, measured in cycles.
One cycle = using a total of 100% of battery capacity (not necessarily in one go).
Most phone batteries last 300–500 cycles before noticeable degradation.
Batteries age faster when exposed to heat, deep discharge, and constant full charging.
To increase battery life, your goal is simple:
Reduce battery stress and avoid behaviors that shorten its health.
This article teaches you exactly how to do that in the simplest, most practical way.
Does This Article Help the Battery Last Longer Per Charge?
No. This guide focuses on extending your battery’s lifespan, not increasing daily screen time. If you want tips to make each charge last longer, you would follow a separate guide.
Here, we focus on how to make your battery stay healthy for months and years—not die early.
Do’s and Don’ts to Extend Smartphone Battery Life
These habits are the foundation of long-term battery health. Follow them consistently and you will see measurable improvement in your battery’s lifespan.
1. Do Not Charge Your Battery Frequently
Many people plug in their phone multiple times a day, even when their battery is above 50% or 70%. While this seems harmless, it consumes charging cycles faster.
Every full recharge adds up. Frequent unnecessary charging means your phone completes more cycles sooner, reducing its lifespan.
Important Tip: Let the battery drop naturally before charging. Avoid plugging in every time it hits 60–70%.
2. Charge Only When Battery Falls to 5–10%
This tip from your original content remains relevant today, with slight modern refinement.
Lithium batteries do not like being:
Fully drained
Charged too frequently
Let your phone discharge to about 10–20%, then charge it.
Do NOT wait until it reaches 0% unless you are recalibrating your battery occasionally.
Regularly draining to 0% puts strain on the battery chemistry and shortens its lifespan.
3. Avoid Charging to 100% Every Time
This is an updated scientific recommendation.
Keeping a lithium battery at full charge for long periods increases chemical stress.
The ideal charge range is:
20% to 80% for maximum long-term health
Charging to 100% occasionally is fine—just avoid keeping it at 100% constantly, especially overnight.
Many modern phones now include:
Optimized charging
Adaptive charging
Slow overnight charging
Enable these settings to protect battery health.
4. Avoid Heat: The Number One Battery Killer
Heat destroys battery cells faster than anything else.
Your phone can heat up due to:
Gaming for long hours
Fast charging
Using the phone while charging
Keeping it under sunlight
Running heavy apps
Using poor-quality chargers
High ambient temperatures
When your phone is hot, stop charging immediately.
Important: Never leave your phone inside a parked car, under a pillow, or on top of a laptop exhaust.
5. Do Not Directly Plug Your Phone into a Car Charger
Your original content mentioned this point and it is still extremely useful today.
Car chargers deliver unstable voltage, especially when:
AC is turned on
Engine starts or stops
Vehicle power fluctuates
This fluctuation can damage:
Charging IC
Battery
Charge port
Motherboard
Instead, use:
A branded car charger with surge protection
A USB PD (Power Delivery) supported accessory
A converter where power is regulated
Cheap car chargers cause more damage than benefit.
6. Turn Off Unnecessary Services
Certain features constantly consume battery even when you’re not actively using them. They also increase heat, which directly weakens battery quality.
Turn off features like:
GPS
Bluetooth
WiFi
Hotspot
NFC
Auto-sync
Background data for non-essential apps
Constant notifications
You don’t need these services running 24/7.
Tip: Use quick settings to toggle them ON only when required.
7. Switch Off or Use Airplane Mode When Not in Use
Your original content mentioned this — and it’s still valid.
When you are:
Sleeping
Driving
In meetings
Working offline
In areas with weak network
Switching to Airplane Mode or simply turning the device off reduces battery stress and preserves long-term health.
Phones consume more power searching for networks in weak-signal areas. This accelerates wear.
8. Avoid Using the Phone While Charging
Using the phone during charging generates heat. The battery experiences two pressures:
Charging
Discharging due to usage
This damages the chemical structure of the battery.
A well-optimized system puts less stress on the battery.
12. Avoid Heavy Cases That Trap Heat
Thick or poor-quality cases prevent heat from escaping. Since heat is the enemy of battery health, choose:
Slim cases
Heat-dissipating materials
Cases with ventilation patterns
Remove the case while charging if your phone heats up frequently.
13. Reduce Screen Brightness and Use Auto-Brightness
High screen brightness increases heat and drains power. Auto-brightness reduces strain by adjusting light based on your environment.
Also consider:
Dark mode
Shorter screen timeout
Lower refresh rate if available (e.g., 60Hz instead of 120Hz)
These not only save power but also reduce wear on the battery.
14. Avoid Keeping Many Apps Running in Background
Apps running in the background consume:
CPU
RAM
Battery
Close unnecessary apps, especially:
Social media apps
Browser tabs
Maps
Streaming apps
Use your device’s battery usage menu to identify power-hungry apps.
15. Store Your Phone Properly When Not Using for Long Periods
If you will not use your phone for many days or weeks:
Charge it to around 50%
Switch it off
Store in a cool, dry place
Storing at 0% or 100% damages the battery permanently.
Real-Life Example: A Small Habit That Saved a Battery
A user was charging his phone three times a day, often using it while charging. The phone heated up, and within months, the battery health dropped drastically.
After switching to:
One full charge daily
Avoiding heat
Letting it drop to 15% before charging
Not using while charging
The battery health stabilized and stopped declining rapidly.
Small changes create big effects.
16. Use Battery Saver Mode When Needed
Battery saver reduces:
Background activity
Animations
Location scanning
Sync services
This reduces both daily battery usage and long-term chemical stress.
17. Understand That Fast Charging Has a Cost
Fast charging is convenient, but it generates heat. Heat drives battery aging.
Use fast charging when:
You need quick top-up
Use slow or normal charging when:
You’re at home
Overnight (with optimized charging enabled)
You are not in a hurry
Balance convenience with long-term battery health.
18. Monitor Battery Health Regularly
Some phones provide built-in battery health indicators. For others, use authorized service center diagnostics.
Monitoring helps you:
Detect abnormal decline
Identify heating patterns
Replace battery before damage spreads
Common Battery Charging Myths You Should Stop Believing
Many people follow old charging habits that no longer apply to modern lithium-ion batteries. These myths not only create confusion but can also reduce battery health over time. Understanding the truth helps you charge your phone smarter and keep the battery healthy for longer.
Here are the most common myths — and the facts behind them.
Myth 1: “You must charge your phone to 100% every time.”
Most users still believe a full charge is good for the battery. But lithium-ion batteries actually prefer staying between 20% and 80% during regular use.
The Truth:
Charging to 100% occasionally is fine, but doing it daily increases battery stress. Short, frequent top-ups are healthier than deep charging cycles.
Myth 2: “You should always let your battery drain to 0%.”
Older nickel batteries needed full discharge to maintain calibration. Modern smartphone batteries do not work this way.
The Truth:
Letting your battery reach 0% frequently reduces its lifespan. Only do a full drain if you need to recalibrate battery percentage — and even that is rarely required.
Myth 3: “Fast charging damages your battery immediately.”
Fast chargers generate more heat, which worries many users. But phones today are designed with advanced temperature management and charging controls.
The Truth:
Fast charging is safe on supported devices. The phone automatically slows down charging if heat increases. What harms the battery is excess heat, not the fast charging technology itself.
Myth 4: “Using your phone while charging is dangerous.”
Some people think using a phone while charging causes battery explosions or long-term damage.
The Truth:
Using the phone while charging is safe as long as you are using original or certified chargers. However, heavy gaming or video editing can increase heat, which may slow down charging or affect long-term battery health.
Myth 5: “Third-party chargers always damage the battery.”
Not all non-original chargers are bad. The real concern is low-quality, uncertified chargers.
The Truth:
A good-quality, certified charger works as safely as the original. Avoid cheap, unbranded chargers because they may lack voltage protection and overheat the battery.
Myth 6: “Closing all apps improves battery life dramatically.”
People often force-stop apps thinking it reduces battery usage.
The Truth:
Constantly closing and reopening apps uses more battery. Modern operating systems manage background apps efficiently. Only stop apps that are stuck or misbehaving.
Myth 7: “Charging overnight always ruins the battery.”
Phones stay plugged in for hours at night, and many users worry that the battery keeps ‘overcharging.’
The Truth:
Phones stop charging once they reach 100%. They do not continuously keep pushing current into the battery. Overnight charging is safe, but heat build-up under pillows, cases, or bedsheets can be harmful. Good ventilation is key.
Many apps promise to extend battery life by killing background processes.
The Truth:
Most battery-saving apps do little to improve performance and may even drain more power. Built-in battery optimization from your phone manufacturer is far more effective.
Myth 9: “Keeping Wi-Fi, Bluetooth, or GPS ON drains your battery heavily.”
This was true many years ago, but not today.
The Truth:
Modern phones use very little power for Wi-Fi and Bluetooth when idle. GPS drains battery only when an app actively uses location in the background.
Myth 10: “Higher mAh always means better battery life.”
Many users assume a big battery capacity automatically equals great performance.
The Truth:
Battery life depends on many factors — software optimization, processor efficiency, screen type, refresh rate, and user habits. A well-optimized phone with lower mAh can last longer than a poorly optimized one with a bigger battery.
Conclusion
Your smartphone battery is designed to last long, but only if you treat it right. By following simple, science-backed habits like avoiding heat, charging smarter, using quality accessories, and reducing unnecessary strain, you significantly extend your battery’s lifespan.
Battery care is not complicated. It’s about forming better habits. A healthy battery means a reliable phone, fewer repairs, and a better user experience every day.
Always remember: “Take care of your battery, and your phone will take care of you.”
Losing a phone is one of the most stressful experiences in today’s digital world. Your device holds your contacts, memories, banking apps, personal data, and everyday tools. Misplacing it — even for a few minutes — can create panic. But the good news is that most lost phones can be found if you take the right steps immediately.
“A lost phone is only lost when you stop trying to find it.”
This guide explains simple, practical, and effective methods to track, locate, and recover your missing mobile. Whether you misplaced it at home, left it at work, or fear it was stolen, you’ll learn exactly what to do — calmly, confidently, and step by step.
We’ll cover everything from calling your device to using advanced tracking systems like Google Find My Device and Apple’s Find My network, plus what to do if your phone has no internet or is switched off.
Why Losing a Phone Feels So Stressful
Your phone today is more than just a gadget. It is:
Your communication tool
Your camera
Your digital wallet
Your authentication device
Your navigation assistant
Your identity and security hub
Misplacing it feels like losing a part of your daily life. But most phones leave digital footprints that help you track them down — if you know how to use the right tools.
First Steps: Simple Methods to Recover a Missing Phone
Before using tracking apps or reporting theft, try these straightforward methods.
1. Call Your Phone
This is the fastest and simplest way to locate a misplaced mobile.
If it’s ringing, follow the sound.
If it’s vibrating, move slowly around the room to sense the vibration.
If someone finds it, they may answer and return it.
Important Tip: If your phone is on silent, many modern Android and iPhone tools allow you to force it to ring remotely. We will cover that later.
2. Retrace Your Steps
Think about where you last used your device. Then search:
Your desk
Couch or bed
Kitchen counter
Car seat or dashboard
Pockets or bags
Restaurant or shop where you visited recently
Often, the phone is hiding in obvious places.
3. Ask People Around You
Don’t feel embarrassed. Simply ask:
Family members
Friends
Colleagues
Neighbors
Sometimes someone picks it up for safekeeping and forgets to inform you.
4. Send a Text Message to Your Phone
If you suspect someone might find your lost phone, send a message like:
“This phone is lost. Please call me at [your number]. Reward if returned.”
Honest people often respond quickly.
5. Use a Secondary Device to Check Recent Locations
If you have another phone, tablet, or laptop connected to the same Google or Apple ID, you may be able to see your last location history even before launching a tracking tool.
Using Technology to Track Your Lost Phone
This is the most important part of the guide. Modern smartphones come with built-in tracking systems that work even if the device is silent, lost indoors, outdoors, or connected to a network.
We’ll start with Android, then move to iPhone.
🟢 How to Find a Lost Android Phone Using Google Find My Device
Google’s Find My Device is one of the most powerful tracking tools available. It can:
Show your phone’s location on a map
Force the phone to ring
Lock your phone remotely
Display a custom message
Erase your data
Show last known location
Track nearby devices using Google’s crowdsourced Find My Device network
To use this tool, your phone must have:
A Google account logged in
Location services ON
Internet or Bluetooth nearby device detection
Even if the phone is offline, the last known position will be shown.
Step-by-Step Guide: Track Your Android Phone
Step 1: Visit the Find My Device website
Go to: google.com/android/find (Or use the Find My Device app on another device.)
Step 2: Sign in to your Google account
Use the same Google ID linked to your missing phone.
Step 3: Select your device
Your phone’s approximate or exact location will appear on the map.
Step 4: Choose an action
1. Play Sound
Your phone rings at full volume for 5 minutes — even in silent mode.
2. Secure Device
You can lock the phone and display a message like: “Phone lost. Please call 98xxxxxxx.”
3. Erase Device
If stolen and unrecoverable, you can erase all data remotely. (Note: Once erased, you cannot track the device.)
Tracking an Offline Android Device
Google’s modern Find My Device network uses Bluetooth signals from nearby Android devices to help locate your lost phone — even if:
It has no internet
It’s switched off
The SIM card is removed
The moment a nearby device detects it, the location updates automatically.
Track a Lost Android Phone Through Google Maps Timeline
If Find My Device doesn’t show the phone, try this method.
Steps:
Open Google Maps on another device.
Tap your profile → Your Timeline.
Check location history for your last movements.
This is useful for tracking lost or stolen phones after the battery dies.
🔵 How to Find a Lost iPhone Using Apple Find My
Apple’s Find My network is extremely powerful and works through:
GPS
Wi-Fi
Bluetooth
Nearby Apple devices detecting your missing phone
It can track your phone even:
When it’s offline
When turned off
Without SIM
Without active internet
This network is connected to millions of Apple devices worldwide.
Step-by-Step Guide: Track Your iPhone
Step 1: Open iCloud.com/find
Or use the Find My app on another Apple device.
Step 2: Sign in with your Apple ID
Use the ID linked to your missing iPhone.
Step 3: Select your iPhone
Your device location appears on the map.
Actions You Can Take
1. Play Sound
Forces the iPhone to ring, even on silent.
2. Lost Mode
This locks your phone and shows a custom message such as: “Lost iPhone. Please contact me.”
It also disables Apple Pay for your safety.
3. Erase iPhone
Use only if you’re sure the device cannot be recovered.
🟣 Advanced Tracking Features for Apple Devices
Apple’s Find My network can:
✔ Track your phone even when switched off
Recent models send Bluetooth signals even in shut-down mode.
✔ Track via nearby devices
Any Apple device passing near your phone can anonymously update the location for you.
✔ Show location of AirPods, Apple Watch, and items attached to AirTag
Useful if they are connected to your phone.
If Your Phone Is Switched Off or Has No Signal
A turned-off phone is not the end. You can still:
See its last known location
Check location history
Get updates when it switches ON
Track via Bluetooth-based Find My networks (Android & Apple)
If stolen, do not confront the thief — let authorities handle it.
What to Do If Your Phone Is Stolen
If you believe the phone was taken:
1. Lock the device immediately
Use Find My Device or Find My iPhone.
2. Display a message on the lock screen
Offer a safe number for contact.
3. Track the movement
Do not approach dangerous locations.
4. Report to the police
Provide:
IMEI number
Last location
Purchase bill
IMEI allows authorities to request telecom assistance.
5. Inform your mobile operator
They can block the SIM to prevent misuse.
How to Get Your IMEI Number When the Phone Is Missing
Look in:
Your phone’s retail box
Purchase invoice
Email receipts
Google account device list
Apple ID device list
IMEI helps in filing police complaints.
Useful Tips to Prevent Losing Your Phone Again
Prevention is better than searching later. Here’s how to avoid future problems.
1. Enable Tracking Services Immediately
Turn ON Google Find My Device (Android)
Turn ON Apple Find My (iPhone)
Allow location access
Keep Bluetooth ON if using the Find My network
2. Use a Smart Tracker or Tag
Attach tags like:
Bluetooth trackers
AirTag (iPhone)
SmartTag
If your phone is attached to your bag, keys, or wallet, these tags can help track everything together.
3. Keep Your Phone in the Same Place Every Day
Create a habit:
A specific pocket
Bag compartment
Drawer
Desk area
Consistency reduces misplacements.
4. Use Lock Screen Information
Add your alternate number to the lock screen. This allows honest people to contact you instantly.
5. Avoid Keeping Your Phone on Silent All the Time
Silent mode makes finding the phone harder. Use vibration + ring, or enable “Find My” ring override.
What Not to Do When Your Phone Is Lost
Avoid these mistakes:
Do not panic
Do not try to track a thief alone
Do not erase the phone unless necessary
Do not delay contacting authorities
Do not share your tracking dashboard with strangers
Staying calm helps you think clearly.
Conclusion
Losing a phone can be frustrating, but modern smartphones are built with powerful recovery tools. Whether you use an Android or an iPhone, you can track your device, force it to ring, secure it remotely, or even erase your data if needed.
With the right steps, your chances of recovering your phone increase dramatically.
“It’s not about how fast you react — it’s about knowing the right steps to take.”
Most importantly, enable tracking features before something goes wrong. A few minutes of setup today can save hours of stress later.
Your iPhone is more powerful than you think. Apart from capturing photos, browsing the web, or staying connected, it can also work as a portable storage drive — a secure, convenient way to carry your important files without needing an external hard disk or USB drive.
Today’s iPhones offer fast processors, generous storage options, advanced file management, and built-in tools that make them perfect for storing documents, videos, music, work files, and more.
“Your iPhone is a tool — and it becomes even more useful when you learn how to use it like one.”
This guide explains every modern way to use an iPhone as a portable drive, including USB transfers, the Files app, Wi-Fi sharing, AirDrop, external drive support, and third-party apps. Everything is written in simple language with practical steps.
Why Use Your iPhone as a Portable Drive?
Here are the biggest advantages:
You don’t need to carry an extra USB drive
Your data stays with you at all times
Files remain secure inside Apple’s ecosystem
Sharing files becomes extremely easy
You can organize everything using the Files app
Most tasks can be done wirelessly
And unlike traditional storage devices, your iPhone offers encryption, password protection, and cloud backup as added safety layers.
Method 1: Using USB Cable to Access iPhone Storage on Windows & Mac
This is the simplest and fastest way to use your iPhone as a portable storage device. Modern systems no longer require iTunes for basic file transfer.
Using Your iPhone as Storage on Windows (File Explorer)
Step-by-step guide:
Connect your iPhone to the PC using a USB-to-Lightning or USB-C cable.
Unlock your iPhone.
Tap “Allow” when your phone asks to trust the computer.
Open File Explorer on Windows.
You will see Apple iPhone listed under Devices.
Open it and access DCIM (Photos & Videos).
You can now copy media files between the phone and PC.
Important Note:
Windows allows full access only to the Media folder (DCIM) because of iOS sandboxing. But you can still use third-party apps to create custom folders — explained later.
Using USB Transfer on Mac (Finder Integration)
Mac users have an even easier method:
Connect the iPhone via USB.
Open Finder (replaces iTunes for file management).
Select your iPhone from the sidebar.
Navigate to Files section.
Drag & drop files into apps like:
Files
VLC
Documents by Readdle
Adobe Acrobat
Any file-handling app
You can create folders, import documents, export files, and manage everything smoothly.
Method 2: Using the Files App — The Heart of iPhone Storage
The Files app is what truly allows your iPhone to act as a portable storage drive.
Think of it as the iPhone’s internal hard drive, where you can:
Create folders
Store documents
Save downloads
Import files from PC
Manage offline media
View PDFs, videos, audio, and images
Organize files just like on a computer
How to Store Files Locally (Offline Storage)
Open the Files app.
Tap Browse → On My iPhone.
Create your folders.
Add files using:
Share → “Save to Files”
Drag & drop (on iPad or Mac)
Downloads from Safari
USB transfer
Third-party apps
Everything you store in On My iPhone stays offline, just like a portable hard drive.
Using Third-Party Apps to Expand Storage Ability
Apps like:
Documents by Readdle
VLC Media Player
Adobe Acrobat
FE File Explorer
FileBrowser Pro
They allow:
Custom folders
Wireless transfers
FTP/SFTP connection
Private encrypted folders
ZIP/RAR extraction
This greatly expands what your iPhone can do as a storage device.
Method 3: Using AirDrop for Quick Wireless File Transfer
AirDrop is one of the fastest and most secure wireless transfer methods in the world.
It allows instant sharing between:
iPhone → Mac
iPhone → iPhone
iPhone → iPad
No cables, no apps, no internet required.
How to Use AirDrop (iPhone to Mac or iPhone to iPhone)
Turn ON Bluetooth and Wi-Fi on both devices.
Open Control Center → long-press the connectivity box.
Tap AirDrop → choose Everyone or Contacts Only.
Select the file → tap Share → AirDrop.
Choose the receiving device.
Files transfer instantly and appear in the correct location automatically.
Method 4: Using Wi-Fi Transfer Tools (Browser & Network Sharing)
Many apps offer local Wi-Fi sharing without cables.
You can also combine cloud storage with offline iPhone storage.
Supported services:
iCloud Drive
Google Drive
Dropbox
OneDrive
Mega
pCloud
Benefits:
Keeps files synced across devices
Lets you download files for offline use
Reduces physical storage usage
Not a replacement for a physical hard drive, but extremely convenient.
Limitations of Using iPhone as a Storage Drive
To remain honest, here are real-world restrictions:
iPhone doesn’t expose full root storage like Android or USB disks.
Apps operate in sandboxed folders, meaning each app has its own storage.
Windows access is limited mostly to media folders unless you use apps.
Large file transfers may require modern cables (USB-C is much faster).
DRM-protected media cannot be moved freely.
But with external drives, advanced apps, and the Files app, you can still use your iPhone almost exactly like a portable hard drive.
Best Practices for Using iPhone as Portable Storage
Create organized folders in the Files app.
Use USB-C cables where possible for faster transfer speeds.
Back up important files to cloud to avoid accidental loss.
Use password protection for sensitive data.
Clean up old downloads regularly to save space.
Use external drives for large video files.
“Storage is only useful when it’s organized and secure.”
Who Benefits Most from Using iPhone as a Portable Drive?
This method is useful for:
Students carrying notes and PDF books
Travelers storing passport scans, tickets, and offline maps
Business users keeping presentations and work files
Video creators managing clips and drafts
Teachers with class materials
Anyone who prefers not to carry extra gadgets
Your iPhone becomes a safe, reliable digital companion.
Conclusion
Using an iPhone as a portable storage drive is easier today than ever before. With the Files app, USB connectivity, Wi-Fi transfer, AirDrop, and external drive support, your phone becomes a powerful, flexible storage tool that fits in your pocket.
Whether you need to carry documents for work, store offline videos, manage project files, or back up important data, your iPhone can do it all with minimal effort.
Once you learn these methods, you’ll never feel the need to carry a separate hard drive again.