Category: Mobile Phone Repair

  • Soft Reset vs Hard Reset in Phones: What’s the Difference?

    Soft Reset vs Hard Reset in Phones: What’s the Difference?

    Modern smartphones have become powerful digital tools. A single device now handles communication, banking, navigation, entertainment, and work. With so many functions running together, it is normal for a mobile phone to sometimes slow down, freeze, or behave strangely.

    Most phone problems are not serious. Knowing the right fix at the right time makes all the difference.

    Many common phone issues can be solved without visiting a service center. Two simple solutions often help—soft reset and hard reset. These methods look similar on the surface but work very differently.

    This guide explains the real difference between soft reset and hard reset, when to use each one, what happens to your data, and what to do if problems continue even after resetting.


    Why Phones Start Misbehaving

    Smartphones run complex software. Over time, temporary files, background apps, system bugs, or failed updates can cause issues. Some phones start turning off by itself, others keep restarting, and some become slow even with a full battery.

    Common symptoms include:

    • Phone freezing or becoming unresponsive
    • Apps opening slowly or crashing
    • Screen not responding to touch
    • Phone switching off again and again
    • Device shutting down with full battery
    • Phone stuck on logo during startup
    • Random restarting without warning

    Most of these problems are software-related. That is where reset options help.


    What Is a Soft Reset? (Simple Restart Explained)

    A soft reset means restarting your smartphone normally or force-restarting it if the screen does not respond.

    It is the first and safest step to try when a phone behaves oddly.

    What a Soft Reset Does

    • Refreshes the system memory
    • Clears temporary background processes
    • Stops stuck apps and services
    • Reloads the operating system cleanly

    What a Soft Reset Does NOT Do

    • Does not delete data
    • Does not remove apps
    • Does not erase settings
    • Does not affect photos or contacts

    In simple words, a soft reset is like giving your phone a short break.


    When Should You Use a Soft Reset?

    A soft restart works best for minor problems, such as:

    • Phone is slow
    • Apps not opening properly
    • Screen not responding
    • Temporary network issues
    • Phone heating slightly
    • Phone restarting occasionally
    • Device behaving unusually after long usage

    Many technicians try a soft reset before doing anything else because it fixes a large number of issues instantly.


    How to Perform a Soft Reset (Android & iPhone)

    For Android Phones

    • Press and hold the Power button
    • Tap Restart, or
    • Hold Power for 10–20 seconds until the phone restarts

    For iPhones

    • For Face ID models: Press Volume Up + Power, then slide to power off
    • For Home button models: Hold Power, then slide to power off
    • Turn the phone back on after a few seconds

    This method is safe and can be repeated anytime.


    What Is a Hard Reset? (Factory Reset Explained)

    A hard reset, also known as a factory reset, erases all user data from the phone and restores it to its original condition.

    It is a last-resort solution when other troubleshooting steps fail.

    A hard reset does not repair hardware. It only gives the software a fresh start.


    What a Hard Reset Deletes

    A factory reset removes:

    • Google or Apple account data
    • Installed apps and app data
    • Contacts and call logs
    • Messages and chat history
    • Photos, videos, and downloads
    • System settings and preferences

    What It Does Not Remove

    • Operating system itself
    • Manufacturer firmware
    • Data on external memory card (in most cases)

    When Should You Use a Hard Reset?

    A hard reset is useful when:

    • Phone is switching off on its own
    • Phone is restarting repeatedly
    • Device stuck on boot logo
    • Severe lag even after restart
    • Malware or suspicious apps detected
    • Phone settings badly corrupted
    • Preparing the phone for resale

    It is also recommended if the phone keeps turning off automatically with full battery and software checks show no error.


    Important Checks Before Hard Reset

    Before performing a factory reset, always ensure:

    • Backup is taken (cloud or computer)
    • Battery level is above 50%
    • You remember your Google or Apple ID
    • SIM and memory card are removed (optional)

    Failing to back up data can cause permanent data loss.


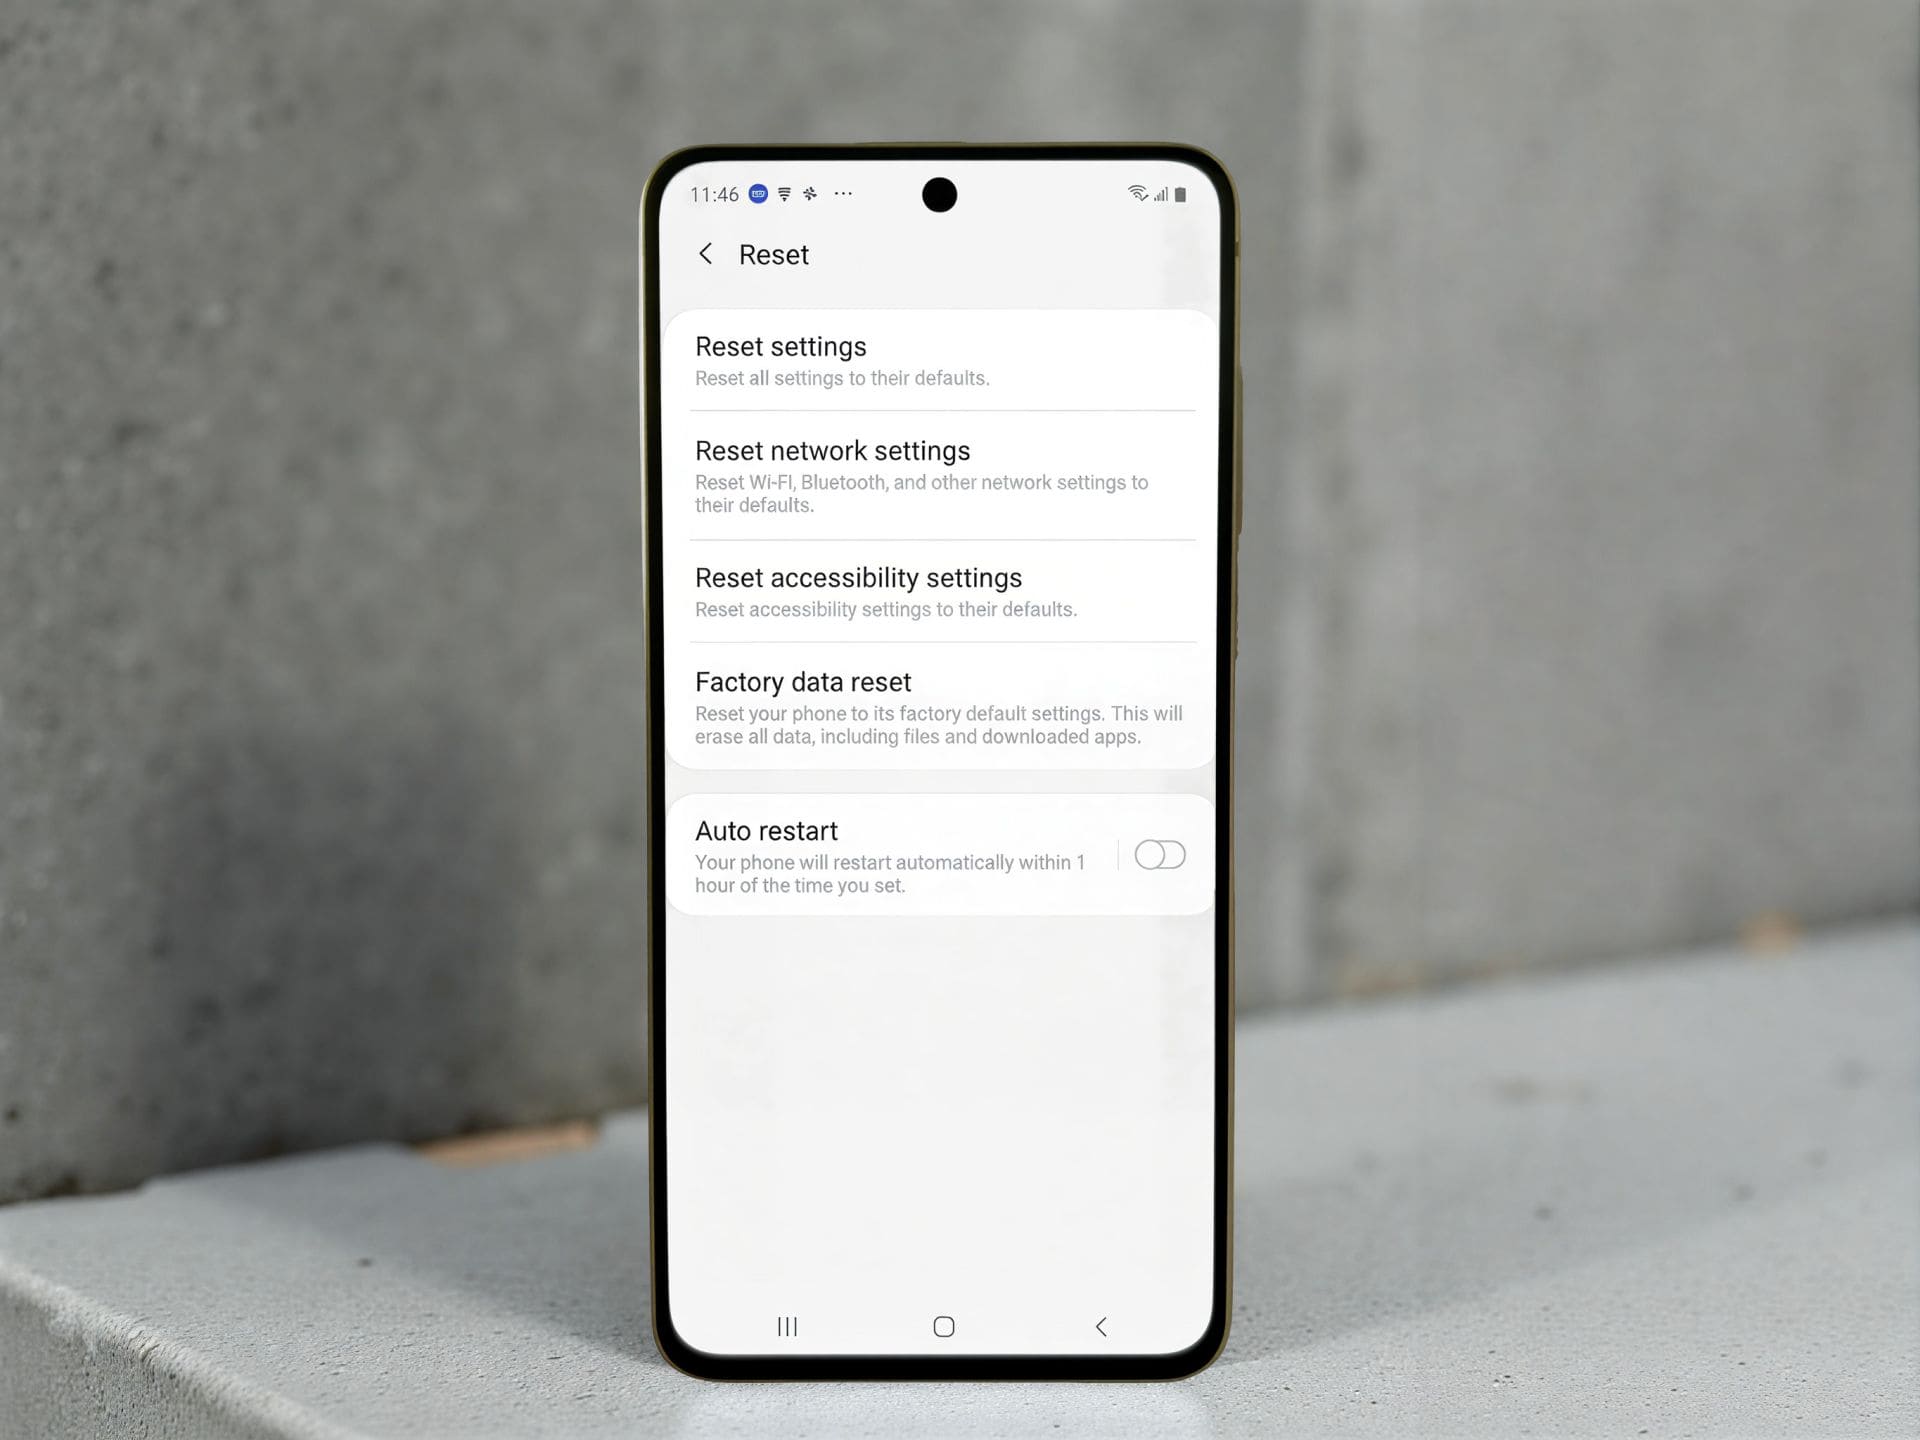
    How to Perform a Hard Reset

    From Phone Settings

    1. Open Settings
    2. Go to System / General Management
    3. Tap Reset
    4. Select Factory data reset
    5. Confirm and wait

    Using Hardware Buttons

    Used when the phone does not turn on properly.

    Steps vary by model, but usually involve:

    • Power + Volume buttons
    • Selecting reset option using volume keys

    Soft Reset vs Hard Reset: Quick Comparison

    FeatureSoft ResetHard Reset
    Deletes data❌ No✅ Yes
    Fixes minor bugs✅ Yes✅ Yes
    Fixes major software issues❌ Sometimes✅ Often
    Safe to repeat✅ Yes❌ Limited
    Time requiredFew secondsSeveral minutes

    What If Reset Does Not Fix the Problem?

    Sometimes, even after a hard reset, the phone may still:

    • Keep shutting down
    • Restart automatically
    • Not boot properly

    In such cases, the issue could be:

    • Battery health problem
    • Power IC fault
    • Software corruption requiring firmware reinstall
    • Hardware damage

    At this stage, professional diagnosis is recommended.


    Common Myths About Phone Resets

    Myth: Reset repairs hardware
    Truth: Resets only fix software issues

    Myth: Reset improves battery health
    Truth: Battery performance depends on physical condition

    Myth: Hard reset removes system updates
    Truth: Updates remain installed


    Expert Tips for Safe Phone Usage

    • Restart your phone once every few days
    • Avoid installing unknown apps
    • Keep system updates enabled
    • Do not ignore repeated shutdown issues
    • Backup data regularly

    Most phone failuressues grow worse when ignored. Early action saves time and money.


    Soft Reset or Hard Reset: Which One Should You Try First?

    Always follow this order:

    1. Soft reset
    2. Check updates and apps
    3. Hard reset (only if needed)

    Jumping directly to factory reset is unnecessary in most cases.


    Final Thoughts

    Understanding the difference between a soft reset and a hard reset helps you make the right decision at the right time. A simple restart can solve many issues, while a factory reset should be used carefully and only when needed.

    If your smartphone is turning off by itself, restarting again and again, or shutting down with full battery, resetting may help—but only if the issue is software-related.

    When in doubt, start small. Let your phone tell you what it needs.

  • All Types of Mobile Phone Locks Explained (Screen, SIM & More)

    All Types of Mobile Phone Locks Explained (Screen, SIM & More)

    Mobile phones are no longer just calling devices. They store personal photos, private chats, banking apps, work files, and sensitive data. Because of this, mobile phone locks play a critical role in protecting both the device and the data inside it.

    Many users only know about screen locks like PIN or fingerprint. But in reality, there are multiple types of locks in smartphones, each designed for a specific purpose. Some protect privacy. Some protect network contracts. Others prevent theft or misuse after a factory reset.

    “A phone lock is not just about privacy. It’s about control, ownership, and security.”

    In this guide, we will clearly explain all types of mobile phone locks, how they work, when they appear, and what users should know before trying to remove or change them.


    What Is a Mobile Phone Lock?

    A mobile phone lock is a security mechanism that restricts access to a device, its features, or its network usage. The lock may activate:

    • When the screen turns on
    • When a SIM card is inserted
    • After a factory reset
    • When EMI payments are pending
    • When the phone connects to a network

    Each lock serves a different purpose, and confusing one lock for another often leads to panic or data loss.


    Why Do Smartphones Have So Many Types of Locks?

    Modern smartphones combine software security, hardware protection, and financial safeguards. Phone manufacturers, network providers, and finance companies all add their own layers of protection.

    These locks help to:

    • Prevent unauthorized access
    • Protect stolen devices
    • Enforce carrier or finance agreements
    • Secure personal and business data

    1. PIN Code Lock

    A PIN code lock is one of the oldest and most common screen security methods used in mobile phones.

    How It Works

    • User sets a numeric code
    • The phone asks for the code when the screen wakes up
    • Usually 4 to 6 digits long

    Where It Is Used

    • Feature phones
    • Android smartphones
    • iPhones

    Pros

    • Easy to remember
    • Works offline
    • Quick to unlock

    Cons

    • Can be guessed if too simple
    • Less secure than long passwords

    Tip: Avoid using common combinations like 1234 or birth years.


    2. Password Lock

    A password lock uses letters, numbers, and symbols to secure the phone.

    How It Works

    • User creates an alphanumeric password
    • Required every time the screen unlocks or device restarts

    Where It Is Used

    • Smartphones with higher security needs
    • Business or enterprise devices

    Pros

    • Very strong security
    • Hard to brute-force

    Cons

    • Slower to unlock
    • Easy to forget

    This lock is best for users who store sensitive or professional data.

    locks of cell phones

    3. Pattern Lock

    Pattern lock is popular among Android users due to its visual simplicity.

    How It Works

    • User draws a pattern connecting dots on the screen
    • Pattern must match exactly to unlock

    Pros

    • Fast to use
    • Easy for touch navigation

    Cons

    • Pattern marks can be visible
    • Less secure if simple patterns are used

    Technician insight: Many forgotten pattern locks require data reset unless backup credentials exist.


    4. Biometric Locks (Fingerprint & Face Unlock)

    Biometric locks use physical traits instead of memorized codes.

    Common Types

    • Fingerprint sensor
    • Face recognition

    How It Works

    • Phone scans fingerprint or face
    • Matches it with stored biometric data

    Pros

    • Very fast
    • Convenient
    • Hard to duplicate

    Cons

    • Requires fallback PIN or password
    • May fail in low light or with wet fingers

    Biometrics add comfort but do not replace traditional locks completely.


    5. Smart Lock (Android Feature)

    Smart Lock is an Android-only feature that keeps the phone unlocked in trusted conditions.

    How It Works

    The phone stays unlocked when:

    • Connected to a trusted Bluetooth device
    • Located at a trusted place
    • Carried by the owner

    Pros

    • Reduces repeated unlocking
    • Improves daily usability

    Cons

    • Less secure in public places
    • Depends on sensors and location accuracy

    Smart Lock should be used carefully, not as a primary security method.


    6. SIM Lock

    A SIM lock restricts the phone to specific SIM cards.

    How It Works

    • Phone accepts only approved SIM cards
    • Other SIMs show “SIM not supported” message

    Who Applies It

    • Network providers
    • Carriers

    Why It Exists

    • To enforce network contracts
    • To prevent misuse of subsidized phones

    Important Note

    SIM lock is different from screen lock and does not protect data.


    7. Network Lock

    Network lock is similar to SIM lock but applies at a carrier level.

    How It Works

    • Phone only works on approved network bands or providers
    • Common in contract-based phones

    Seen In

    • Imported smartphones
    • Carrier-bound devices

    Removing a network lock usually requires carrier authorization.


    8. Finance Lock (EMI Lock)

    Finance lock is increasingly common in phones purchased on EMI or loan plans.

    How It Works

    • Device locks automatically if payments are missed
    • Screen may show payment reminder
    • Some features become inaccessible

    Why It Exists

    • To protect lenders from default
    • To enforce payment discipline

    Key Point

    Finance locks are legal and server-controlled. Bypassing them without clearance is not advised.


    9. Factory Reset Protection (FRP Lock)

    FRP lock is one of the most misunderstood phone locks.

    How It Works

    • Activates after factory reset
    • Requires original Google account login

    Why It Exists

    • Prevents stolen phone reuse
    • Protects user identity

    Common Scenario

    User resets phone but forgets Google credentials.

    FRP lock turns a stolen phone into a useless device.


    Difference Between Screen Locks and System Locks

    TypePurpose
    Screen LocksProtect daily access
    SIM / Network LocksControl carrier usage
    Finance LocksEnforce EMI payments
    FRP LockPrevent theft after reset

    Understanding this difference helps users avoid unnecessary panic.


    Common Myths About Mobile Phone Locks

    • Resetting removes all locks
    • SIM lock protects data
    • Finance lock is same as FRP
    • Biometrics work without PIN

    Locks serve specific roles and cannot replace one another.


    When Should You Contact a Professional?

    Seek expert help when:

    • FRP lock credentials are lost
    • Finance lock appears unexpectedly
    • Network lock prevents SIM usage
    • Data is critical

    Attempting random fixes may cause permanent data loss.


    Best Practices for Managing Phone Locks

    • Always remember backup credentials
    • Keep Google or Apple account details safe
    • Avoid unknown unlocking tools
    • Understand your phone’s purchase terms

    FAQs – Mobile Phone Locks (Quick Guide)

    What is the most common phone lock?

    Screen lock like PIN, pattern, fingerprint, or face unlock.


    Is SIM lock same as network lock?

    No. SIM lock limits SIM cards. Network lock limits carriers.


    Does factory reset remove all locks?

    No. It removes screen lock only. FRP and finance locks remain.


    Why does FRP lock appear?

    To stop misuse. It asks for the previous Google account after reset.


    What if I forget my screen lock?

    You may need to reset the phone. Data can be lost and FRP may appear.


    Is finance lock legal?

    Yes. It activates when EMI payments are missed.


    Does fingerprint work without PIN?

    No. A PIN or password is always required as backup.


    Is Smart Lock safe?

    It’s convenient but not fully secure alone.


    Can technicians remove FRP?

    Only with valid ownership proof.


    How to know which lock is active?

    Check the screen message:

    • PIN → Screen lock
    • Google ID → FRP
    • No network → SIM/Network lock

    Does SIM lock affect Wi-Fi?

    No. Only mobile network is restricted.


    Are Android and iPhone locks different?

    Yes. Android uses FRP, iPhone uses Apple ID Activation Lock.


    Final Thoughts

    Mobile phone locks are not meant to frustrate users. They exist to protect ownership, data, and agreements. Once users understand which lock they are dealing with, solutions become much clearer.

    “A secure phone is not about more locks. It’s about the right lock at the right time.”

    By knowing the difference between screen locks, SIM restrictions, finance locks, and system protections, users can make smarter decisions and avoid costly mistakes.

  • How to Backup and Restore an Android Phone Step by Step

    How to Backup and Restore an Android Phone Step by Step

    A Standard Operating Guide for Safe Data Handling

    “A careful approach to data comes before any technical work.”

    Android phones today carry critical personal and professional information. Contacts, photos, videos, documents, app data, and account credentials are deeply integrated into the device. Any reset, software operation, or system failure can result in permanent data loss if precautions are not taken.

    That is why learning how to properly back up and restore an Android device is not optional anymore. It is a basic digital habit every user should follow, whether you use a budget Android phone or a premium smartphone.

    Learn how to backup and restore an Android phone step by step. Protect contacts, photos, apps, and data with safe, simple, and reliable methods.


    “Your phone can be replaced. Your data often can’t.”

    This guide outlines a structured and reliable process for backing up and restoring Android devices. It explains everything you need to know, in simple language, without technical confusion.


    Purpose of These Instructions

    • Prevent accidental data loss
    • Avoid account lock issues
    • Ensure smooth device setup after reset
    • Maintain clarity and consistency in data handling

    This guide focuses on correct sequence and verification, not shortcuts.


    Step 1: Initial Device Assessment

    Before any reset, update, or troubleshooting:

    Confirm:

    • A Google account is signed in
    • Backup options are accessible
    • Internet connection is available
    • Battery level is sufficient

    If any of these are missing, do not proceed.


    Step 2: Check Backup Status

    Never assume backup is active.

    How to Verify Backup

    1. Open Settings
    2. Go to Google
    3. Tap Backup
    4. Confirm:
      • Backup is ON
      • Recent backup date is visible

    If the backup date is old or missing, data is not protected.


    Step 3: Understand What the Backup Includes

    Android system backup usually covers:

    • Contacts synced to Google
    • Call history
    • Installed apps list
    • Supported app data
    • Device preferences

    Photos, videos, and chat apps require separate attention.

    android phone backup and restore

    Step 4: Perform a Manual Backup

    Even if automatic backup is enabled, run it manually.

    Manual Backup Steps

    1. Go to Settings → Google → Backup
    2. Tap Back up now
    3. Wait for completion

    Use Wi-Fi and avoid interruptions.


    Step 5: Secure Photos and Videos

    Media files are often the most sensitive data.

    Using Google Photos

    1. Open Google Photos
    2. Tap profile icon
    3. Go to Photos settings
    4. Enable Backup
    5. Wait until sync completes

    Scroll through older images to confirm upload.


    Step 6: Backup Messaging Apps Separately

    Messaging apps do not always rely on system backup.

    Example: WhatsApp

    1. Open WhatsApp
    2. Go to Settings → Chats → Chat backup
    3. Select Google account
    4. Tap Back up

    Important notes:

    • Same Google account required for restore
    • Same phone number required

    “A backup made today prevents panic tomorrow.”


    Step 7: Manual File Backup (Offline Option)

    When cloud backup is slow or unavailable:

    Manual Backup Process

    1. Connect phone to computer via USB
    2. Select File Transfer
    3. Copy folders:
      • DCIM
      • Pictures
      • Videos
      • Documents
      • Downloads
    4. Store them in a clearly labeled folder

    This method adds an extra safety layer.


    Step 8: Pre-Reset / Pre-Operation Checklist

    Before performing any reset or software change:

    ✔ Google backup completed
    ✔ Photos synced
    ✔ Messaging app backup done
    ✔ Contacts synced
    ✔ Important files copied

    Skipping this checklist leads to most data-loss problems.


    “Data safety is a process, not a feature.”


    Step 9: Restoring Data After Reset

    Restore begins during the initial setup of the device.

    When Restore Option Appears

    • After factory reset
    • After system reinstall
    • On first startup of a new device

    Step 10: Restore Using Google Account

    Restore Procedure

    1. Power on the device
    2. Choose language
    3. Connect to Wi-Fi
    4. Sign in with the same Google account
    5. Select Restore from backup
    6. Choose the latest available backup

    Apps and settings restore in the background.


    Step 11: What Restores Automatically

    Usually Restored

    • Contacts
    • Call logs
    • Installed apps
    • System settings

    Not Always Restored

    • Local files not synced
    • Some app data
    • Messaging app chats (unless separately backed up)

    This behavior is normal.


    Step 12: Restoring Photos and Files

    • Google Photos restores media automatically once signed in
    • Manual files must be copied back to original folders

    Ensure folder names remain unchanged.


    Step 13: FRP Lock Awareness

    After reset, the device may ask for:

    • Previously used Google account
    • Correct account password

    This is Factory Reset Protection and is a security feature.

    Without correct credentials, setup cannot continue.


    Step 14: Common Problems and Their Causes

    Backup Not Showing

    • Wrong Google account used
    • Backup never completed
    • Backup deleted or overwritten

    Restore Freezing or Slow

    • Weak internet connection
    • Background app downloads
    • Interrupted setup

    Patience and stable Wi-Fi solve most cases.


    Step 15: Best Practices for Safe Data Handling

    • Enable automatic backups
    • Verify backup regularly
    • Use both cloud and offline methods
    • Backup before updates or reset
    • Secure Google account credentials

    These habits eliminate most risks.


    Data Safety and Security Notes

    • Google backups are encrypted
    • Access requires account login
    • Two-step verification adds protection

    Avoid unknown third-party backup tools.


    Common Misunderstandings to Avoid

    • ❌ “Data stays after reset”
    • ❌ “Photos are always safe”
    • ❌ “Backup happens automatically”
    • ❌ “Backup is complicated”

    Backup is simple when done correctly.

    Official Android Apps That Help Restore Data Across Brands

    Many smartphone brands offer official data transfer and restore apps. These apps are designed to move data from any Android phone, not just the same brand. They are safe, trusted, and supported by the manufacturer.

    Below are the most reliable options.


    Samsung Smart Switch

    Brand: Samsung
    What it does:
    Helps transfer contacts, photos, videos, messages, call logs, apps, and settings from any Android phone or even iPhone to a Samsung device.

    Works with:
    Android, iPhone, Windows, macOS

    Play Store link:
    https://play.google.com/store/apps/details?id=com.sec.android.easyMover


    Mi Mover

    Brand: Xiaomi (Mi, Redmi, Poco)
    What it does:
    Allows fast wireless transfer of data from other Android phones to Xiaomi devices without internet. Supports photos, videos, contacts, apps, and files.

    Works with:
    Android phones of all brands

    Play Store link:
    https://play.google.com/store/apps/details?id=com.miui.huanji


    Clone Phone

    Brand: OPPO
    What it does:
    Transfers data like contacts, photos, videos, apps, and system data from any Android phone to OPPO devices using a direct Wi-Fi connection.

    Works with:
    Android phones (cross-brand)

    Play Store link:
    https://play.google.com/store/apps/details?id=com.coloros.backuprestore


    Easy Share

    Brand: Vivo
    What it does:
    Helps move data such as contacts, messages, media, apps, and documents from any Android phone to Vivo devices quickly and securely.

    Works with:
    Android phones of all brands

    Play Store link:
    https://play.google.com/store/apps/details?id=com.vivo.easyshare


    Phone Clone

    Brand: Huawei
    What it does:
    Copies contacts, photos, videos, messages, apps, and system data from Android or iPhone to Huawei phones without using mobile data.

    Works with:
    Android and iOS devices

    Play Store link:
    https://play.google.com/store/apps/details?id=com.hicloud.android.clone


    OnePlus Clone Phone

    Brand: OnePlus
    What it does:
    Transfers data from any Android phone to OnePlus devices, including media, contacts, call logs, and apps.

    Works with:
    Android phones (all brands)

    Play Store link:
    https://play.google.com/store/apps/details?id=com.oneplus.backuprestore

    Realme Clone Phone

    Brand: Realme
    What it does:
    Transfers contacts, photos, videos, apps, messages, and files from any Android phone to a Realme device. Uses a direct wireless connection, no internet needed.

    Works with:
    Android phones of all brands

    Play Store link:
    https://play.google.com/store/apps/details?id=com.coloros.backuprestore

    (Note: Realme uses the same core app framework as OPPO for data transfer.)


    Motorola Migrate / Motorola Data Restore

    Brand: Motorola
    What it does:
    Motorola phones now rely mainly on Google’s built-in restore system, but older and some current models support Motorola’s own data restore tools during setup. These allow restoring contacts, apps, call logs, and media from another Android device.

    Works with:
    Android phones (via Google backup or cable-based transfer)

    Play Store link (Motorola Data Restore):
    https://play.google.com/store/apps/details?id=com.motorola.migrate


    Important Notes About These Apps

    • These are official apps, not third-party tools
    • Most apps work across brands, not limited to the same manufacturer
    • Internet is usually not required
    • Both phones should be charged and close to each other
    • Data transfer speed depends on file size and device condition

    Always install these apps only from the Google Play Store.

    Backup Tips for Technicians and Repair Shops

    • Always inform customers about data loss
    • Ask if backup exists before repair
    • Avoid responsibility disputes
    • Encourage customers to sign backup consent

    This builds trust and professionalism.


    Final Summary

    Handling Android phones responsibly means prioritizing data before any technical action. Backup and restore are not advanced tasks. They are essential steps that prevent irreversible loss.

    Following a structured process ensures:

    • Smooth device transitions
    • Fewer account issues
    • No unexpected data loss

    A few minutes of preparation saves hours of recovery.

  • How to Check a Mobile Phone Ear Speaker (Receiver)

    How to Check a Mobile Phone Ear Speaker (Receiver)

    IWhen a customer says, “I can hear on loudspeaker but not during calls,” the problem often points to the ear speaker, also known as the receiver.
    This is one of the most common audio complaints in smartphones, Android devices, and iPhones.

    Fixing it is not about guessing.
    It is about systematic checking.

    “Good repair work is not about speed. It’s about knowing exactly where to look.”

    This guide explains how to check a mobile phone ear speaker step by step, using practical methods that technicians rely on daily.
    Whether you work on Android phones, iPhones, or feature phones, the logic remains the same.


    What Is an Ear Speaker (Receiver) in a Mobile Phone?

    The ear speaker is the small internal speaker placed near the top of a phone.
    It allows users to hear the caller’s voice during normal calls, without enabling loudspeaker mode.

    Other Common Names Used by Technicians

    • Receiver
    • Call speaker
    • Top speaker
    • In-call speaker
    • Voice speaker

    Do not confuse it with:

    • Loudspeaker (bottom speaker)
    • Ringtone speaker
    • Media speaker

    Each one has a different circuit path.

    A sample ear speaker

    Common Symptoms of a Faulty Ear Speaker

    Before opening a device, always understand the complaint clearly. If you do not hear phone speaker sounds during calls and just hear music and multimedia sound, then it means your phone receiver (ear speaker) is not working.

    Typical Problems Reported

    • No sound during calls
    • Very low voice while calling
    • Sound works only on loudspeaker
    • Distorted or crackling voice
    • Intermittent sound when pressing the top area
    • Sound disappears after water exposure
    • Works with headphones but not directly

    If the loudspeaker works but the ear speaker does not, the issue is localized, not system-wide.


    Tools Required to Check an Ear Speaker

    A technician does not need advanced equipment for initial diagnosis.

    Basic Tools

    • Known-good SIM card
    • Working earphones
    • Soft brush
    • Isopropyl alcohol (IPA)
    • Screwdrivers
    • Multimeter (continuity and resistance mode)

    Optional Advanced Tools

    • DC power supply
    • Service box or diagnostic app
    • Schematic or block diagram (if available)

    Here is a list of essential and basic cell phone repair tools all beginner technicians shoul have.


    Step 1: Basic Call Test (Most Important First Step)

    Always begin with non-invasive testing.

    How to Perform

    1. Insert a working SIM card.
    2. Make a normal voice call.
    3. Do not enable loudspeaker.
    4. Increase call volume using volume keys.
    5. Place the phone close to your ear.

    What to Observe

    • Clear sound → Ear speaker is fine
    • Low sound → Mesh blockage or weak receiver
    • No sound → Continue diagnosis

    Never open a phone before confirming the issue through a call test.


    Step 2: Check Using Loudspeaker Comparison

    This step helps isolate the problem.

    Method

    • During the same call, enable loudspeaker.
    • If loudspeaker audio is clear:
      • Microphone and network are working
      • Audio codec is likely fine
      • Problem is receiver-side

    If both ear speaker and loudspeaker fail, the issue may be:

    • Audio IC
    • Software
    • Network
    • Call settings

    Step 3: Test with Headphones or Earphones

    This is a fast and reliable check.

    Results Interpretation

    • Sound works with earphones → Receiver or path issue
    • Sound does not work → Deeper audio problem

    If sound switches correctly when earphones are plugged in, the phone’s audio routing is functioning.


    Step 4: Check Call Settings and Software Audio Paths

    Many phones today have software-level audio controls.

    Things to Check

    • Call volume set to maximum
    • Accessibility settings (mono audio, hearing aid mode)
    • Call recording apps interfering
    • Bluetooth disconnected
    • Safe mode test (Android)

    Restart the device once before proceeding.

    A simple restart solves more problems than most people expect.


    Step 5: Visual Inspection and Cleaning

    Dust and sweat are silent killers of ear speakers.

    Cleaning Method

    1. Power off the phone.
    2. Remove top mesh or grill (if accessible).
    3. Use a soft brush.
    4. Lightly clean with IPA.
    5. Let it dry fully.

    Many “dead receivers” come back to life after cleaning.


    Step 6: Swap Test with a Known-Good Receiver

    This is a technician’s shortcut.

    How It Helps

    • If replacement receiver works → Original is faulty
    • If replacement also fails → Path or board issue

    Always test with:

    • Same model
    • Same impedance rating

    Step 7: Multimeter Test (Receiver Resistance Check)

    This step confirms whether the ear speaker coil is open.

    Typical Resistance Values

    • Usually between 25Ω and 60Ω
    • Depends on model

    Procedure

    1. Remove the ear speaker.
    2. Set multimeter to resistance (Ω).
    3. Touch probes to speaker terminals.

    Readings

    • Normal resistance → Speaker is electrically fine
    • No reading / infinite → Coil open, replace speaker
    • Zero resistance → Shorted speaker

    This test is reliable and fast.


    Step 8: Check Receiver Line Continuity on PCB

    If the receiver is fine, check the signal path.

    What to Check

    • Receiver connector pins
    • Audio line continuity
    • Ground path
    • Series resistors
    • EMI filters

    Use continuity mode on a multimeter.

    Broken tracks often occur after:

    • Drops
    • Water damage
    • Poor previous repairs

    Step 9: Check Audio IC and Power Supply (Advanced)

    This is required only if:

    • Receiver is good
    • Tracks are fine
    • Software is ruled out

    Indicators of Audio IC Issues

    • No sound in any mode
    • Heating near codec IC
    • Sound works only sometimes
    • Crackling across outputs

    At this stage, experience matters more than tools.


    Step 10: Water Damage Considerations

    Water damage affects ear speakers first.

    Signs

    • Green corrosion near receiver pads
    • Rust on connector
    • White residue

    Action

    • Clean PCB properly
    • Check under microscope if available
    • Replace receiver even if it looks fine

    Water damage is never just “dry and done.”


    Common Mistakes Technicians Make

    Avoid these errors:

    • Replacing receiver without testing
    • Ignoring software settings
    • Not checking ear mesh
    • Skipping continuity checks
    • Overheating near audio IC

    Good repair is about logic, not shortcuts.


    Ear Speaker vs Loudspeaker: Quick Comparison

    FeatureEar SpeakerLoudspeaker
    Used forCallsMedia, ringtone
    LocationTopBottom
    PowerLowHigh
    Common faultDust, coil openDistortion

    When to Replace vs Repair

    Replace Receiver If

    • Coil is open
    • Sound is distorted
    • Volume is permanently low

    Repair Path If

    • Connector is loose
    • Track is broken
    • Pad is damaged

    Practical Technician Tips

    • Always keep tested receivers in stock
    • Label removed parts
    • Avoid touching receiver diaphragm
    • Never blow air directly into mesh
    • Test before full reassembly

    “A repair is only complete after final testing.”


    Final Checklist Before Returning the Phone

    ✔ Call test completed
    ✔ Volume stable
    ✔ No distortion
    ✔ Proximity sensor working
    ✔ No loose connections


    Conclusion

    Checking a mobile phone ear speaker is not guesswork.
    It is a step-by-step diagnostic process that saves time, parts, and reputation.

    By following the methods explained above, technicians can:

    • Identify faults accurately
    • Avoid unnecessary replacements
    • Deliver consistent results

    A phone may be small, but precision matters.

  • How to Check Cell Phone Mic (Microphone) Like a Technician

    How to Check Cell Phone Mic (Microphone) Like a Technician

    A phone microphone looks like a small, simple part. But in real-world repair work, it is one of the most common complaint points. Customers report issues like low voice, no sound during calls, voice notes not recording, or videos capturing silence.

    For a repair technician, guessing is not an option. A proper microphone check helps you decide whether the problem is software-based, dirt-related, flex damage, IC-level, or board-related.

    “A good technician never replaces parts first. He diagnoses first.”

    This guide is written for repair technicians, trainees, and serious learners who want to check a mobile phone microphone professionally, not casually. The methods explained here are used in real repair shops on Android phones, iPhones, and modern smartphones.


    Understanding the Microphone System in Smartphones

    Before testing, you must understand what you are testing.

    How Many Microphones Does a Phone Have?

    Most modern devices have multiple microphones, not just one.

    • Primary microphone
      Used during normal calls and voice recordings.
    • Secondary microphone
      Used for noise cancellation during calls.
    • Tertiary microphone (in some models)
      Used for video recording, speaker mode, or voice assistants.

    A phone can appear to have a “mic problem” even if only one mic is faulty.

    Common Microphone Locations

    • Bottom side near charging port
    • Top side near headphone jack or camera
    • Rear camera area
    • Side frame (on some models)

    Knowing mic placement helps in accurate diagnosis.


    Common Symptoms of Phone Microphone Problems

    A technician should first listen to the complaint carefully. Different symptoms point to different faults.

    Typical Mic-Related Complaints

    • Other person cannot hear during calls
    • Voice recording sounds very low or muffled
    • Voice notes not recording
    • Video recording has no sound
    • Speakerphone works but normal call doesn’t
    • Google Assistant or Siri can’t hear commands

    Each symptom requires a different testing approach.


    Step 1: Initial Visual Inspection (Technician Habit)

    Never start with apps or software tests. Start with your eyes.

    What to Check First

    • Dust or lint blocking the mic hole
    • Corrosion near mic area
    • Liquid damage indicators
    • Bent frame blocking mic path
    • Poor-quality back covers or cases

    Many microphone problems are simply caused by blockage, not failure.

    Clean gently using:

    • Soft brush
    • Isopropyl alcohol (if needed)
    • Compressed air (carefully)

    Step 2: Basic Voice Recording Test (Controlled Method)

    This test checks the primary microphone.

    How Technicians Perform This Test

    1. Open the default voice recorder
    2. Speak clearly from normal distance
    3. Record for 10–15 seconds
    4. Play back using earphones and speaker

    What to Observe

    • Clear voice → mic likely working
    • Very low sound → partial blockage or weak mic
    • Distorted sound → moisture or mic damage
    • No sound → mic line or IC issue

    Repeat the test while slightly tapping near the mic area. A reaction confirms mic connectivity.


    Step 3: Call Testing (Network-Independent Method)

    A phone call tests mic behavior under real conditions.

    Technician-Level Call Test

    • Call another phone
    • Speak normally
    • Switch between:
      • Normal mode
      • Speaker mode
      • Wired earphones
      • Bluetooth (if available)

    Diagnosis Clues

    • Mic works on speaker but not normal call → primary mic issue
    • Works with headset but not phone → phone mic hardware issue
    • Works intermittently → flex or solder issue

    This test helps separate mic fault from audio routing issues.


    Step 4: Hidden Hardware Test Menus (Professional Shortcut)

    Many Android phones have built-in diagnostic menus.

    Example Test Codes (May Vary by Brand)

    • ##4636##
    • ##6484##
    • #0#
    • *#0243#

    Inside these menus, technicians can:

    • Test each microphone individually
    • Check audio input levels
    • Identify dead or weak mics

    This is one of the fastest technician-level checks.

    For iPhones, diagnostics are usually done via:

    • Voice memos
    • Call tests
    • Service diagnostic tools (at center level)

    Step 5: Video Recording Test (Secondary Mic Check)

    Video recording uses different microphones depending on mode.

    How to Test Properly

    • Record video using:
      • Front camera
      • Rear camera
    • Speak while covering one mic at a time

    Interpretation

    • Sound missing only in video → secondary mic issue
    • Rear camera video silent → top mic problem
    • Front camera video silent → front mic path issue

    This method helps pinpoint which microphone is faulty.


    Step 6: Noise Cancellation Test (Advanced Diagnosis)

    Noise cancellation relies on secondary microphones.

    Technician Test Method

    1. Make a call
    2. Cover the top mic
    3. Speak and observe sound clarity

    If voice becomes unclear or drops, the noise-cancellation mic may be defective or misconfigured.

    Improper noise cancellation often feels like a “mic problem” to customers.


    Step 7: Software-Level Checks (Before Opening Phone)

    A professional technician always rules out software causes.

    Important Software Checks

    • App microphone permissions
    • System sound settings
    • Do Not Disturb mode
    • Third-party recording apps
    • Safe mode testing
    • System updates or recent app installs

    Sometimes a single permission change fixes the issue.


    Step 8: Charging Port and Mic Flex Inspection

    On many smartphones, the microphone is connected via the charging port flex cable.

    Technician Observations

    • Replaced charging port recently?
    • Local duplicate flex installed?
    • Mic contacts dirty or loose?

    Low-quality flex cables are a major cause of mic complaints after repairs.


    Step 9: Multimeter and Continuity Testing (Hardware-Level)

    This step is for trained technicians.

    What to Test

    • Mic line continuity
    • Ground connection
    • Short to ground
    • Flex-to-board signal flow

    Use circuit diagrams when available.
    A broken line often mimics a dead microphone.


    Step 10: Audio IC and Board-Level Diagnosis

    If everything else passes, suspect audio IC or logic board damage.

    Indicators of IC-Level Mic Fault

    • Multiple mics not working
    • Random audio issues
    • Heating near audio IC
    • History of liquid damage

    This stage requires:

    • Microsoldering skills
    • Schematics
    • Experience

    “Replacing a microphone is easy. Fixing an audio IC takes skill.”

    Can a Phone Microphone Be Checked Using a Multimeter?

    This is a very common doubt among mobile repair technicians, especially those who learned repair work during the feature-phone and early smartphone era.

    The short and honest answer is:
    It depends on the type of microphone used in the phone.

    There are 2 types of microphones in cell phones

    1. Universal mic used in older smartphones and keypad phones
    2. Latest sensor (Digital) mic used in today’s smartphones.
    types of cell phone microphones

    Multimeter Testing for Older Analog Microphones

    Earlier mobile phones and some early smartphones used analog electret condenser microphones. These microphones could be checked using a basic multimeter test.

    The commonly used method was:

    • Set the multimeter to 20kΩ (resistance mode)
    • Connect the probes to the microphone terminals
    • Gently blow air into the microphone hole

    If the resistance value on the multimeter changed while blowing air, it indicated that the diaphragm was responding to sound pressure and the microphone was likely working.
    If there was no change in reading, the microphone was considered faulty.

    This method worked because analog microphones generate small electrical variations when sound moves the diaphragm.

    However, it is important to understand that this test only confirmed basic diaphragm movement. It did not guarantee sound clarity, noise performance, or real-world call quality.


    Why Multimeter Testing Does Not Work on Modern Smartphone Microphones

    Modern smartphones use digital MEMS (sensor-based) microphones, not analog microphones.

    These microphones:

    • Do not operate on resistance-based output
    • Communicate using digital data signals
    • Require power supply, clock, and data lines
    • Do not show meaningful resistance changes on a multimeter

    Because of this, digital smartphone microphones cannot be tested directly using a multimeter. Even a perfectly working microphone may show no change or misleading readings.

    Using resistance testing on MEMS microphones can result in incorrect diagnosis and unnecessary part replacement.


    How Technicians Confirm Digital Microphone Faults

    For digital microphones used in smartphones today, the only reliable confirmation method is functional testing, not electrical resistance testing.

    Technicians confirm microphone failure by:

    • Voice recording tests
    • Call and speaker mode testing
    • Video recording checks
    • Built-in hardware diagnostic menus (where available)
    • Replacing or swapping the microphone with a known-good part

    If the replacement microphone works correctly in the same phone, it confirms that the original microphone was faulty.
    If the issue remains even after replacement, the fault is usually related to:

    • Microphone flex cable
    • Power or data line issue
    • Audio IC
    • Logic board or motherboard damage

    Common Technician Mistakes to Avoid

    Even experienced technicians sometimes misdiagnose mic issues.

    Avoid These Errors

    • Replacing mic without testing
    • Ignoring secondary microphones
    • Using low-quality replacement parts
    • Skipping software checks
    • Not cleaning mic path properly

    Good diagnosis saves time, money, and reputation.


    Real-World Repair Scenario

    A customer complains: “My voice is not clear on calls.”

    • Voice recorder works fine
    • Video recording works
    • Only normal call has issue

    Diagnosis:

    • Noise cancellation mic faulty
    • Not primary mic

    Solution:

    • Replace top mic flex or disable noise cancellation (temporary)

    This is why technician-level testing matters.


    Tools Every Technician Should Have for Mic Testing

    • Good earphones
    • Soft brush and IPA
    • Multimeter
    • Known-good flex cables
    • Diagnostic apps (offline)
    • Strong lighting and magnifier

    Tools don’t replace skill, but they support accuracy.


    When to Replace the Microphone

    Replace the mic only when:

    • All software tests fail
    • Cleaning doesn’t help
    • Flex cable confirmed good
    • Continuity verified
    • Mic input shows no response

    Always use quality replacement parts.


    Building Trust With Proper Diagnosis

    Customers may not understand microphone technology, but they understand honesty.

    Explain:

    • What you tested
    • What failed
    • Why replacement is needed

    This builds long-term trust and repeat business.


    Final Thoughts: Think Like a Technician

    Checking a phone microphone is not about pressing record once. It’s about systematic elimination, understanding audio paths, and using experience.

    “Diagnosis is the difference between a parts changer and a technician.”

    Master these methods, and microphone issues will no longer confuse you.


    Simple Summary

    • Smartphones have multiple microphones
    • Always start with inspection and cleaning
    • Test calls, recordings, and videos
    • Use diagnostic menus when available
    • Rule out software before hardware
    • Replace parts only after confirmation

    A structured approach saves time and builds expertise.

  • How to Check Ringer (Loud Speaker) of Mobile Phone

    How to Check Ringer (Loud Speaker) of Mobile Phone

    A mobile phone that does not ring properly is more than a small inconvenience. For users, it means missed calls and alerts. For a repair technician, it is a common and important fault to diagnose correctly. Whether you are a beginner learning mobile repairing or an experienced technician handling smartphones daily, understanding how to test a mobile phone ringer is a must-have skill.

    The ringer plays a key role in call alerts, notifications, music, videos, and system sounds. A fault here can be hardware-related, software-related, or even due to simple settings issues. Jumping straight to replacement without proper testing often leads to wasted time and money.

    This guide explains how to check the ringer of a mobile phone step by step, using both basic and advanced technician methods, including multimeter testing. The focus is on clarity, accuracy, and real workshop experience, not guesswork.

    “Good technicians don’t replace parts first. They test, confirm, and then repair.”
    That mindset saves devices, builds trust, and improves your success rate.


    What Is a Ringer in a Mobile Phone?

    In mobile phones, the ringer is the component responsible for producing loud sound output. It is used for incoming calls, notification alerts, alarms, music playback, videos, and system tones.

    A ringer is commonly known by many names in the mobile repairing field, such as:

    • Speaker
    • Loud speaker
    • Buzzer
    • Ring speaker
    • Music speaker
    • Main speaker
    • Speaker module
    a sample ringer (loud speaker) spare part of a mobile phone

    All these terms generally refer to the same output unit used for high-volume sound. Earpiece speakers are different and should not be confused with the ringer.

    Understanding terminology is important because customers, spare part suppliers, and service manuals may use different names for the same component.


    Common Symptoms of Ringer Problems

    Before testing, observe the complaint carefully. Ringer issues usually appear in the following ways:

    • No sound during incoming calls
    • Very low volume even at maximum level
    • Distorted or crackling sound
    • Sound works only on earphones or Bluetooth
    • Sound works sometimes and fails sometimes
    • Ringer works for music but not for calls or notifications

    Each symptom points to a different possible cause. Correct diagnosis begins with understanding these signs.


    Tools Required to Check Mobile Phone Ringer

    For proper testing, a technician should have the following basic tools:

    • Known good ringer (for cross-testing)
    • Multimeter (digital preferred)
    • DC power supply (optional, for advanced testing)
    • Screwdrivers and opening tools
    • Cleaning brush and isopropyl alcohol
    • Service test codes or diagnostic menu access

    You do not need all tools for every job, but a multimeter is essential for professional diagnosis.


    Step 1: Check Sound and Settings (Basic but Critical)

    Many phones are repaired unnecessarily because basic checks are skipped.

    Start with these simple steps:

    • Increase volume to maximum
    • Check silent mode and vibration mode
    • Disable Do Not Disturb
    • Check accessibility sound settings
    • Test ringtone, alarm, and media sound separately

    On Android devices, media volume, call volume, and notification volume are often independent. On iPhones, ringer and alert volume may be linked to buttons or settings.

    Always confirm that the issue is not software or settings-related before opening the phone.


    Step 2: Test Using Service or Diagnostic Mode

    Most smartphones have built-in hardware test menus.

    Android Phones

    Technicians often use dialer codes like:

    • #0# (works on many Samsung devices)
    • OEM-specific diagnostic menus

    From here, you can directly test the loud speaker without opening any app.

    iPhone

    Apple devices use internal diagnostics accessed via software tools or service modes. For basic testing:

    • Play system sounds
    • Use voice memos or music playback
    • Test alerts and ringtones

    If sound fails in diagnostic mode, the issue is likely hardware-related.


    Step 3: Physical Inspection of the Ringer Area

    Before electrical testing, inspect the hardware physically.

    Check for:

    • Dust or lint blocking speaker grill
    • Water or moisture residue
    • Rust or corrosion near speaker contacts
    • Torn or punctured speaker membrane
    • Loose or misaligned speaker module

    Many low-sound issues are caused by dirt buildup, not speaker failure.

    Clean the speaker grill carefully using a brush and alcohol. Never use sharp objects that can damage the membrane.


    Step 4: Cross-Test with a Known Working Speaker

    This is one of the fastest technician methods.

    Steps:

    1. Remove the existing ringer.
    2. Connect a known good speaker temporarily.
    3. Play ringtone or music.

    If sound is clear:

    • Original speaker is faulty.

    If sound is still missing:

    • Problem lies in circuit, connector, or software.

    This method saves time and avoids unnecessary board work.


    Step 5: How to Check Mobile Phone Ringer Using a Multimeter

    This is the most important section for technicians.

    A multimeter helps confirm whether the speaker coil is open, shorted, or healthy.

    Understanding Speaker Basics

    Mobile phone ringers are usually:

    • Low-resistance speakers
    • Typically between 4Ω to 8Ω

    If resistance is abnormal, the speaker is faulty.


    Method 1: Resistance (Ohms) Test

    Steps:

    1. Set multimeter to resistance (Ω) mode.
    2. Touch probes to the speaker terminals.
    3. Observe the reading.

    Expected results:

    • 4Ω–8Ω → Speaker likely OK
    • OL or infinite → Coil open (speaker dead)
    • 0Ω or very low → Shorted coil (speaker faulty)

    This is the most reliable and safe test.


    Method 2: Continuity Test (Basic Check)

    Steps:

    1. Set multimeter to continuity mode.
    2. Place probes on speaker terminals.

    Results:

    • Beep sound → Coil continuity present
    • No beep → Coil broken

    Continuity alone does not confirm sound quality, but it confirms whether the speaker is completely dead.


    Important Multimeter Safety Tip

    Do not use voltage or current modes directly on speaker terminals.
    Always use resistance or continuity mode only.

    Incorrect testing can damage the speaker or the multimeter.


    Step 6: Checking Ringer Line on the PCB (Advanced Level)

    If the speaker tests fine, move to board-level diagnosis.

    Check:

    • Speaker connector solder joints
    • Speaker line continuity from IC to connector
    • Presence of audio signal using oscilloscope (advanced)
    • Audio IC output condition

    Use schematic or boardview if available. In many smartphones, audio output IC failure is rare but possible, especially after water damage.


    Software vs Hardware Ringer Issues

    Understanding the difference is crucial.

    Software-Related Causes

    • Corrupted system files
    • Faulty updates
    • Third-party sound control apps
    • Custom ROM bugs

    Solutions:

    • Safe mode testing
    • Cache reset
    • Software restore or flashing

    Hardware-Related Causes

    • Speaker coil damage
    • Water damage
    • Connector faults
    • Audio IC failure

    Solutions:

    • Cleaning
    • Replacement
    • Board repair

    Never assume software or hardware without testing.


    Common Technician Mistakes to Avoid

    Even experienced technicians make these errors:

    • Replacing speaker without testing
    • Ignoring basic settings check
    • Not cleaning speaker grill
    • Using low-quality replacement speakers
    • Skipping multimeter testing

    Diagnosis first, replacement second.


    Choosing the Right Replacement Speaker

    If replacement is needed:

    • Match exact model and size
    • Avoid cheap aftermarket parts
    • Check sound quality before final assembly
    • Secure proper contact alignment

    A low-quality ringer can cause distortion and customer complaints even if it works.


    Special Notes for iPhone Ringer Testing

    iPhone speakers are integrated into modules with antenna or flex connections.

    Keep in mind:

    • Improper fitting affects sound
    • Missing screws reduce volume
    • Dust mesh alignment matters

    Testing with original-quality parts is strongly recommended.


    Real Workshop Insight

    In daily repair work, more than half of “dead ringer” cases are caused by dust blockage, misalignment, or settings issues. Only a portion actually need speaker replacement.

    “Repairing smartly is not about speed. It is about accuracy.”

    This approach builds long-term customer trust and professional confidence.


    Summary: Best Way to Check Mobile Phone Ringer

    To correctly check the ringer of a mobile phone:

    1. Verify sound settings and modes
    2. Test via diagnostic or service menu
    3. Inspect and clean speaker area
    4. Cross-test with known good speaker
    5. Use multimeter to confirm speaker health
    6. Diagnose PCB or IC only if needed

    This structured approach works for Android phones, iPhones, and most modern smartphones.


    Final Thoughts

    Learning to test a mobile phone ringer properly separates a parts-changer from a real technician. Whether you are repairing entry-level Android devices or high-end smartphones, the principles remain the same: observe, test, confirm, and then repair.

    With practice, these steps become second nature and improve both repair success and professional reputation.

  • How to Check Mobile Phone Battery Using a Multimeter

    How to Check Mobile Phone Battery Using a Multimeter

    A mobile phone battery is the heart of every smartphone. No matter how powerful the processor or how advanced the display, a weak battery can make even a premium device unusable. For mobile repair technicians, battery-related complaints are among the most common issues faced in daily work.

    Customers often say things like “phone is not charging,” “battery drains too fast,” or “device switches off suddenly.” Behind these simple complaints can be multiple causes. That is why learning how to correctly check a mobile phone battery is a core skill for every technician, whether beginner or advanced.

    This guide explains battery testing in a clear, practical, and professional way. It avoids myths, focuses on real workshop practices, and helps you make confident repair decisions.

    “Power problems are rarely complicated. They only become expensive when testing is skipped.”


    A Mobile Phone Battery is Also Called

    In the repair industry, a mobile phone battery may be referred to as:

    • Rechargeable battery
    • Lithium-ion battery
    • Li-ion battery
    • Lithium-polymer battery
    • Li-Po battery
    • Power cell
    • Battery pack

    Although these names sound different, they often refer to the same function: storing and delivering electrical energy safely to the device.


    Types of Mobile Phone Batteries Used Today

    Understanding battery type helps in correct diagnosis and replacement.

    Lithium-Ion Battery (Li-ion Battery)

    This is the most widely used battery type in smartphones. Li-ion batteries are reliable but sensitive to heat, overcharging, and deep discharge.


    Lithium-Polymer Battery (Li-Po Battery)

    A lithium-polymer battery is a more flexible version of lithium technology. They have slim and lightweight design, can be shaped to fit thin phones and have better safety design compared to older lithium cells. They are often used in modern smartphones and iPhones

    In practical repair work, Li-ion and Li-Po batteries are tested in almost the same way.


    Minimum and Maximum Voltage of a Cell Phone Battery

    Knowing voltage limits is extremely important for battery diagnosis.

    Standard Voltage Ranges

    For most mobile phone batteries:

    • Minimum safe voltage: 3.0V
    • Nominal voltage: 3.6V to 3.7V
    • Fully charged voltage: 4.2V
    • Over-voltage (danger zone): Above 4.25V

    If a battery voltage drops below 3.0V, it is considered deeply discharged and may not recover safely.

    A battery showing zero or very low voltage is usually damaged. However, if it has not been used for a long time, it should be recharged once and then tested for proper performance.

    Problems Caused by a Faulty Mobile Phone Battery

    A defective mobile phone battery can create many confusing issues that often look like software or motherboard faults.

    • Dead phone – device does not power ON at all
    • Fast draining – battery drops quickly even after full charge
    • Stuck at logo / boot loop – phone restarts during startup
    • Auto switch OFF – shuts down suddenly, often below 40%
    • Swollen (pregnant) battery – back cover or display lifts
    • Charging issues – slow charging, no charging, or unstable charging
    • Works only on charger – phone turns OFF when unplugged
    • Overheating – battery heats during charging or normal use
    • Wrong battery percentage – sudden drops or jumps in charge level

    Technician note: Always check or replace the battery first before assuming software or motherboard problems.


    Tools Required to Check a Mobile Phone Battery

    Every repair technician should have:

    • Digital multimeter
    • Known good battery (for comparison)
    • Charging cable and adapter
    • DC power supply (advanced level)
    • Basic hand tools

    Among these, the multimeter is the most important diagnostic tool.


    How to Check Mobile Phone Battery Voltage Using a Multimeter

    This is the most reliable and professional method.

    Step-by-Step Battery Voltage Test

    1. Set the multimeter to DC voltage mode
    2. Select the 10V / 20V DC range (or auto-range)
    3. Place the red probe on the positive (+) terminal
    4. Place the black probe on the negative (–) terminal
    5. Read the voltage displayed
    how to check mobile phone battery with a multimeter

    How to Interpret the Reading

    • 4.1V – 4.2V → Battery fully charged
    • 3.7V – 3.9V → Battery in good condition
    • 3.3V – 3.6V → Battery partially discharged
    • Below 3.0V → Battery weak or damaged
    • 0V → Battery dead or protection circuit triggered

    A mobile phone battery showing below 3.7V on a multimeter is partially discharged. Some smartphones may still power ON around 3.3–3.6V, but a weak battery often fails to deliver enough current during startup, causing the phone to not turn ON or to switch OFF immediately. Below 3.3V, most smartphones will not power ON at all due to low-voltage protection.

    This test gives you a quick and accurate picture of the battery’s current charge level.


    Checking Battery Terminals and Contacts

    Sometimes the battery is fine, but power is not delivered properly.

    Inspect:

    • Battery terminals for corrosion
    • Bent or damaged contacts
    • Loose battery connectors
    • Dirt or oxidation on pins

    Poor contact can mimic battery failure.
    Always clean and inspect before declaring a battery faulty.


    A Funny but Unsafe Traditional Battery Checking Method (For Knowledge Only)

    There is an old and widely known method used by some traditional mobile phone repair technicians.

    They lightly touch the tip of their tongue to the positive (+) terminal of the battery.
    If a mild tingling or “spicy” sensation is felt, the battery is assumed to have some charge.
    If no sensation is felt, the battery is considered discharged.

    This method may give a rough idea, but it is unsafe, unhygienic, and unprofessional.

    It is mentioned here only for awareness and knowledge, and it is strongly advised not to use this method, except in extreme emergencies where no tools are available.

    A multimeter is safer, accurate, and professional.


    Why Multimeter Testing Is Not Enough for Fast Draining Batteries

    Many technicians believe that if voltage is normal, the battery is good. This is not always true.

    A multimeter only shows:

    • Current voltage
    • Surface charge level

    It does not show:

    • Internal chemical health
    • Capacity loss
    • Discharge speed

    This is why fast-draining batteries often confuse beginners. If your smartphone battery is draining very fast, know how to fix if a Phone Battery Drains Fast Even When Idle


    How to Check a Fast Draining Mobile Phone Battery

    If a battery drains very quickly even after full charging, simple voltage testing will not reveal the problem.

    This happens when:

    • Battery chemicals have weakened
    • Internal resistance has increased
    • Battery capacity has dropped significantly

    Practical Technician Method

    The most reliable method is replacement testing:

    1. Fully charge the existing battery
    2. Insert a known good or new battery into the same phone
    3. Use the phone normally
    4. Observe battery performance

    If the problem disappears:

    • The old battery is faulty

    If the problem remains:

    • The issue is with software, charging circuit, or power management IC

    This method reflects real-world usage and gives accurate results.


    Common Signs of a Bad Mobile Phone Battery

    Watch for these symptoms:

    • Battery percentage drops suddenly
    • Phone switches off at 20–30%
    • Battery heats up during charging
    • Phone restarts randomly
    • Charging takes too long
    • Battery drains even in idle mode

    Any two or more symptoms usually indicate battery replacement is needed.


    Charging Test: Another Important Battery Check

    Battery testing is incomplete without charging observation.

    Check:

    • Charging current stability
    • Charging time consistency
    • Battery temperature rise

    A battery that heats excessively during charging is unsafe and should be replaced immediately.


    Built-In vs Removable Battery Considerations

    Removable Battery Phones

    • Easy voltage testing
    • Easy replacement
    • Lower labor risk

    Non-Removable Battery Phones

    • Require careful opening
    • Risk of flex damage
    • Adhesive removal needed

    Regardless of design, battery testing principles remain the same.


    Choosing the Right Replacement Battery

    When replacing a battery:

    • Match exact model number
    • Prefer original or OEM-quality battery pack
    • Avoid cheap, low-capacity duplicates
    • Check voltage before installation

    A poor-quality power cell can damage the device or reduce customer trust.


    Technician-Level Best Practices

    • Never short battery terminals intentionally
    • Do not overcharge externally
    • Store batteries at safe voltage levels
    • Avoid swollen or leaking batteries
    • Dispose damaged batteries properly

    “Battery safety is not optional. One mistake can damage the phone or injure the technician.”


    Summary: How to Check a Mobile Phone Battery the Right Way

    To correctly diagnose a mobile phone battery:

    1. Identify battery type (Li-ion or Li-Po)
    2. Check voltage using a multimeter
    3. Understand minimum and maximum voltage limits
    4. Inspect terminals and contacts
    5. Test charging behavior
    6. Replace temporarily to confirm fast drain issues

    This approach works for Android phones, iPhones, and most modern smartphones.


    Final Thoughts

    Battery testing is not about speed. It is about accuracy. A technician who understands voltage behavior, chemical wear, and real-world usage can solve power issues confidently and professionally.

    Learning these fundamentals not only improves repair quality but also builds long-term customer trust.

  • How to Test a Smartphone LCD Screen Before Replacement

    How to Test a Smartphone LCD Screen Before Replacement

    Replacing a smartphone LCD screen without proper testing is one of the most common and costly mistakes in mobile repair. A phone may show a black screen, distorted display, or flickering image, but the actual fault may not always be the LCD panel itself. Many display issues are caused by battery problems, loose connectors, software glitches, or board-level faults.

    For repair technicians, learning how to test a smartphone LCD screen before replacement is essential. It saves time, reduces unnecessary part changes, and builds customer trust. Whether you work on Android phones or iPhones, the testing principles remain similar, with a few important differences.

    “Good repair work starts with confirmation, not assumption.”
    That principle applies perfectly to LCD diagnosis.

    This guide explains step-by-step LCD testing methods, practical workshop checks, and common mistakes to avoid. It is written for both beginner and experienced technicians.


    Smartphone LCD Screen: Names and Common Terms Used

    A smartphone LCD displays images, text, videos, system interfaces, and touch feedback when combined with a digitizer. In repair and user language, an LCD screen may also be called:

    • Phone screen
    • Mobile screen
    • Display
    • Display panel
    • Screen module
    • LCD panel
    • Display assembly
    • Touch and display unit
    • Folder
    • Screen combo

    Although modern phones may use OLED or AMOLED technology, technicians still commonly use the term LCD screen to refer to the complete display unit.


    Common LCD-Related Complaints from Customers

    Before testing, understand the complaint clearly. Customers usually describe display problems in simple words, such as:

    • Screen is black but phone is ON
    • Display is white or blank
    • Lines or spots on the screen
    • Flickering or dim display
    • Touch works but no image
    • Screen shows logo and then goes black

    Each symptom points to a different diagnostic path. Jumping straight to replacement can lead to wrong conclusions.


    Important: Check the Battery Before Testing the LCD

    This step is often ignored.

    A weak battery can cause LCD-related symptoms even when the screen is perfectly fine.

    Battery Voltage Reference (Very Important)

    For most smartphones:

    • Minimum operating voltage: around 3.3V
    • Nominal voltage: 3.6V – 3.7V
    • Fully charged voltage: 4.2V
    • Maximum safe voltage: around 4.25V

    Below approximately 3.3V, most smartphones will not power ON at all.

    If the battery is weak, unstable, or deeply discharged, the phone may:

    • Fail to boot
    • Restart repeatedly
    • Show a black or flickering display

    Always test or replace the battery first before blaming the LCD screen.


    Tools Required to Test a Smartphone LCD

    A professional technician should have:

    • Known good battery
    • Charging cable and adapter
    • Digital multimeter
    • Screwdrivers and opening tools
    • Known working LCD (for cross-testing)
    • Clean workspace with proper lighting

    Advanced tools like DC power supplies are useful but not mandatory for basic LCD testing.


    Step 1: Visual Inspection Without Opening the Phone

    Start with what you can see.

    Check for:

    • Cracks on the screen or glass
    • Ink-like black spots (LCD bleed)
    • White patches or discoloration
    • Uneven brightness
    • Lines across the display

    Cracked glass does not always mean the LCD is damaged, and an unbroken screen does not guarantee a healthy display.


    Step 2: Check if the Phone Is Actually Powering ON

    Many “LCD problems” are actually power issues.

    Confirm:

    • Vibration when power button is pressed
    • Sound during charging
    • Notification sounds
    • Backlight glow in dark environment

    If the phone shows signs of life but no image, LCD testing is required.


    Step 3: Torch Light Test (Basic but Useful)

    This is a quick field test.

    Steps:

    1. Turn ON the phone
    2. Shine a bright torch or flashlight on the screen at an angle
    3. Look closely for faint images

    If faint images are visible:

    • The display panel is working
    • Backlight or power delivery may be faulty

    This method works on many LCD-based displays and is especially helpful for beginners.


    Step 4: External Display or Screenshot Test (Android vs iPhone)

    For Android Phones

    • Take a screenshot using button combination
    • Connect phone to a PC
    • View the screenshot file

    If the screenshot looks normal:

    • The phone is generating display output
    • The LCD screen or display connection is likely faulty

    For iPhones

    • Use screen mirroring or backup tools
    • Check if display output is visible externally

    This helps separate software and GPU output from physical LCD failure.


    Step 5: Test Using a Known Good LCD Screen

    This is the most reliable technician method.

    Steps:

    1. Open the phone carefully
    2. Disconnect the existing display
    3. Connect a known working LCD screen
    4. Power ON the device

    If the phone displays properly:

    • Original LCD screen is faulty

    If the issue remains:

    • Problem may be battery, connector, or motherboard related

    This method prevents unnecessary LCD replacement.

    apple iPhone 17 pro max display lcd screen replacement spare part

    Step 6: Check LCD Connectors and Flex Cables

    Many display problems are caused by poor connections.

    Inspect Visually:

    • Bent or broken connector pins
    • Dust or corrosion on contacts
    • Torn flex cables
    • Improper seating of connectors

    Clean gently if needed and reseat connectors properly before final testing.


    Android vs iPhone: Additional LCD Checks

    Additional Points for Android Devices

    • Use hardware test codes (where available)
    • Boot into safe mode to rule out app conflicts
    • Check display settings and brightness controls

    Additional Points for iPhones

    • Ensure all screws are placed correctly
    • Check proximity sensor and earpiece alignment
    • Confirm display compatibility with the model

    Improper fitting can affect display behavior, especially in iPhones.


    LCD vs Touch Problem: How to Identify

    Understanding the difference saves time.

    LCD Issue Signs

    • No image
    • Lines or discoloration
    • Flickering display
    • White or black screen

    Touch/Digitizer Issue Signs

    • Image visible but touch not responding
    • Partial touch failure
    • Ghost touch

    A full display replacement may not always be necessary if only the touch layer is faulty.


    Can Software Cause LCD Problems?

    Yes, but rarely.

    Software-related display issues may include:

    • Stuck logo due to firmware corruption
    • Display glitches after updates
    • Incompatible ROMs

    In such cases:

    • Software restore or flashing may help
    • Hardware replacement should be the last step

    Common Technician Mistakes to Avoid

    • Replacing LCD without battery testing
    • Ignoring connector inspection
    • Assuming black screen always means dead LCD
    • Using low-quality display panels
    • Skipping cross-testing

    Testing first saves money, parts, and reputation.


    Choosing the Right Replacement LCD Screen

    If replacement is confirmed:

    • Match exact model and version
    • Prefer original or OEM-grade display
    • Check brightness and color accuracy
    • Test before final assembly

    A poor-quality screen leads to callbacks and dissatisfaction.


    Real Workshop Insight

    In daily repair work, many “LCD problems” are solved by fixing battery issues, reseating connectors, or correcting improper assembly. True LCD failure is common—but not as common as assumed.

    “Diagnosis is the skill that separates a repairer from a parts changer.”


    Summary: How to Test a Smartphone LCD Screen Before Replacement

    To test a smartphone LCD properly:

    1. Check battery voltage and condition
    2. Confirm the phone powers ON
    3. Inspect visually
    4. Use torch light test
    5. Cross-test with known good LCD
    6. Inspect connectors and flex cables
    7. Consider Android and iPhone-specific checks

    This process works for Android phones, iPhones, and most modern smartphones.


    Final Thoughts

    LCD testing is not about speed. It is about certainty. A technician who follows a structured testing process avoids mistakes, saves money, and delivers professional-level repairs.

    Master this skill, and LCD replacement will never be a guess again.

  • How to Use a Soldering Iron for Cell Phone Repair

    How to Use a Soldering Iron for Cell Phone Repair

    A soldering iron is one of the most important tools in cell phone repair. Whether you work on Android devices, iPhones, or basic mobile phones, soldering helps restore broken connections on the PCB. Many phone problems exist not because a component is dead, but because its solder joints have weakened, cracked, or completely disconnected.

    Modern smartphones use compact motherboards. Components are tiny. Tracks are thin. One careless move can damage the board permanently. That is why soldering is considered both a basic requirement and an advanced skill in mobile phone repairing.

    “Good soldering is invisible. Bad soldering is easy to spot.”

    This guide explains how to use a soldering iron correctly for cell phone repair, covering tools, preparation, techniques, mistakes, and real technician-level insights. It is written for beginners as well as experienced repair technicians.


    Introduction: Why Soldering Matters in Phone Repair

    A soldering iron is used to join metal parts using solder wire. In mobile phones, it is mainly used on the green-colored PCB (Printed Circuit Board) to attach spare parts or repair broken electrical connections.

    In repair shops, it is also commonly called:

    • A soldering station
    • A soldering pen
    • A micro soldering iron (for fine work)

    Most technicians today use a temperature-controlled soldering station because it provides stable heat and reduces board damage.


    Why Phone Components Need Resoldering

    Over time, solder joints inside a smartphone can fail. Common reasons include:

    • Physical shock or phone drop
    • Loose charging cable usage
    • Excessive heat
    • Repeated plugging and unplugging
    • Manufacturing stress points

    When solder joints fail, the component may still work but loses contact with the PCB.

    Common parts that often require soldering include:

    • Charging port
    • Battery connector
    • Power button
    • Volume keys
    • Headset connector
    • Antenna contact points
    • LCD connector (in selected models)
    • Microphone or speaker terminals

    In many low-cost or Chinese mobile phones, almost all components are soldered, including mic, speaker, and ringer. This reduces manufacturing cost but increases repair difficulty.


    Soldering Skill: Training vs Practice

    Soldering is not something you master overnight. Watching videos helps, but practice matters more than theory.

    Many self-taught technicians learned soldering by:

    • Practicing on dead phones
    • Removing and resoldering old components
    • Experimenting with different temperatures and tips

    Mobile phone soldering is more delicate than soldering computer motherboards or laptop boards. The margin for error is small.

    “The difference between a repair and a board replacement is often just soldering skill.”


    Types of Soldering Tools Used in Phone Repair

    1. Soldering Iron / Soldering Station

    Used for:

    • Connector soldering
    • Jumper wire work
    • Small component repair

    Temperature control is essential for smartphone boards.

    2. Micro Soldering Iron

    Used for:

    • IC legs
    • Tiny pads
    • Precision rework

    3. Soldering Pen

    Lightweight tool, suitable for beginners but limited in advanced work.

    4. Hot Air Rework Station

    Used for:

    • IC removal
    • BGA chips
    • Shield removal

    This article focuses mainly on the soldering iron, but advanced technicians often use both tools together.


    Choosing the Right Soldering Iron for Mobile Repair

    A good soldering setup should include:

    • Temperature control
    • ESD-safe design
    • Interchangeable fine tips
    • Stable heating element

    Avoid cheap non-regulated irons. They overheat pads and damage PCBs.

    Recommended temperature range for phone repair:

    • Lead solder: 320–350°C
    • Lead-free solder: 350–380°C

    Always start lower and increase gradually.


    Importance of ESD Safety in Smartphone Repair

    Modern smartphones are sensitive to static electricity. A small discharge can damage ICs silently.

    Basic ESD precautions include:

    • ESD-safe soldering iron
    • Grounded work surface
    • Anti-static wrist strap
    • Avoid synthetic clothing

    Ignoring ESD protection is one of the biggest hidden causes of repair failure.


    Role of Soldering Flux in Phone Repairs

    Soldering flux is not optional. It is essential.

    Flux:

    • Improves solder flow
    • Prevents oxidation
    • Reduces heat damage
    • Creates stronger joints

    Always use quality flux, especially for micro soldering. Avoid acidic or low-grade flux that leaves corrosive residue.


    Step-by-Step: How to Use a Soldering Iron for Cell Phone Repair

    Step 1: Prepare the PCB Surface

    Before soldering:

    • Clean the solder points using the iron tip
    • Remove old solder if required
    • Make the pads flat and shiny

    Dirty pads cause weak joints.


    Step 2: Heat the Soldering Iron Properly

    • Switch on the soldering station
    • Allow it to heat for around 2 minutes
    • Confirm stable temperature before starting

    Never solder with a half-heated iron.


    Step 3: Hold the Component Correctly

    • Right-handed technicians usually hold:
      • Component with left hand
      • Iron with right hand
    • Use precision tweezers for small parts

    Never hold components directly with fingers near heat.


    Step 4: Apply Solder Wire Correctly

    • Take a small amount of solder wire
    • Touch it to the iron tip
    • Position the component on the PCB
    • Touch the joint briefly

    Less solder is always better than excess solder.


    Step 5: Allow the Joint to Cool Naturally

    • Remove the iron tip
    • Do not move the component
    • Let the joint cool for a few seconds
    • Check strength manually

    If it looks dull or weak, resolder it.

    how to do soldering in mobile phone repair

    Making Jumpers Using a Soldering Iron

    Jumpers are used when PCB tracks are broken. This is advanced-level repair.

    Jumpers are usually made using:

    • Thin copper wire
    • Enamel-coated jumper wire

    Only attempt jumper work if you understand circuit paths. Otherwise, you may cause short circuits.

    If you do not repair motherboards at circuit level, you do not need jumper skills.


    Common Soldering Mistakes Technicians Make

    Avoid these common errors:

    • Overheating PCB pads
    • Using excessive solder
    • Not using flux
    • Dragging pads accidentally
    • Solder bridges between pins
    • Using blunt or dirty tips

    Most motherboard damage happens due to impatience, not lack of tools.


    Beginner Tips to Improve Soldering Skills Faster

    • Practice on dead smartphones
    • Start with charging ports
    • Use magnification
    • Clean tips frequently
    • Maintain steady hand posture

    Consistency improves accuracy.


    Advanced Technician Tips

    For experienced repair professionals:

    • Use different tips for different jobs
    • Combine hot air and iron strategically
    • Preheat boards for complex work
    • Inspect joints under microscope
    • Clean flux residue after repair

    Professional repair is about control, not speed.


    Soldering Iron vs Hot Air: When to Use What

    TaskBest Tool
    Charging portSoldering iron
    Button flexSoldering iron
    IC removalHot air
    Shield removalHot air
    Jumper wireSoldering iron

    Knowing the right tool saves boards.


    Safety Tips While Soldering Mobile Phones

    • Never touch hot tip
    • Work in ventilated area
    • Avoid inhaling fumes
    • Keep tools organized
    • Switch off iron after use

    Safety habits protect both technician and device.


    Is Soldering Still Relevant in Modern Smartphones?

    Yes. Despite increasing modular designs, soldering remains essential for:

    • Charging issues
    • Power failures
    • Network problems
    • Audio faults
    • Board-level repair

    Technicians who master soldering earn more and solve deeper issues.

    “Replacing parts is easy. Repairing boards builds real skill.”


    Who Should Learn Soldering in Mobile Repair?

    • Beginners entering phone repair
    • Advanced technicians upgrading skills
    • DIY enthusiasts
    • Electronics students
    • Service center professionals

    Soldering knowledge expands your repair capability significantly.


    Final Thoughts

    Using a soldering iron for cell phone repair is both an art and a technical skill. It demands patience, practice, and respect for the device. With the right tools, correct technique, and steady improvement, you can handle everything from simple connector repairs to advanced motherboard work.

    Start small. Practice often. Focus on quality, not speed.

    A well-made solder joint can bring a dead smartphone back to life.

  • How to Make Jumpers in Mobile Phone Repair to Fix Open Tracks

    How to Make Jumpers in Mobile Phone Repair to Fix Open Tracks

    Jumper work is one of the most important skills in mobile phone hardware repair. When a smartphone comes to a repair shop with charging problems, no display, no power, or dead keys, the fault is often not the component itself—but a broken track on the PCB.

    This article explains how to make jumpers in mobile phone repair to fix open tracks in a clear, practical, and technician-friendly way. It is written for beginners as well as working technicians who want to strengthen their fundamentals. The focus is on real repair logic, not shortcuts or myths.

    “Track repair is not about soldering wires randomly. It is about understanding the circuit and restoring the original path.”


    What Is a Track in a Mobile Phone PCB?

    A track is a thin copper pathway on a printed circuit board (PCB) that carries current and signals between components. These tracks connect:

    • ICs (integrated circuits)
    • Resistors and capacitors
    • Charging ports
    • Display connectors
    • Audio, network, and power sections

    In modern smartphones, tracks are:

    • Extremely thin
    • Spread across multiple PCB layers
    • Often hidden inside the board

    Because of this, track damage is not always visible to the naked eye.


    What Does an “Open Track” Mean?

    An open track means the electrical path is broken. Current cannot flow from one point to another.

    Common reasons for open tracks:

    • Water or liquid damage
    • Physical impact or bending
    • Corrosion over time
    • Excessive heat during previous repairs
    • Improper soldering or component removal

    When a track is open, the connected component will not receive proper voltage or signal, even if the part itself is perfectly fine.


    What Is Jumper Work in Mobile Phone Repair?

    Jumper work is the process of restoring a broken electrical path by creating an alternate connection using a thin wire. This wire replaces the damaged section of the PCB track.

    In simple words:

    • Original track = damaged
    • Jumper wire = new path

    If done correctly, the circuit behaves as if the track was never broken.


    When Do You Need to Make a Jumper?

    Jumper repair is required only after proper diagnosis.

    Common situations where jumper work is needed:

    • Charging section not working despite a good charging port
    • Phone dead even after battery and IC checks
    • Display backlight missing
    • Network issues due to broken RF lines
    • Speaker, mic, or vibrator not functioning

    Important:
    Never make a jumper without confirming an open track. Random jumpers can damage the device further.


    How to Confirm That a Track Is Broken

    Before making any jumper, you must prove that the track is open.

    Step 1: Check the Faulty Section

    First, identify what is not working:

    • Charging
    • Power
    • Display
    • Audio
    • Network

    Replace or test the component if required. A faulty part should be ruled out first.


    Step 2: Use a Digital Multimeter (Continuity Mode)

    Set your multimeter to continuity mode.

    • Place one probe on the starting point of the track
    • Place the other probe on the ending point

    If you hear a beep, the track is fine.
    If there is no beep, the track is open.

    This is the most reliable basic test in mobile phone repairing.

    Also read: How to Use a Multimeter in Mobile Phone Repairing


    Why Tracks Are Harder to Trace in Smartphones

    Older mobile phones had:

    • Single or double-layer PCBs
    • Visible copper lines

    Modern smartphones have:

    • 7 to 10 PCB layers or more
    • Very compact designs
    • Buried internal tracks

    Because of this, technicians rely on:

    • Jumper diagrams
    • Schematic diagrams
    • Boardview files
    • Logical circuit understanding

    Methods to Find Tracks for Jumper Work

    There are three practical ways technicians trace tracks today. Each has its own importance.


    Method 1: Using Jumper Diagrams (Most Common Method)

    Jumper diagrams are images that show:

    • Test points
    • Component connections
    • Alternative jumper locations

    These diagrams are widely used because they are easy to understand, even for beginners.

    How to search jumper diagrams in Google correctly:

    Use clear and specific search terms, such as:

    • “Samsung Galaxy s24 charging jumper”
    • “iPhone 17 backlight jumper solution”
    • “Redmi Note 15 no power jumper diagram”
    sample jumper diagram f a mobile phone

    Avoid vague searches.


    How to Use a Jumper Diagram Properly

    1. Identify the two points shown in the diagram
    2. Check continuity between them using a multimeter
    3. If continuity is missing, prepare to make a jumper
    4. Clean both solder points properly
    5. Solder a thin jumper wire between the points

    If done correctly, the fault often gets resolved immediately.

    Technician tip:
    Always cross-check with more than one diagram if available. Some images online can be misleading.


    Method 2: Using Schematic Diagrams (Professional Approach)

    A schematic diagram shows the complete electrical network of a mobile phone. It includes:

    • Power lines
    • Signal paths
    • Component values
    • IC pin functions

    This method requires more learning but gives maximum control over hardware repair.

    How schematic-based jumper repair works:

    1. Identify the faulty section (example: charging)
    2. Locate that section in the schematic
    3. Understand where voltage or signal should flow
    4. Trace the path using a multimeter
    5. Make a jumper only where continuity is missing

    If jumper repair does not solve the issue, the problem may be:

    • Faulty IC
    • Internal layer damage
    • CPU or power IC failure

    Method 3: Comparing With a Working PCB (Limited Use)

    Some technicians compare the faulty board with a known working PCB of the same model.

    How it is done:

    • Check continuity on a good board
    • Compare with the faulty board
    • Identify missing continuity

    This method:

    • Requires an extra board
    • Is time-consuming
    • Is not always accurate

    Still, in some cases, it helps when diagrams are unavailable.


    Trusted Paid Schematic & PCB Diagram Services for Mobile Repair

    These platforms provide official or professionally compiled schematics, layouts, bitmaps, boardviews, and track diagrams. They are widely used by experienced technicians to trace open tracks, locate components, and understand complex circuit paths.

    1. Borneo Schematics – Mobile & Electronics Hardware Solutions

    📌 Website: https://www.borneoschematics.com/

    Borneo Schematics is a paid service that delivers daily updated schematic diagrams, hardware solutions, and bitmap files for many mobile phones and other devices. It helps technicians trace voltages, open tracks, and component connections for multiple brands.
    It is often used by repair professionals who need accurate hardware diagrams and schematic guidance for troubleshooting complex faults.


    2. Pragmafix Schematics – Technician Mentor & Diagram Tool

    📌 Website: https://pragmafix.net/

    Pragmafix provides a comprehensive schematic solution paired with training resources and repair guides for mobile phone technicians. This server-based tool includes:

    • Thousands of mobile phone schematics and PCB layout files
    • Circuit tracking tools for signal and power lines
    • Component datasheets and block diagrams
    • Repair tutorials and mentoring materials

    Pragmafix aims to support technicians in both hardware and software repair learning, not only track tracing.


    3. Estech Schematics (Orion by Estech) – Boardview & PCB Guides

    📌 Website: https://estechschematics.com/

    Estech or GSM 24 Seven provides schematic and boardview services under products like Orion Schematics. These tools are designed to assist technicians in visualizing PCB layers, track routes, and component networks across many mobile and electronic devices.
    The service is useful when:

    • Standard images or diagrams are not available
    • Detailed boardview and circuit path views are needed for hardware troubleshooting
    • Multiple brands and models must be supported

    Orion and similar Estech products are popular among professionals working with both Android and Apple devices.


    Why Paid Schematic Services Matter for Track & Jumper Repair

    Tracked diagrams and boardviews are essential when:

    • The PCB has hidden internal layers
    • Simple continuity tests are insufficient
    • You need exact voltage pathways
    • The open track is complex or near critical ICs

    Paid schematic repositories often offer:

    • Multi-layer boardview files (showing hidden paths)
    • Bitmap or PDF schematics with component labels
    • Regular updates for new devices
    • Cross-reference tools for better trace identification

    Tips for Using Paid Schematic Platforms Safely

    • Choose reputable sources only — avoid uncertain or pirated materials.
    • Always back up data before trying advanced fixes.
    • Combine diagrams with actual multimeter testing for best results.
    • Learn basic schematic reading first to use these tools effectively.

    Tools Required for Jumper Work

    Having the right tools makes jumper repair safe and precise.

    Essential tools:

    • Digital multimeter
    • Fine-tip soldering iron (temperature controlled)
    • Thin jumper wire (copper or enamel-coated)
    • Flux (good quality)
    • Isopropyl alcohol for cleaning
    • Tweezers
    • Magnification (microscope or magnifier)

    Avoid thick wires. They can short nearby components.


    Step-by-Step: How to Make a Jumper Safely

    Step 1: Clean the Area

    Use isopropyl alcohol to remove dust, corrosion, and old flux.

    Step 2: Identify Exact Jumper Points

    Confirm both start and end points using:

    • Jumper diagram
    • Schematic
    • Multimeter continuity

    Step 3: Prepare the Jumper Wire

    • Use very thin wire
    • Strip only the required length
    • Apply a small amount of flux

    Step 4: Solder One End First

    • Use low heat
    • Ensure strong solder joint
    • Avoid touching nearby components

    Step 5: Route the Wire Neatly

    • Keep it short
    • Avoid sharp bends
    • Do not cross sensitive signal lines

    Step 6: Solder the Other End

    • Double-check position
    • Ensure no short circuit

    Step 7: Test Continuity Again

    Confirm beep sound across the jumper.


    Common Mistakes During Jumper Work

    Many beginners face failures due to avoidable errors.

    Avoid these mistakes:

    • Making jumper without confirming open track
    • Using thick or rigid wire
    • Applying too much heat
    • Creating long jumper paths
    • Skipping final continuity testing

    “A bad jumper creates more faults than the original damage.”


    When Jumper Work Will NOT Help

    Jumper repair has limitations.

    It will not fix:

    • CPU damage
    • Internal layer breaks near processor
    • Severe liquid damage under ICs
    • Dead memory or baseband ICs

    In such cases, advanced board repair or replacement is required.


    Jumper Repair vs Track Repair Using Scratching

    Sometimes tracks are repaired by:

    • Scratching PCB mask
    • Exposing copper
    • Rebuilding the track

    This works only when:

    • Track is on the top layer
    • Damage is very small

    For deeper layers, jumper wire is the safer solution.


    Practical Advice From Repair Experience

    • Always document your jumper paths
    • Keep jumper wires short and clean
    • Practice on dead boards first
    • Learn reading schematics slowly
    • Do not trust one image blindly


    Final Thoughts

    Learning how to make jumpers in mobile phone repair is a milestone for any technician. It transforms you from a parts replacer into a problem solver. With proper diagnosis, correct tools, and patience, jumper work can fix many “dead” phones that others give up on.

    Focus on understanding circuits, not just soldering wires.

    Good jumper work restores the original design, not just the connection.