A Standard Operating Guide for Safe Data Handling
“A careful approach to data comes before any technical work.”
Android phones today carry critical personal and professional information. Contacts, photos, videos, documents, app data, and account credentials are deeply integrated into the device. Any reset, software operation, or system failure can result in permanent data loss if precautions are not taken.
That is why learning how to properly back up and restore an Android device is not optional anymore. It is a basic digital habit every user should follow, whether you use a budget Android phone or a premium smartphone.
Learn how to backup and restore an Android phone step by step. Protect contacts, photos, apps, and data with safe, simple, and reliable methods.
“Your phone can be replaced. Your data often can’t.”
This guide outlines a structured and reliable process for backing up and restoring Android devices. It explains everything you need to know, in simple language, without technical confusion.
Purpose of These Instructions
- Prevent accidental data loss
- Avoid account lock issues
- Ensure smooth device setup after reset
- Maintain clarity and consistency in data handling
This guide focuses on correct sequence and verification, not shortcuts.
Step 1: Initial Device Assessment
Before any reset, update, or troubleshooting:
Confirm:
- A Google account is signed in
- Backup options are accessible
- Internet connection is available
- Battery level is sufficient
If any of these are missing, do not proceed.
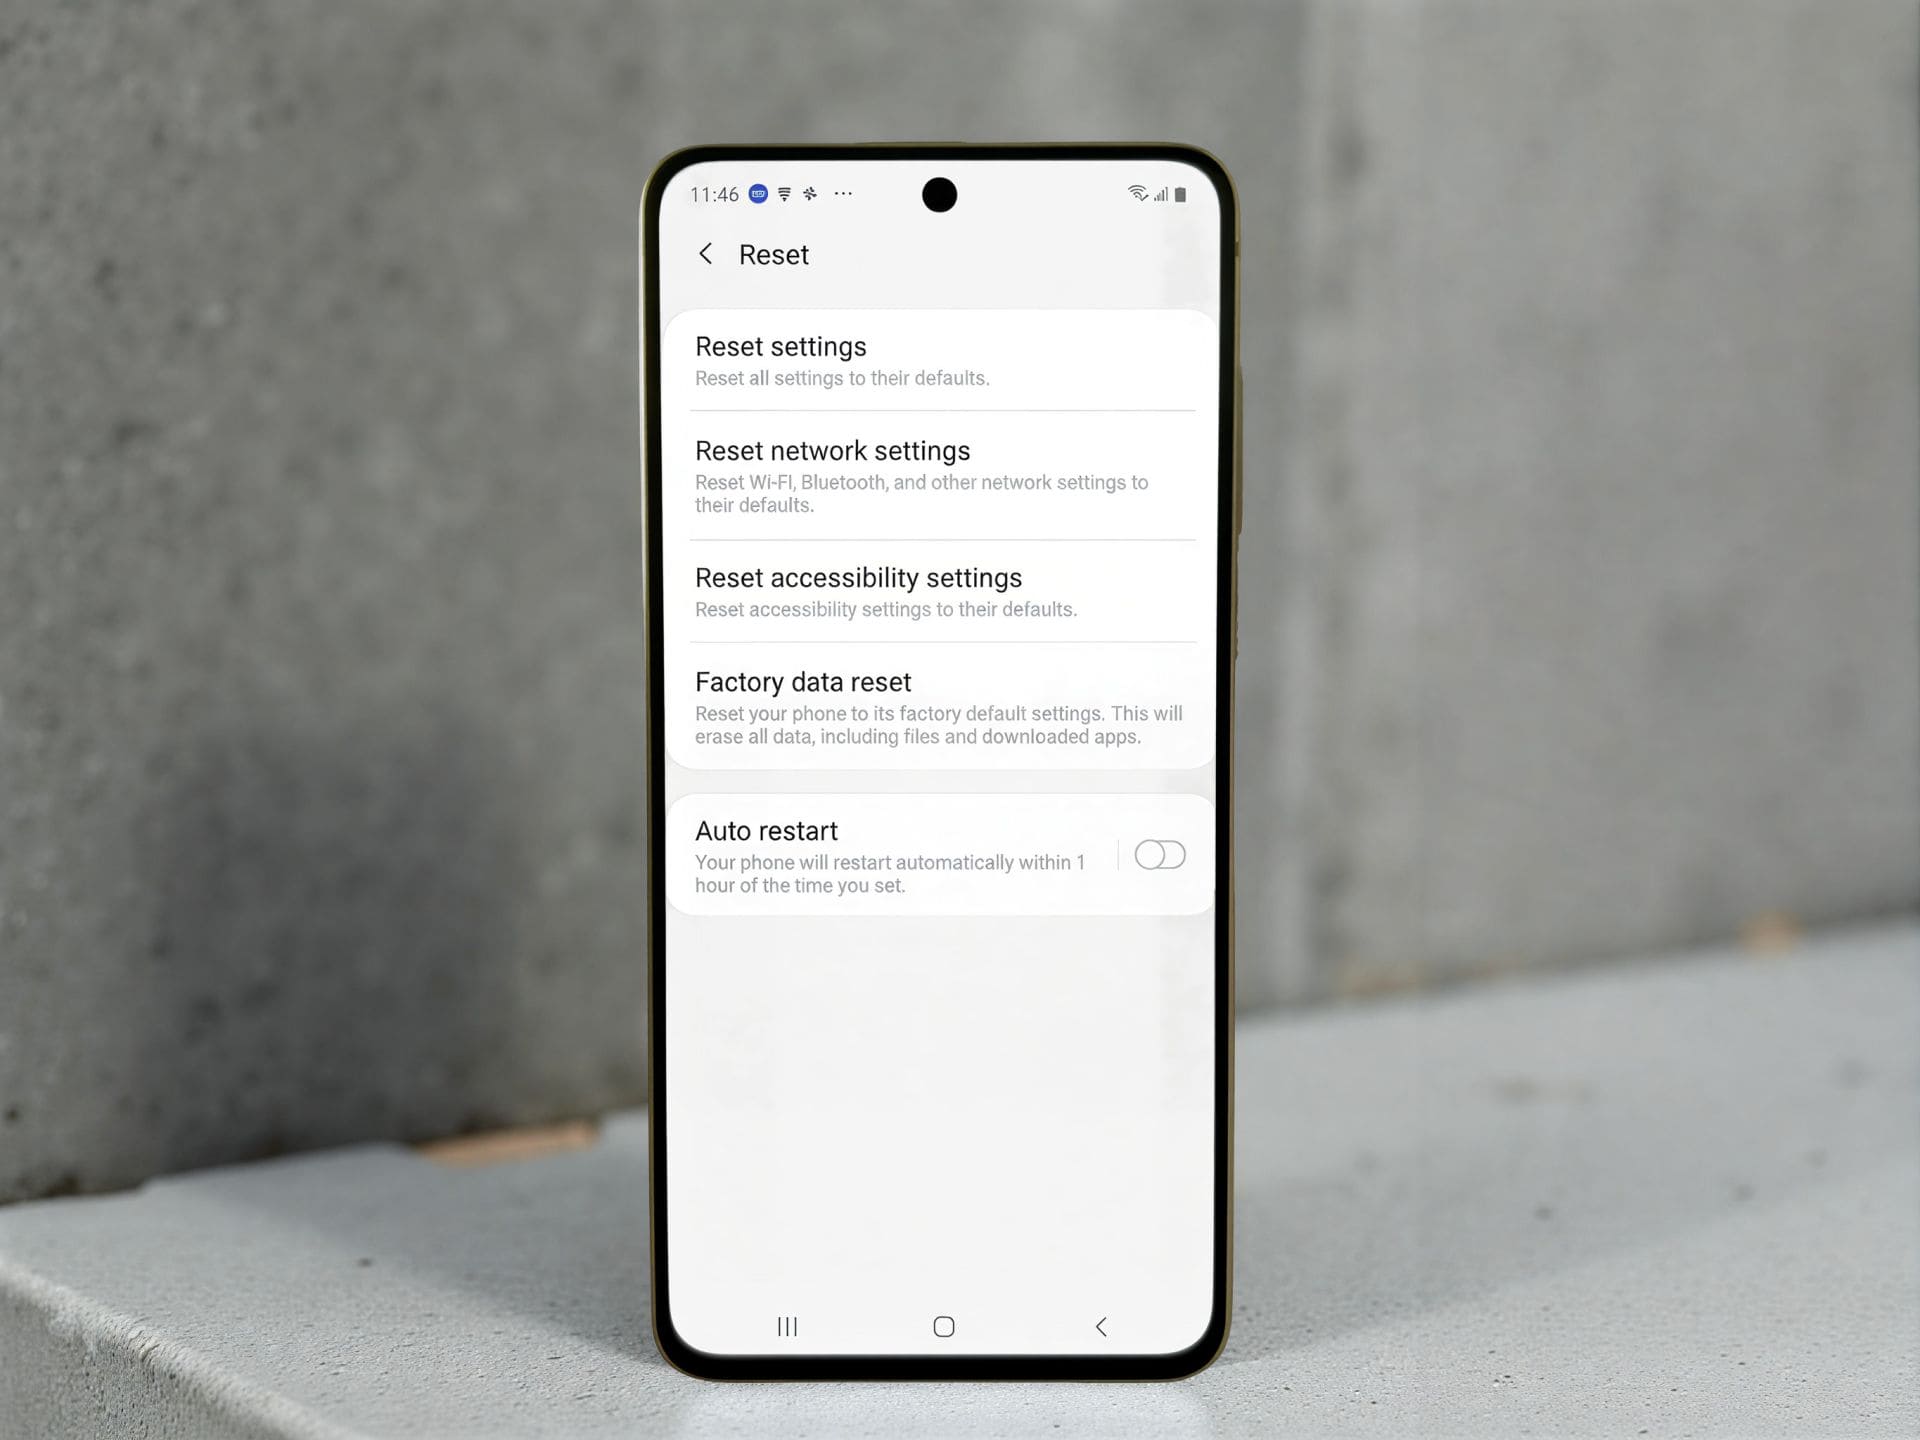
Step 2: Check Backup Status
Never assume backup is active.
How to Verify Backup
- Open Settings
- Go to Google
- Tap Backup
- Confirm:
- Backup is ON
- Recent backup date is visible
If the backup date is old or missing, data is not protected.
Step 3: Understand What the Backup Includes
Android system backup usually covers:
- Contacts synced to Google
- Call history
- Installed apps list
- Supported app data
- Device preferences
Photos, videos, and chat apps require separate attention.
Step 4: Perform a Manual Backup
Even if automatic backup is enabled, run it manually.
Manual Backup Steps
- Go to Settings → Google → Backup
- Tap Back up now
- Wait for completion
Use Wi-Fi and avoid interruptions.
Step 5: Secure Photos and Videos
Media files are often the most sensitive data.
Using Google Photos
- Open Google Photos
- Tap profile icon
- Go to Photos settings
- Enable Backup
- Wait until sync completes
Scroll through older images to confirm upload.
Step 6: Backup Messaging Apps Separately
Messaging apps do not always rely on system backup.
Example: WhatsApp
- Open WhatsApp
- Go to Settings → Chats → Chat backup
- Select Google account
- Tap Back up
Important notes:
- Same Google account required for restore
- Same phone number required
“A backup made today prevents panic tomorrow.”
Step 7: Manual File Backup (Offline Option)
When cloud backup is slow or unavailable:
Manual Backup Process
- Connect phone to computer via USB
- Select File Transfer
- Copy folders:
- DCIM
- Pictures
- Videos
- Documents
- Downloads
- Store them in a clearly labeled folder
This method adds an extra safety layer.
Step 8: Pre-Reset / Pre-Operation Checklist
Before performing any reset or software change:
✔ Google backup completed
✔ Photos synced
✔ Messaging app backup done
✔ Contacts synced
✔ Important files copied
Skipping this checklist leads to most data-loss problems.
“Data safety is a process, not a feature.”
Step 9: Restoring Data After Reset
Restore begins during the initial setup of the device.
When Restore Option Appears
- After factory reset
- After system reinstall
- On first startup of a new device
Step 10: Restore Using Google Account
Restore Procedure
- Power on the device
- Choose language
- Connect to Wi-Fi
- Sign in with the same Google account
- Select Restore from backup
- Choose the latest available backup
Apps and settings restore in the background.
Step 11: What Restores Automatically
Usually Restored
- Contacts
- Call logs
- Installed apps
- System settings
Not Always Restored
- Local files not synced
- Some app data
- Messaging app chats (unless separately backed up)
This behavior is normal.
Step 12: Restoring Photos and Files
- Google Photos restores media automatically once signed in
- Manual files must be copied back to original folders
Ensure folder names remain unchanged.
Step 13: FRP Lock Awareness
After reset, the device may ask for:
- Previously used Google account
- Correct account password
This is Factory Reset Protection and is a security feature.
Without correct credentials, setup cannot continue.
Step 14: Common Problems and Their Causes
Backup Not Showing
- Wrong Google account used
- Backup never completed
- Backup deleted or overwritten
Restore Freezing or Slow
- Weak internet connection
- Background app downloads
- Interrupted setup
Patience and stable Wi-Fi solve most cases.
Step 15: Best Practices for Safe Data Handling
- Enable automatic backups
- Verify backup regularly
- Use both cloud and offline methods
- Backup before updates or reset
- Secure Google account credentials
These habits eliminate most risks.
Data Safety and Security Notes
- Google backups are encrypted
- Access requires account login
- Two-step verification adds protection
Avoid unknown third-party backup tools.
Common Misunderstandings to Avoid
- ❌ “Data stays after reset”
- ❌ “Photos are always safe”
- ❌ “Backup happens automatically”
- ❌ “Backup is complicated”
Backup is simple when done correctly.
Official Android Apps That Help Restore Data Across Brands
Many smartphone brands offer official data transfer and restore apps. These apps are designed to move data from any Android phone, not just the same brand. They are safe, trusted, and supported by the manufacturer.
Below are the most reliable options.
Samsung Smart Switch
Brand: Samsung
What it does:
Helps transfer contacts, photos, videos, messages, call logs, apps, and settings from any Android phone or even iPhone to a Samsung device.
Works with:
Android, iPhone, Windows, macOS
Play Store link:
https://play.google.com/store/apps/details?id=com.sec.android.easyMover
Mi Mover
Brand: Xiaomi (Mi, Redmi, Poco)
What it does:
Allows fast wireless transfer of data from other Android phones to Xiaomi devices without internet. Supports photos, videos, contacts, apps, and files.
Works with:
Android phones of all brands
Play Store link:
https://play.google.com/store/apps/details?id=com.miui.huanji
Clone Phone
Brand: OPPO
What it does:
Transfers data like contacts, photos, videos, apps, and system data from any Android phone to OPPO devices using a direct Wi-Fi connection.
Works with:
Android phones (cross-brand)
Play Store link:
https://play.google.com/store/apps/details?id=com.coloros.backuprestore
Easy Share
Brand: Vivo
What it does:
Helps move data such as contacts, messages, media, apps, and documents from any Android phone to Vivo devices quickly and securely.
Works with:
Android phones of all brands
Play Store link:
https://play.google.com/store/apps/details?id=com.vivo.easyshare
Phone Clone
Brand: Huawei
What it does:
Copies contacts, photos, videos, messages, apps, and system data from Android or iPhone to Huawei phones without using mobile data.
Works with:
Android and iOS devices
Play Store link:
https://play.google.com/store/apps/details?id=com.hicloud.android.clone
OnePlus Clone Phone
Brand: OnePlus
What it does:
Transfers data from any Android phone to OnePlus devices, including media, contacts, call logs, and apps.
Works with:
Android phones (all brands)
Play Store link:
https://play.google.com/store/apps/details?id=com.oneplus.backuprestore
Realme Clone Phone
Brand: Realme
What it does:
Transfers contacts, photos, videos, apps, messages, and files from any Android phone to a Realme device. Uses a direct wireless connection, no internet needed.
Works with:
Android phones of all brands
Play Store link:
https://play.google.com/store/apps/details?id=com.coloros.backuprestore
(Note: Realme uses the same core app framework as OPPO for data transfer.)
Motorola Migrate / Motorola Data Restore
Brand: Motorola
What it does:
Motorola phones now rely mainly on Google’s built-in restore system, but older and some current models support Motorola’s own data restore tools during setup. These allow restoring contacts, apps, call logs, and media from another Android device.
Works with:
Android phones (via Google backup or cable-based transfer)
Play Store link (Motorola Data Restore):
https://play.google.com/store/apps/details?id=com.motorola.migrate
Important Notes About These Apps
- These are official apps, not third-party tools
- Most apps work across brands, not limited to the same manufacturer
- Internet is usually not required
- Both phones should be charged and close to each other
- Data transfer speed depends on file size and device condition
Always install these apps only from the Google Play Store.
Backup Tips for Technicians and Repair Shops
- Always inform customers about data loss
- Ask if backup exists before repair
- Avoid responsibility disputes
- Encourage customers to sign backup consent
This builds trust and professionalism.
Final Summary
Handling Android phones responsibly means prioritizing data before any technical action. Backup and restore are not advanced tasks. They are essential steps that prevent irreversible loss.
Following a structured process ensures:
- Smooth device transitions
- Fewer account issues
- No unexpected data loss
A few minutes of preparation saves hours of recovery.