A mobile phone that does not ring properly is more than a small inconvenience. For users, it means missed calls and alerts. For a repair technician, it is a common and important fault to diagnose correctly. Whether you are a beginner learning mobile repairing or an experienced technician handling smartphones daily, understanding how to test a mobile phone ringer is a must-have skill.
The ringer plays a key role in call alerts, notifications, music, videos, and system sounds. A fault here can be hardware-related, software-related, or even due to simple settings issues. Jumping straight to replacement without proper testing often leads to wasted time and money.
This guide explains how to check the ringer of a mobile phone step by step, using both basic and advanced technician methods, including multimeter testing. The focus is on clarity, accuracy, and real workshop experience, not guesswork.
“Good technicians don’t replace parts first. They test, confirm, and then repair.”
That mindset saves devices, builds trust, and improves your success rate.
What Is a Ringer in a Mobile Phone?
In mobile phones, the ringer is the component responsible for producing loud sound output. It is used for incoming calls, notification alerts, alarms, music playback, videos, and system tones.
A ringer is commonly known by many names in the mobile repairing field, such as:
- Speaker
- Loud speaker
- Buzzer
- Ring speaker
- Music speaker
- Main speaker
- Speaker module
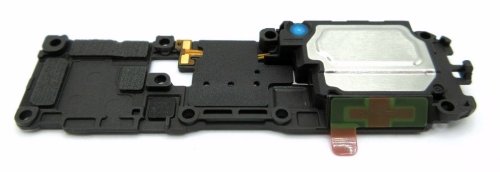
All these terms generally refer to the same output unit used for high-volume sound. Earpiece speakers are different and should not be confused with the ringer.
Understanding terminology is important because customers, spare part suppliers, and service manuals may use different names for the same component.
Common Symptoms of Ringer Problems
Before testing, observe the complaint carefully. Ringer issues usually appear in the following ways:
- No sound during incoming calls
- Very low volume even at maximum level
- Distorted or crackling sound
- Sound works only on earphones or Bluetooth
- Sound works sometimes and fails sometimes
- Ringer works for music but not for calls or notifications
Each symptom points to a different possible cause. Correct diagnosis begins with understanding these signs.
Tools Required to Check Mobile Phone Ringer
For proper testing, a technician should have the following basic tools:
- Known good ringer (for cross-testing)
- Multimeter (digital preferred)
- DC power supply (optional, for advanced testing)
- Screwdrivers and opening tools
- Cleaning brush and isopropyl alcohol
- Service test codes or diagnostic menu access
You do not need all tools for every job, but a multimeter is essential for professional diagnosis.
Step 1: Check Sound and Settings (Basic but Critical)
Many phones are repaired unnecessarily because basic checks are skipped.
Start with these simple steps:
- Increase volume to maximum
- Check silent mode and vibration mode
- Disable Do Not Disturb
- Check accessibility sound settings
- Test ringtone, alarm, and media sound separately
On Android devices, media volume, call volume, and notification volume are often independent. On iPhones, ringer and alert volume may be linked to buttons or settings.
Always confirm that the issue is not software or settings-related before opening the phone.
Step 2: Test Using Service or Diagnostic Mode
Most smartphones have built-in hardware test menus.
Android Phones
Technicians often use dialer codes like:
- #0# (works on many Samsung devices)
- OEM-specific diagnostic menus
From here, you can directly test the loud speaker without opening any app.
iPhone
Apple devices use internal diagnostics accessed via software tools or service modes. For basic testing:
- Play system sounds
- Use voice memos or music playback
- Test alerts and ringtones
If sound fails in diagnostic mode, the issue is likely hardware-related.
Step 3: Physical Inspection of the Ringer Area
Before electrical testing, inspect the hardware physically.
Check for:
- Dust or lint blocking speaker grill
- Water or moisture residue
- Rust or corrosion near speaker contacts
- Torn or punctured speaker membrane
- Loose or misaligned speaker module
Many low-sound issues are caused by dirt buildup, not speaker failure.
Clean the speaker grill carefully using a brush and alcohol. Never use sharp objects that can damage the membrane.
Step 4: Cross-Test with a Known Working Speaker
This is one of the fastest technician methods.
Steps:
- Remove the existing ringer.
- Connect a known good speaker temporarily.
- Play ringtone or music.
If sound is clear:
- Original speaker is faulty.
If sound is still missing:
- Problem lies in circuit, connector, or software.
This method saves time and avoids unnecessary board work.
Step 5: How to Check Mobile Phone Ringer Using a Multimeter
This is the most important section for technicians.
A multimeter helps confirm whether the speaker coil is open, shorted, or healthy.
Understanding Speaker Basics
Mobile phone ringers are usually:
- Low-resistance speakers
- Typically between 4Ω to 8Ω
If resistance is abnormal, the speaker is faulty.
Method 1: Resistance (Ohms) Test
Steps:
- Set multimeter to resistance (Ω) mode.
- Touch probes to the speaker terminals.
- Observe the reading.
Expected results:
- 4Ω–8Ω → Speaker likely OK
- OL or infinite → Coil open (speaker dead)
- 0Ω or very low → Shorted coil (speaker faulty)
This is the most reliable and safe test.
Method 2: Continuity Test (Basic Check)
Steps:
- Set multimeter to continuity mode.
- Place probes on speaker terminals.
Results:
- Beep sound → Coil continuity present
- No beep → Coil broken
Continuity alone does not confirm sound quality, but it confirms whether the speaker is completely dead.
Important Multimeter Safety Tip
Do not use voltage or current modes directly on speaker terminals.
Always use resistance or continuity mode only.
Incorrect testing can damage the speaker or the multimeter.
Step 6: Checking Ringer Line on the PCB (Advanced Level)
If the speaker tests fine, move to board-level diagnosis.
Check:
- Speaker connector solder joints
- Speaker line continuity from IC to connector
- Presence of audio signal using oscilloscope (advanced)
- Audio IC output condition
Use schematic or boardview if available. In many smartphones, audio output IC failure is rare but possible, especially after water damage.
Software vs Hardware Ringer Issues
Understanding the difference is crucial.
Software-Related Causes
- Corrupted system files
- Faulty updates
- Third-party sound control apps
- Custom ROM bugs
Solutions:
- Safe mode testing
- Cache reset
- Software restore or flashing
Hardware-Related Causes
- Speaker coil damage
- Water damage
- Connector faults
- Audio IC failure
Solutions:
- Cleaning
- Replacement
- Board repair
Never assume software or hardware without testing.
Common Technician Mistakes to Avoid
Even experienced technicians make these errors:
- Replacing speaker without testing
- Ignoring basic settings check
- Not cleaning speaker grill
- Using low-quality replacement speakers
- Skipping multimeter testing
Diagnosis first, replacement second.
Choosing the Right Replacement Speaker
If replacement is needed:
- Match exact model and size
- Avoid cheap aftermarket parts
- Check sound quality before final assembly
- Secure proper contact alignment
A low-quality ringer can cause distortion and customer complaints even if it works.
Special Notes for iPhone Ringer Testing
iPhone speakers are integrated into modules with antenna or flex connections.
Keep in mind:
- Improper fitting affects sound
- Missing screws reduce volume
- Dust mesh alignment matters
Testing with original-quality parts is strongly recommended.
Real Workshop Insight
In daily repair work, more than half of “dead ringer” cases are caused by dust blockage, misalignment, or settings issues. Only a portion actually need speaker replacement.
“Repairing smartly is not about speed. It is about accuracy.”
This approach builds long-term customer trust and professional confidence.
Summary: Best Way to Check Mobile Phone Ringer
To correctly check the ringer of a mobile phone:
- Verify sound settings and modes
- Test via diagnostic or service menu
- Inspect and clean speaker area
- Cross-test with known good speaker
- Use multimeter to confirm speaker health
- Diagnose PCB or IC only if needed
This structured approach works for Android phones, iPhones, and most modern smartphones.
Final Thoughts
Learning to test a mobile phone ringer properly separates a parts-changer from a real technician. Whether you are repairing entry-level Android devices or high-end smartphones, the principles remain the same: observe, test, confirm, and then repair.
With practice, these steps become second nature and improve both repair success and professional reputation.